GMOD
Galaxy Tutorial 2010

This Galaxy tutorial was presented by James Taylor at the 2010 GMOD Summer School - Americas, May 2010. The most recent Galaxy tutorial can be found at the Galaxy Tutorial page.
This tutorial walks you through setting up and running a Galaxy server.
Contents
- 1 VMware
- 2 Caveats
- 3 About Galaxy
- 4 Creating a Galaxy instance
- 5 Initial Setup
- 6 Running analyses with Galaxy
- 7 Under the hood
- 8 Configuring Galaxy (2)
- 9 A second example with NGS data
- 10 Adding a new tool
- 11 Galaxy Workflows
- 12 Making genome
/ alignment data available to
Galaxy
- 12.1 Install Python package management tools
- 12.2 Install bx-python
- 12.3 Get datasets for our genome
- 12.4 Edit configuration files
- 12.5 Create dataset using new genome build
- 12.6 Extract sequence corresponding to these intervals
- 12.7 Extract multiple alignments corresponding to these intervals
- 12.8 BETA Features
- 12.9 Galaxy Pages
- 13 Where to go next
VMware
This tutorial was taught using a VMware system image as a starting point. If you want to start with the same system, download and install the start image (below). See VMware for what software you need to use a VMware system image and for directions on how to get the image up and running on your machine.
Download the start image and the end image.
Logins:
| Purpose | Username | Password |
|---|---|---|
| Shell | gmod | gmodamericas2010 |
| MySQL | root | gmodamericas2010 |
Caveats
Important Note
This tutorial describes the world as it existed on the day the tutorial was given. Please be aware that things like CPAN modules, Java libraries, and Linux packages change over time, and that the instructions in the tutorial will slowly drift over time. Newer versions of tutorials will be posted as they become available.
About Galaxy
Galaxy is a framework for integrating computational tools. It allows nearly any tool that can be run from the command line to be wrapped in a structured well defined interface.
On top of these tools, Galaxy provides an accessible environment for interactive analysis that transparently tracks the details of analyses, a workflow system for convenient reuse, data management, sharing, publishing, and more.
Creating a Galaxy instance
Before we start, please run:
sudo apt-get install ttf-mscorefonts-installer
Getting Galaxy
Prerequisites
The only prerequisite to run your own Galaxy is a Python interpreter, version 2.4 or greater. Python 3 is a different language and is currently not supported. The Ubuntu VM images used for this course include version 2.6.4 of the interpreter:
gmod@ubuntu:~$ python --version
Python 2.6.4
Galaxy is distributed (and developed) using a distributed version control system called mercurial. The Ubuntu VM image already includes mercurial version 1.3.1:
gmod@ubuntu:~$ hg --version
Mercurial Distributed SCM (version 1.3.1)
Cloning the Galaxy repository
The development and release repositories are available through the bitbucket hosting service.
DO NOT DO THIS NOW: To create a local clone of the release repository run the following:
 gmod@ubuntu:~$ cd ~/work
 gmod@ubuntu:~/work$ hg clone http://bitbucket.org/galaxy/galaxy-dist
DO THIS INSTEAD: To ensure we are all using the exact same revision of Galaxy, instead clone from a repository that is already on the VM image:
gmod@ubuntu:~$ cd ~/work
gmod@ubuntu:~/work$ hg clone ~/Documents/Software/galaxy/galaxy-dist
Either is equivalent, and the resulting repository can later be updated from any other Galaxy clone.
Initial Setup
Galaxy includes a setup script that can be run to configure a new instance:
gmod@ubuntu:~/work$ cd ~/work/galaxy-dist
gmod@ubuntu:~/work/galaxy-dist$ sh setup.sh
This script performs two main actions:
- Creates initial configuration files, including the main file
universe_wsgi.ini, and empty directories for storing data files - Fetches all of the Galaxy framework’s dependencies, packaged as Python eggs, for the current platform.
Don’t do this unless there are problems with the above: We have also included a local copy of the eggs on the VM image, so if there are any problems fetching the eggs, just type:
gmod@ubuntu:~/work/galaxy-dist$ cp -R /home/gmod/Documents/Software/galaxy/eggs-py2.6-linux-i686-ucs4/ eggs/
Running Galaxy
Now that initial configuration is complete, you can start your Galaxy instance by running:
gmod@ubuntu:~/work/galaxy-dist$ sh run.sh
When running a new instance for the first time, Galaxy first initializes its database. Galaxy uses a database migration system to automatically handle any changes to the database schema. On first load it runs all migrations to ensure the database is in a known state, which may take a little time.
Once the database is initialized, the normal startup process proceeds, loading tool configurations, starting the job runner, and finally initializing the web interface on port. You can now access your Galaxy at http://localhost:8080
See GetGalaxy for more information on setting up Galaxy on other platforms (e.g. Mac OS X).
Running analyses with Galaxy
Without any additional configuration, there is already a lot we can do with our first Galaxy instance. As an example, let’s work through the first example from our recent Current Protocols in Molecular Biology publication.
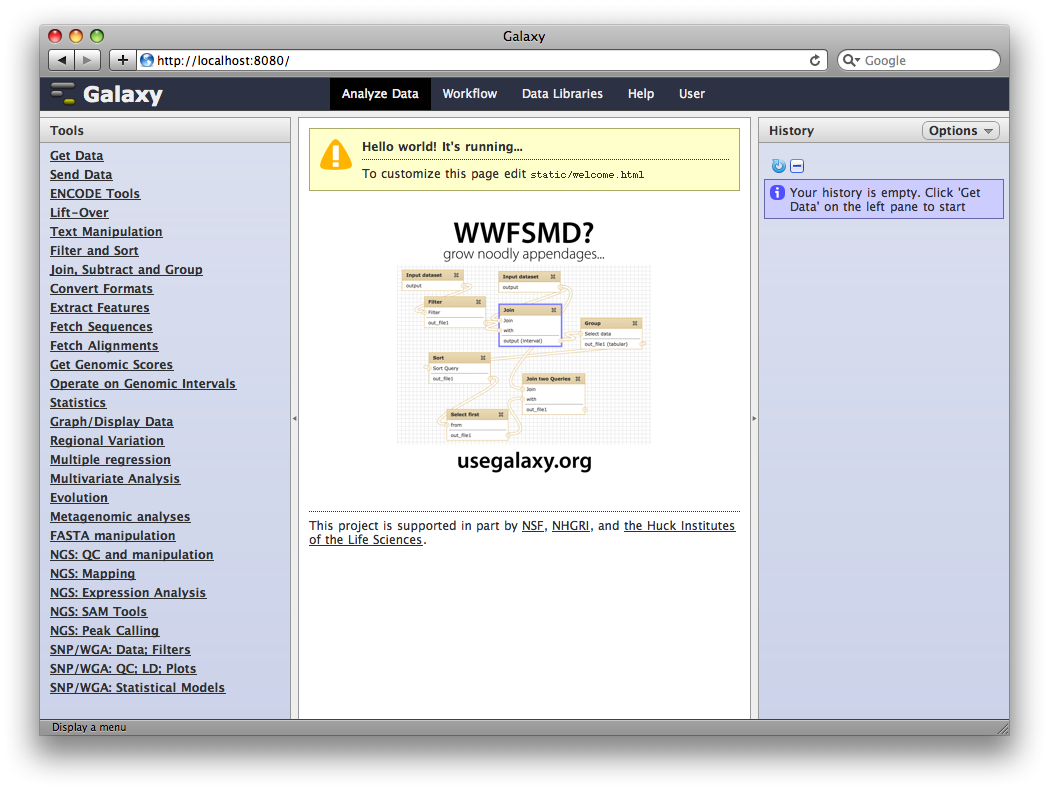
1. Access your new Galaxy instance
Load a web browser and access http://localhost:8080.
2. Upload TAF1 ChIP-Seq data
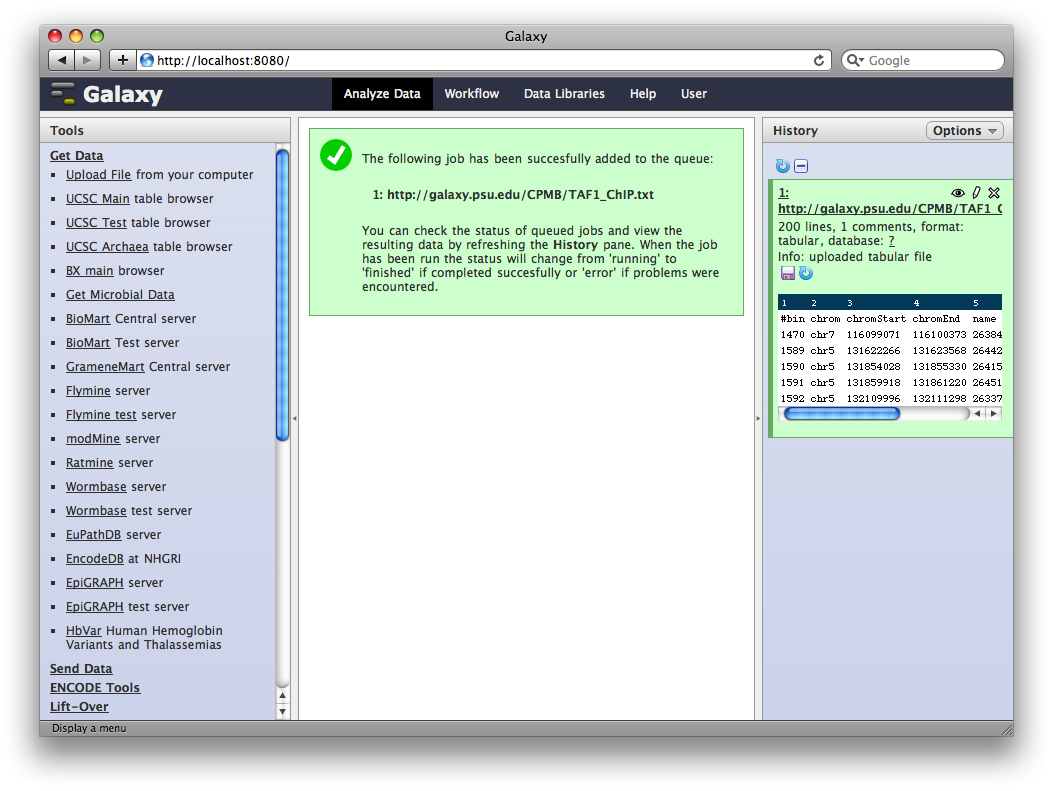
To use data in an analysis in Galaxy, it first needs to be imported into the current history. There are many ways to do this, but the simplest is by uploading or fetching a file.
In the Tools panel select Get Data → Upload File. You can either upload a file, or enter one or more URLs in the URL/Text box. Enter
ftp://ftp.gmod.org/pub/gmod/Courses/2010/SummerSchoolAmericas/Galaxy/TAF1_ChIP.txt
Note: This file was located at galaxy.psu.edu at course time.
in the box and click Execute.
Galaxy will run the upload tool. Because we are fetching data from an external URL, the job will run in the background. It will first appear in the history as queued (gray), then running (yellow) and finally done (green). At this point, clicking on the name of the dataset in the history will show you information about the uploaded file, including the first few lines.
3. Edit Dataset Attributes
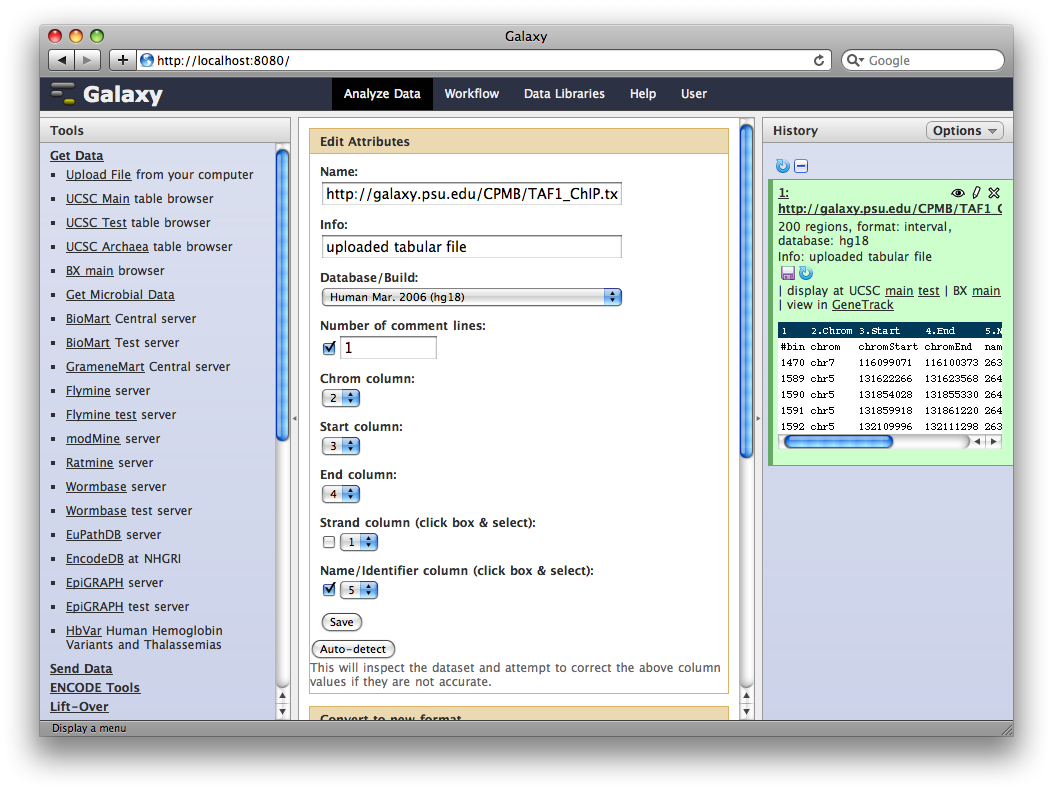
The dataset we uploaded is a generic tabular data file (dumped out of the UCSC browser, not in any particular feature format like BED or GFF). However, it is feature data, meaning that each row represents a location on a genome. To let Galaxy know about this, click the pencil icon in the dataset’s history entry to show the dataset attributes interface. Under Change Datatype set New Type to interval and then click Execute.
Galaxy will look at the dataset and guess which columns represent chromosome, start, end, et cetera. In this case it guesses correctly.
We also need to tell Galaxy what genome assembly the intervals correspond to. Under Database / Build select Human Mar. 2006 (hg18). Then click Save.
4. Get Gene Annotations from UCSC
Another major way to pull data into Galaxy is through interfaces with external data providers. Several of these are pre-configured out of the box, including interfaces to the UCSC Table Browser and BioMart. Here we will pull gene annotations from UCSC.
In the Tools panel, select Get Data → UCSC Main Table Browser. The Table Browser UI will load in the center panel. Because the data is of human annotations, make sure that Clade, Genome, and Assembly are set to Mammal, Human, and Mar. 2006, respectively. Set Group to Genes and Gene Prediction Tracks and Track to RefSeq Genes. Set the region to Genome. Make sure Output Format is set to BED—Browser Extensible Data and the check-box by Send Output to Galaxy is checked. Finally, click get output.
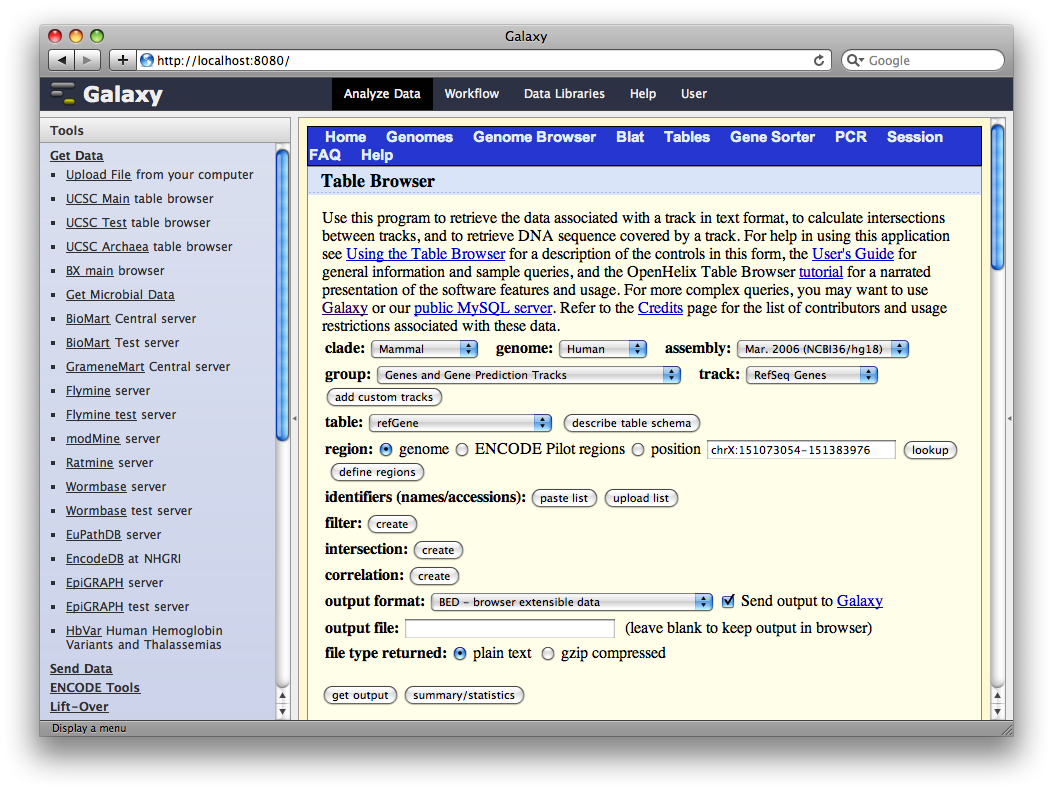
A second interface will load allowing you to specify what portion of genes to select, make sure whole gene is selected and click Send Query to Galaxy.
5. Generate a set of putative promoter regions
You should now have two datasets in your history. Dataset 1 containing TAF ChIP-seq intervals, and Dataset 2 containing RefSeq gene annotations. We will now use a Galaxy tool to (naively) create a set of putative promoter regions.
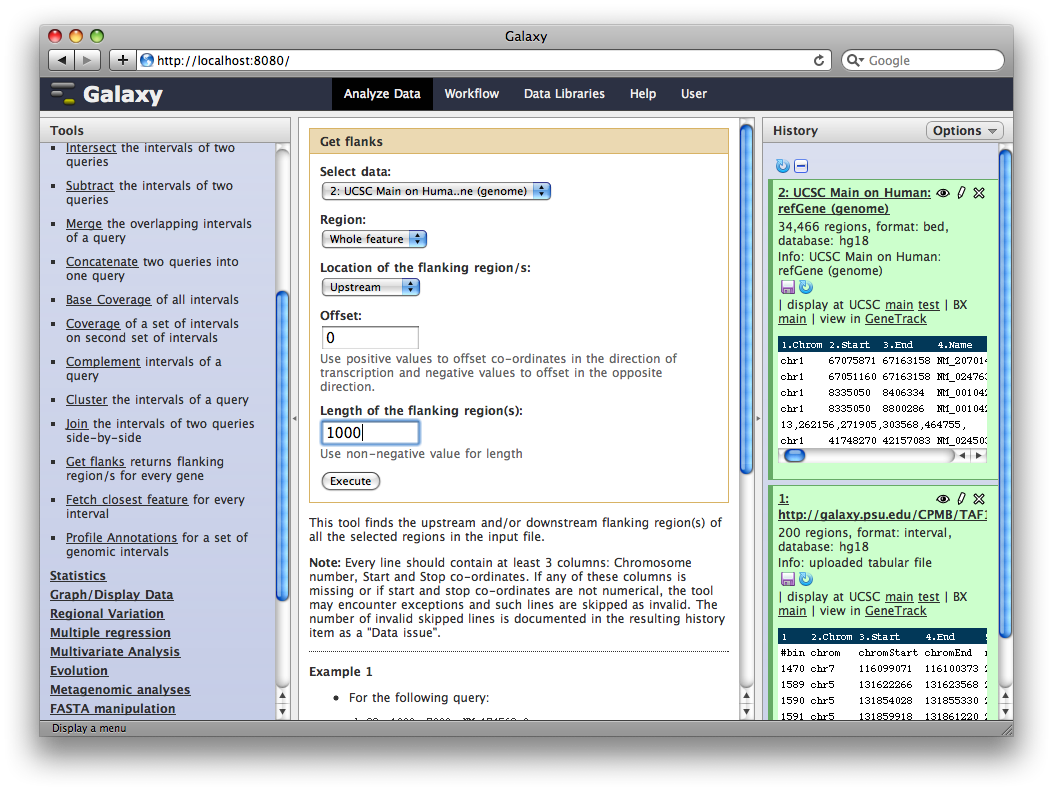
In the Tools panel, select Operate on Genomic Intervals → Get Flanks. The user interface for the tool will appear in the center panel. Make sure the dataset 2: UCSC Main… is selected and set Length of Flanking region to 1000 to create intervals 1000bp upstream of each gene.
6. Identify promoter regions containing TAF1 sites
Finally, we will join this dataset with our original TAF1 dataset to select promoter regions with TAF1 sites. Select Operate on Genomic Intervals → Join and select 3: Get Flanks… as the first query and 1: http:… as the second query. Click Execute.
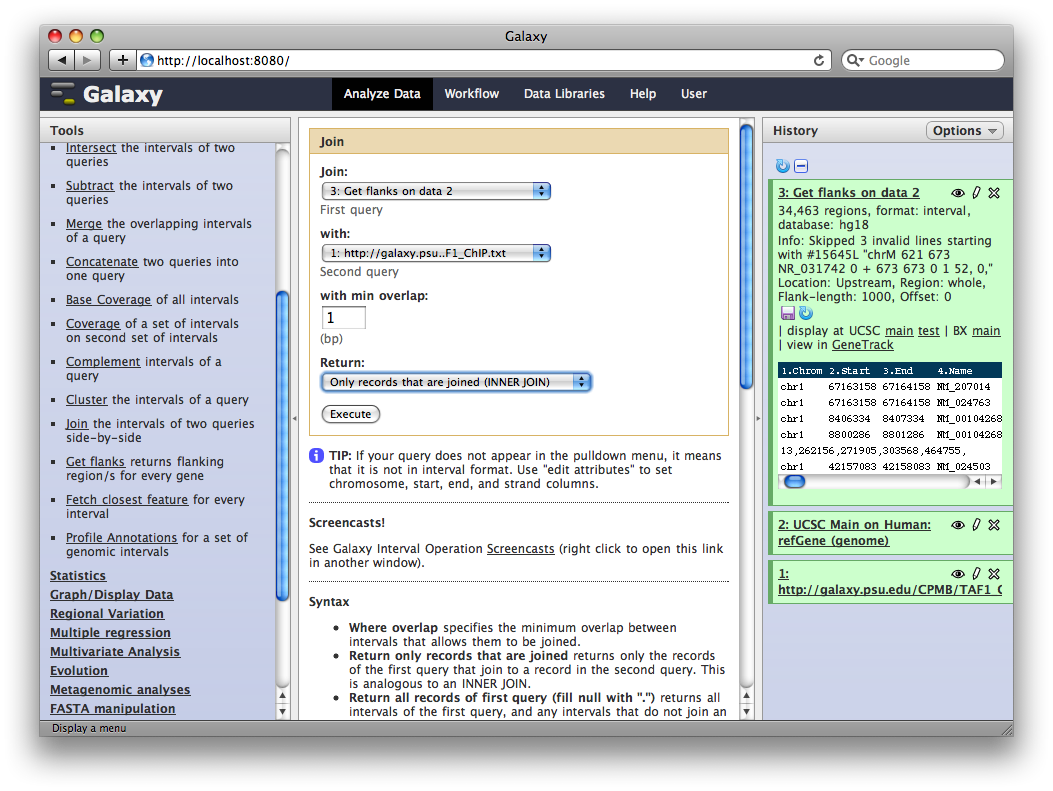
The resulting dataset will contain all promoter regions that contain a TAF1 site, joined side-by-side with the TAF1 sites they contain. From here we can process further or visualize at different browsers.
Under the hood
Now that we’ve run some analyses, let’s look at how Galaxy is organized and how it handles our data. Return to the terminal, and hit Control-C to terminate the Galaxy instance.
Data and metadata
Within out Galaxy instance directory, instance data is stored under the
database directory:
gmod@ubuntu:~/work/galaxy-dist$ ls database/
compiled_templates  files  import  info.txt  job_working_directory  pbs  tmp  tools  universe.sqlite
Two key files are universe.sqlite which is a relational database
containing all the metadata tracked by Galaxy, and the files directory
which contains the raw datasets. First let’s look at the database using
the SQLite command line interface:
gmod@ubuntu:~/work/galaxy-dist$ sqlite3 database/universe.sqlite
SQLite version 3.6.16
Enter ".help" for instructions
Enter SQL statements terminated with a ";"
sqlite>
For example, let’s look at the first dataset we created:
sqlite> select * from history_dataset_association limit 1;
1|1|1|2010-05-02 18:19:35.635527|2010-05-02 18:19:42.365634||1|http://galaxy.psu.edu/CPMB/TAF1_ChIP.txt%7Cuploaded tabular file|200 lines, 1 comments|#bin   chrom   chromStart  chromEnd    name    score   floatScore
1470    chr7    116099071   116100373   26384   720 2.183
1589    chr5    131622266   131623568   26442   679 2.06
1590    chr5    131854028   131855330   26415   693 2.102
1591    chr5    131859918   131861220   26451   675 2.048
1592    chr5    132109996   132111298   26337   764 2.317
|tabular|{"column_types": ["int", "str", "int", "int", "int", "int", "float"], "columns": 7, "comment_lines": 1, "data_lines": 200, "dbkey": "hg18"}|||0|1|
We see that this table tracks all the information the Galaxy interface needs to work with this dataset, include user defined fields such as name and info, as well as the first few lines of the dataset (“peek”), and the type specific metadata.
Exit the sqlite interface by pressing Control-D.
Now let’s look at the actual data.
gmod@ubuntu:~/work/galaxy-dist$ find database/files/
database/files
database/files/000
database/files/000/dataset_1.dat
database/files/000/dataset_2.dat
database/files/000/dataset_3.dat
database/files/000/dataset_4.dat
All of the datasets corresponding to our history items are stored in this directory. Datasets are broken up into a hierarchy based on ID to avoid problems with particular filesystems. If we look at a single file:
gmod@ubuntu:~/work/galaxy-dist$ head database/files/000/dataset_1.dat
#bin    chrom   chromStart  chromEnd    name    score   floatScore
1470    chr7    116099071   116100373   26384   720 2.183
1589    chr5    131622266   131623568   26442   679 2.06
1590    chr5    131854028   131855330   26415   693 2.102
1591    chr5    131859918   131861220   26451   675 2.048
1592    chr5    132109996   132111298   26337   764 2.317
1593    chr5    132140320   132141622   26374   729 2.21
1471    chr11   116212868   116214170   26386   718 2.178
816 chr22   30341490    30342792    26387   718 2.176
102 chr22   30670342    30671644    26475   663 2.01
we see that Galaxy just stores the raw data exactly as we uploaded it.
Tools
Galaxy reads all of it’s tool configuration from a series of XML files.
The file tool_conf.xml defines which tools are loaded by a given
instance:
gmod@ubuntu:~/work/galaxy-dist$ head tool_conf.xml
 <?xml version="1.0"?>
 <toolbox>
   <section name="Get Data" id="getext">
     <tool file="data_source/upload.xml"/>
     <tool file="data_source/ucsc_tablebrowser.xml" />
     <tool file="data_source/ucsc_tablebrowser_test.xml" />
     <tool file="data_source/ucsc_tablebrowser_archaea.xml" />
     <tool file="data_source/bx_browser.xml" />
     <tool file="data_source/microbial_import.xml" />
     <tool file="data_source/biomart.xml" />
Each referenced file contains the description of a particular tool.
Let’s examine the Get Flanks tool we used earlier, contained in the
file tools/new_operations/get_flanks.xml:
 <tool id="get_flanks1" name="Get flanks">
  <description>returns flanking region/s for every gene</description>
  <command interpreter="python">get_flanks.py $input $out_file1 $size $direction $region -o $offset -l ${input.metadata.chromCol},${input.metadata.startCol},${input.metadata.endCol},${input.metadata.strandCol}</command>
  <inputs>
    <param format="interval" name="input" type="data" label="Select data"/>
    <param name="region" type="select" label="Region">
      <option value="whole" selected="true">Whole feature</option>
      <option value="start">Around Start</option>
      <option value="end">Around End</option>
    </param>
    <param name="direction" type="select" label="Location of the flanking region/s">
      <option value="Upstream">Upstream</option>
      <option value="Downstream">Downstream</option>
      <option value="Both">Both</option>
    </param>
    <param name="offset" size="10" type="integer" value="0" label="Offset" help="Use positive values to offset co-ordinates in the direction of transcription and negative values to offset in the opposite direction."/>
    <param name="size" size="10" type="integer" value="50" label="Length of the flanking region(s)" help="Use non-negative value for length"/>
  </inputs>
  <outputs>
    <data format="interval" name="out_file1" metadata_source="input"/>
  </outputs>
  ...
 </tool>
(Tests and help have been removed from this listing).
This file contains everything necessary to defined the user interface of the tool. Compare the inputs element with the figure of the Get Flanks tool interface above.
It also describes how to take a set of user input values from the generated user interface, and construct a command line to actually run the tool. Nearly all tools in Galaxy are constructed in this way – any analysis that can be run from the command line can be integrated into a Galaxy instance.
Configuring Galaxy (2)
Using a more robust database
Out of the box Galaxy includes the embedded SQLite database. This allows Galaxy to run with zero-configuration and provides an excellent solution for single-user Galaxy’s being used for tool development. However, for any multi-user scenario a more robust database will be needed for Galaxy to be reliable. We highly recommend Postgres, although other database are known to work.
Postgres is already installed on our VM image, and the gmod user has permission to create databases, so let’s create a database for Galaxy
gmod@ubuntu:~/work/galaxy-dist$ createdb galaxy_test
Once the empty database is created, we need to edit Galaxy’s
universe_wsgi.ini file to use it. This is as simple as
- commenting out
database_file = database/universe.sqlite, - uncommenting the
#database_connection = postgres:///galaxyline, and - modifying it to use the database name
galaxy_test.
With these changes the app section of your Galaxy config file will
look like:
# ---- Galaxy Web Interface -------------------------------------------------
[app:main]

# Uncomment following line to enable Paste gzip compression
# filter-with = gzip

# Uncomment following line below to enable visualization module
# enable_tracks = True

# Specifies the factory for the universe WSGI application
paste.app_factory = galaxy.web.buildapp:app_factory

# By default, Galaxy uses a SQLite database found here
# database_file = database/universe.sqlite

# You may use a SQLAlchemy connection string to specify an external database
# instead.  PostgreSQL and MySQL are supported.
database_connection = postgres:///galaxy_test
#database_engine_option_echo = true
#database_engine_option_echo_pool = true
#database_engine_option_pool_size = 10
#database_engine_option_max_overflow = 20
Tool dependencies
So far we have used tools that are completely packaged with the Galaxy
distribution. However, many tools require external software to be
installed to be used (we are currently working on an enhanced dependency
management system to make this easier). In the meantime, we maintain a
list of tool dependencies. Suppose we’d
like to analyze some Illumina datasets. We see that the Map with BWA
tool requires us to install BWA (surprise!). To save time, BWA is
already compiled on the VM image, so let’s copy it to a location on the
PATH:
gmod@ubuntu:~/work/galaxy-dist$ sudo cp /home/gmod/Documents/Software/galaxy/bwa-0.5.7/bwa /usr/local/bin
Now bwa can be run from the command line:
gmod@ubuntu:~/work/galaxy-dist$ bwa

Program: bwa (alignment via Burrows-Wheeler transformation)
Version: 0.5.7 (r1310)
Contact: Heng Li <lh3@sanger.ac.uk>

...
The Galaxy tool also requires a loc file which contains the locations
of indexes for locally stored genome builds. We don’t have any, so we
can just use the empty sample:
gmod@ubuntu:~/work/galaxy-dist$ cp tool-data/bwa_index.loc.sample tool-data/bwa_index.loc
and run Galaxy using run.sh
A second example with NGS data
Having made these changes, start Galaxy again using run.sh and access
it at http://localhost:8080
And the ` sh ./run.sh` fails. Type this magic:
 sudo ln -s /var/run/postgresql/.s.PGSQL.5432 /tmp/
 sh ./run.sh
We don’t know why.
You will notice that your history has been lost. This is the result of moving to Postgres. On startup, Galaxy will again have created a new database from scratch.
1. Upload datasets
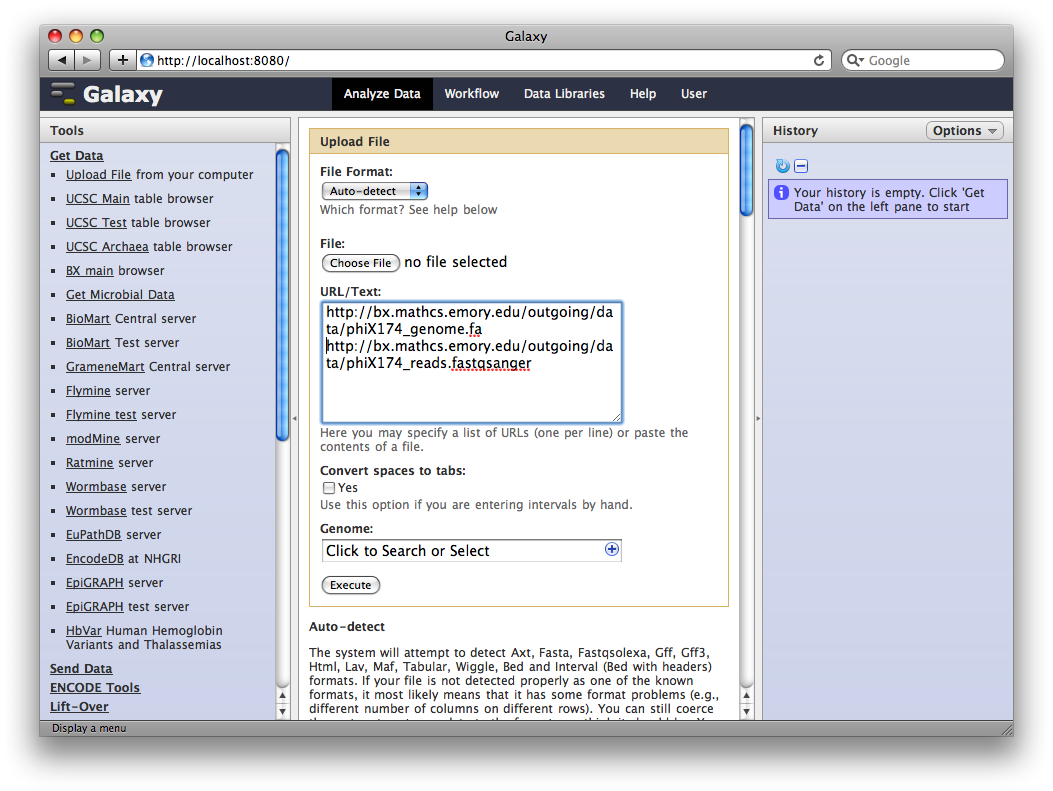
We will again use the Get Data → Upload Tool to upload data into Galaxy. You can enter multiple URLs into the URL / Text box. Enter:
ftp://ftp.gmod.org/pub/gmod/Courses/2010/SummerSchoolAmericas/Galaxy/phiX174_genome.fa
ftp://ftp.gmod.org/pub/gmod/Courses/2010/SummerSchoolAmericas/Galaxy/phiX174_reads.fastqsanger
Note: These files were located at Emory at course time.
and click Execute:
After uploading the datasets, expand them in the history. We can see that Galaxy has successfully detected the file formats of both files.
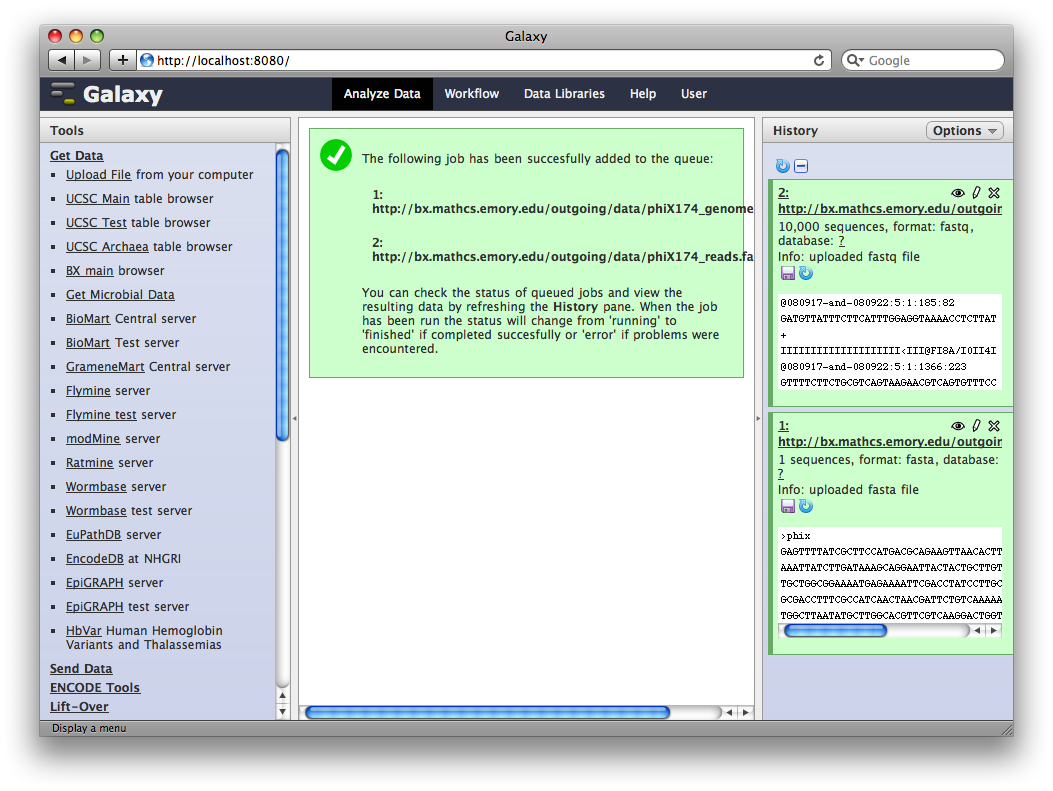
However, we need to make one modification. The FASTQ format is ill-defined, and Galaxy needs to know how the quality scores are scaled. Click the pencil icon for dataset 2, and change the datatype from fastq to fastqsanger (be careful, there are many similar choices here). Finally, click Save.
2. Run BWA to map reads
In the tools panel, select NGS: Mapping → Map with BWA.
Change the value of the first parameter to Use one from the history and make sure that 1: http://…genome.fa is selected.
Make sure that for parameter FASTQ file that 2: http://…fastqsanger is selected.
Click Execute.
A new dataset will be generated containing the mapped reads in SAM format.
Adding a new tool
The SAM format contains 12 required fields representing the read and the position it maps to, followed by a variable number of optional fields of the form “CODE:TYPE:VALUE”. Suppose we want to filter by these optional fields. We can whip up a quick command line tool in Python (or perl, or awk, or…) to do this.
Let’s first create a directory for our new tool:
gmod@ubuntu:~/work/galaxy-dist$ mkdir -p tools/gmod_2010
The tool command (script)
And then using a text editor, create tools/gmod_2010/sam_filter.py
containing:
#!/usr/bin/env python

"""
Usage: sam_filter.py input_file output_file flag value
"""

import sys

out = open( sys.argv[2], "w" )

for line in open( sys.argv[1] ):
    # Strip end of line and split on tabs
    fields = line.rstrip( "\r\n" ).split( "\t" )
    # Look only at optional fields
    write_line = False
    for field in fields[12:]:
        flag, type, value = field.split( ":" )
        if flag == sys.argv[3] and value == sys.argv[4]:
            write_line = True
    # If any optional field matched, keep the read
    if write_line:
        out.write( line )
The tool wrapper
Next, we need to create the tool configuration. Edit the file
tools/gmod_2010/sam_filter.xml and start the following skeleton:
<tool id="sam_filter_1" name="SAM Filter">
    <command interpreter="python">

    </command>
    <inputs>

    </inputs>
    <outputs>

    </outputs>
</tool>
First, let’s define the output. This tool has a single output, of type
sam, so we modify the configuration to contain:
<tool id="sam_filter_1" name="SAM Filter">
    <command interpreter="python">

    </command>
    <inputs>

    </inputs>
    <outputs>
        <data name="output1" format="sam" />
    </outputs>
</tool>
The name can be anything, but it will be used later to identify the output file in the command line. Second, let’s define the following inputs
- An input dataset of type
sam - An input flag, which is selected from a predefined set
- An input value, which can be any text
The resulting configuration:
<tool id="sam_filter_1" name="SAM Filter">
    <command interpreter="python">

    </command>
    <inputs>
        <param type="data" format="sam" name="input1" label="File to filter"/>
        <param type="select" name="flag" label="Optional field to filter on">
            <option value="NM">Edit Distance</option>
            <option value="MD">Mismatching positions / bases</option>
            <option value="AS">Alignment score</option>
        </param>
        <param type="text" name="value" label="Value to require for flag"/>
    </inputs>
    <outputs>
        <data name="output1" format="sam" />
    </outputs>
</tool>
Finally, we define how to construct our command line based on values for the inputs. The command line is a template, where we can substitute in the value of each input (filenames in the case of datasets). Thus our final tool configuration is:
<tool id="sam_filter_1" name="SAM Filter">
    <command interpreter="python">
        sam_filter.py $input1 $output1 $flag $value
    </command>
    <inputs>
        <param type="data" format="sam" name="input1" label="File to filter"/>
        <param type="select" name="flag" label="Optional field to filter on">
            <option value="NM">Edit Distance</option>
            <option value="MD">Mismatching positions / bases</option>
            <option value="AS">Alignment score</option>
        </param>
        <param type="text" name="value" label="Value to require for flag"/>
    </inputs>
    <outputs>
        <data name="output1" format="sam" />
    </outputs>
</tool>
We now need to modify tool_conf.xml to register our new tool and run
Galaxy. Modify the top of tool_conf.xml to look like:
<?xml version="1.0"?>
<toolbox>
  <section name="GMOD 2010 Course Tools" id="gmod_2010">
    <tool file="gmod_2010/sam_filter.xml"/>
  </section>
  ...
and run Galaxy using run.sh
Running the new tool
Return to the Galaxy web interface and from the Tools panel select GMOD 2010 Course Tools → SAM Filter.
The dataset 3: Map with BWA… should already be selected. Because we defined the type of data the tool can accept, Galaxy knows this is the only dataset in our history that is valid.
Select Edit distance for the flag, enter 0 for the value, and click Execute.
We know have a new dataset 4: Sam Filter on data 3 which contains only reads that mapped exactly to the reference.
Galaxy Workflows
The Galaxy workflow system allows analysis containing multiple tools to be built, run, extracted from histories, and rerun. As a trivial example, let’s extract a workflow for the analysis we just performed.
We’ll first need to create a user account and login. At the top of the Galaxy interface, select User → Register. Fill in the required fields and click Submit. Your account will be created, and you will be logged in (retaining your current history).
In the title of the History panel, click Options → Extract Workflow.
At this point, you have the option to select a subset of steps from your history to include in the workflow. Some tools cannot be used as workflow steps (e.g. uploads) so they will instead be treated as inputs to the workflow. This is fine, so click Create Workflow.
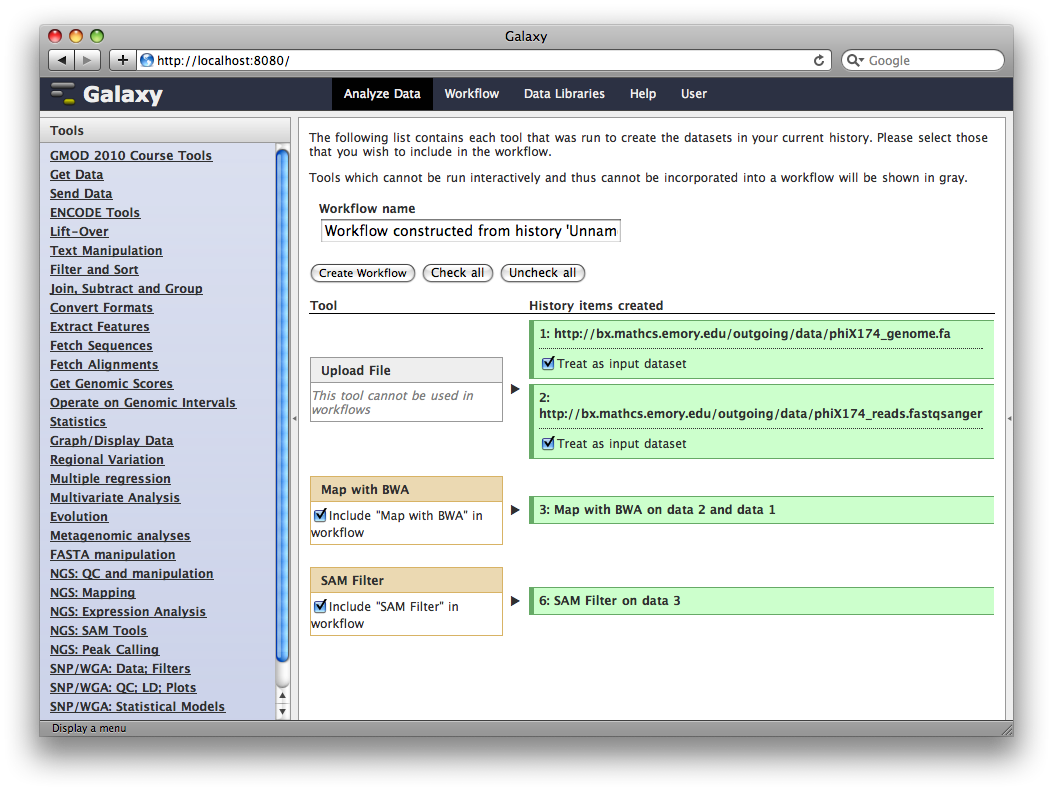
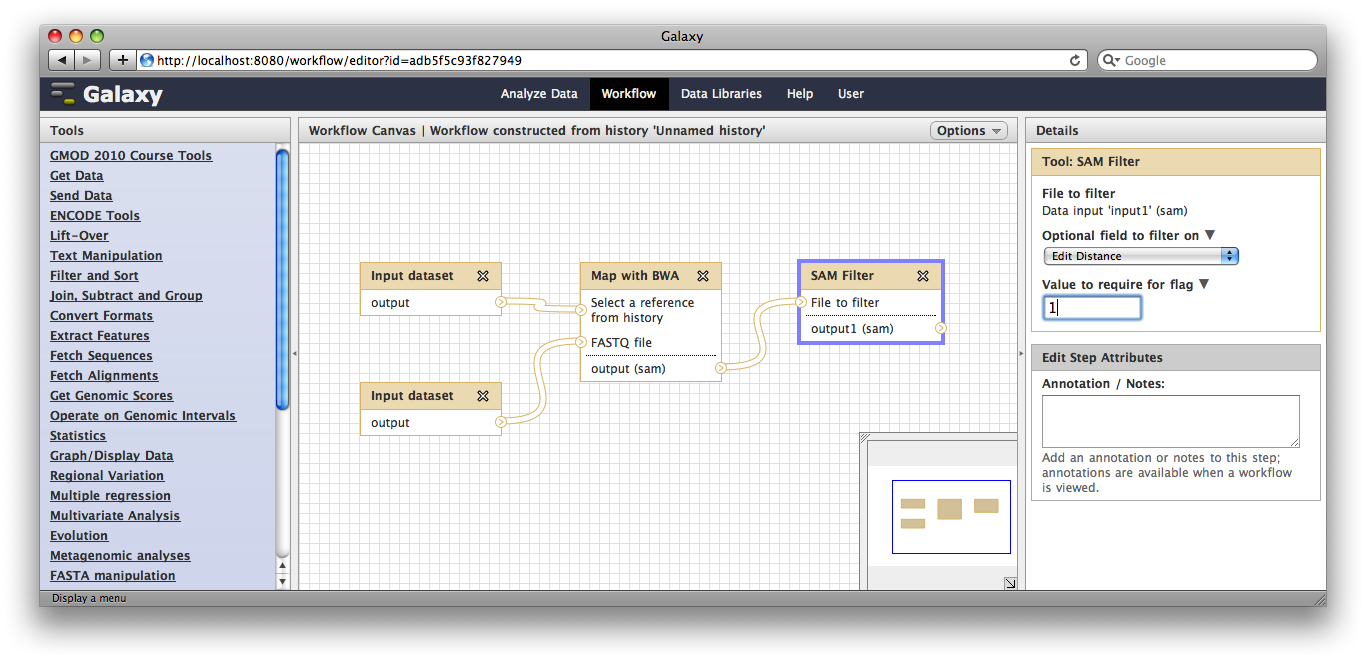
Now, from the top bar click Workflow to see a list of your workflows. You should see one workflow. Click on it’s name to bring up a popup menu, then click Edit to open the workflow editor. In the workflow editor, we can modify parameters or add and remove steps. For example, if we click on SAM filter, we can change edit distance from 0 to 1:
Making genome / alignment data available to Galaxy
Galaxy is designed so that a single Galaxy instance can work with many genomes simultaneously. To use certain tools, Galaxy needs to be configured to know where to find data for those genomes. As an example, let’s create a new fake genome and configure some data for it.
Every genome in Galaxy needs to have an unique identifier (called the
build identifier or dbkey). For our example, the identifier will be
a_example_1.
Install Python package management tools
First, we’ll install a few packages that will allow us to index our data. At the terminal, enter:
$ sudo apt-get install python-dev python-setuptools python-pip
Install bx-python
This will install some support files needed by Python. Next type
$ sudo pip install bx-python
This will install the bx-python package, a collection of scripts and
Python libraries for working with genomic and comparative genomic data.
Get datasets for our genome
Now, we will download the datasets for our example genome:
$ mkdir tool-data/a_example_1
$ cd tool-data/a_example_1
$ wget ftp://ftp.gmod.org/pub/gmod/Courses/2010/SummerSchoolAmericas/Galaxy/a_example_1.maf
$ wget ftp://ftp.gmod.org/pub/gmod/Courses/2010/SummerSchoolAmericas/Galaxy/a_example_1.2bit
Note: These files were at Emory at course time.
Next, we will use the script maf_build_index.py to create a binary
index that allows fast selection of alignments from a MAF file:
$ maf_build_index.py a_example_1.maf
Edit configuration files
We now need to edit several configuration files to inform Galaxy of the existence of our genome, and of these associated datasets. NOTE: these are TAB separated files, and it is important that the tabs are in the right places. If you have trouble cutting and pasting from the wiki, you can cut and paste from this text file instead:
ftp://ftp.gmod.org/pub/gmod/Courses/2010/SummerSchoolAmericas/Galaxy/info.txt
tool-data/shared/ucsc/builds.txt
a_example_1 Example genome
tool-data/alignseq.loc
seq a_example_1 /home/gmod/work/galaxy-dist/tool-data/a_example_1/a_example_1.2bit
tool-data/maf_index.loc
a_example_1 with 3 other species a_example_1_3way a_example_1 a_example_1,apiMel2,n_vitripennis_20100409,dm3 /home/gmod/work/galaxy-dist/tool-data/a_example_1/a_example_1.maf
Create dataset using new genome build
Now let’s see if our new data is available in Galaxy. Click Get Data → Upload File.
Paste the following into the URL/Text box:
scaffold0   450 650
scaffold0       2000 3000
Set the type to BED, make sure Convert spaces to tabs is selected, and click in the Genome: box. You should be able to find your genome by typing example.
Extract sequence corresponding to these intervals
In the Tools menu, click Fetch Sequence → Extract Genomic DNA.
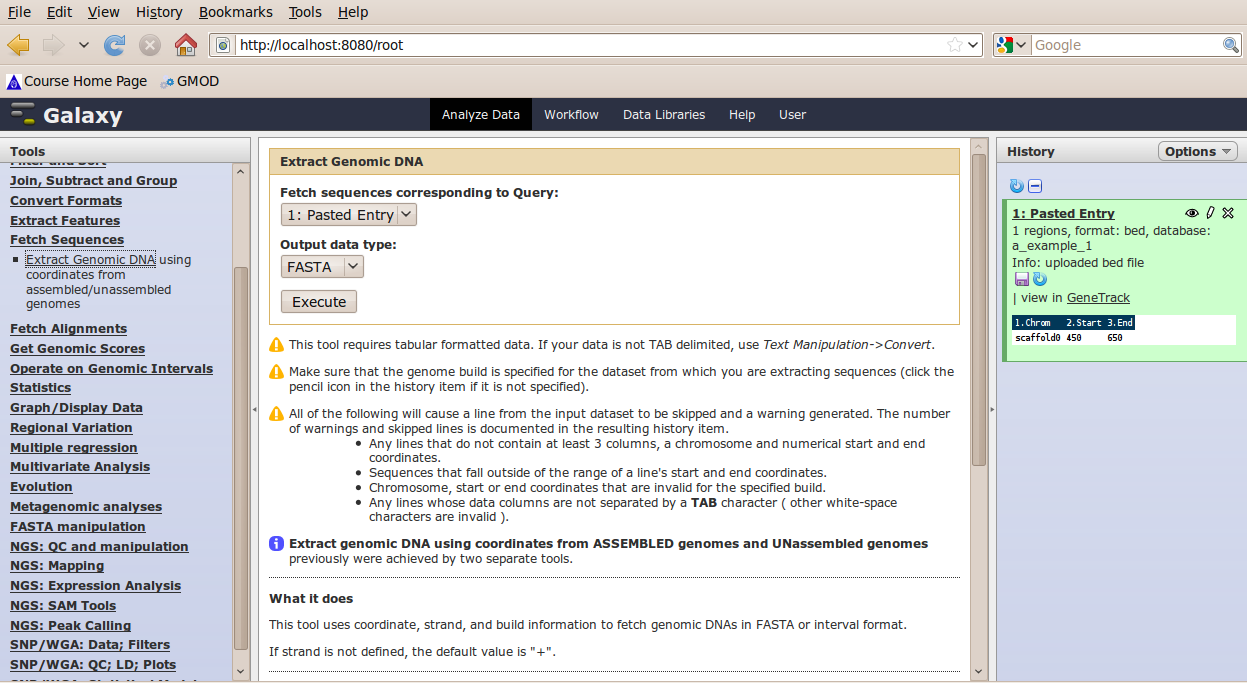
The tool interface should open in the main panel. The default values are probably fine (make sure the dataset you just select is selected). Click Execute. A new dataset will be created containing the DNA for your regions of interest.
Extract multiple alignments corresponding to these intervals
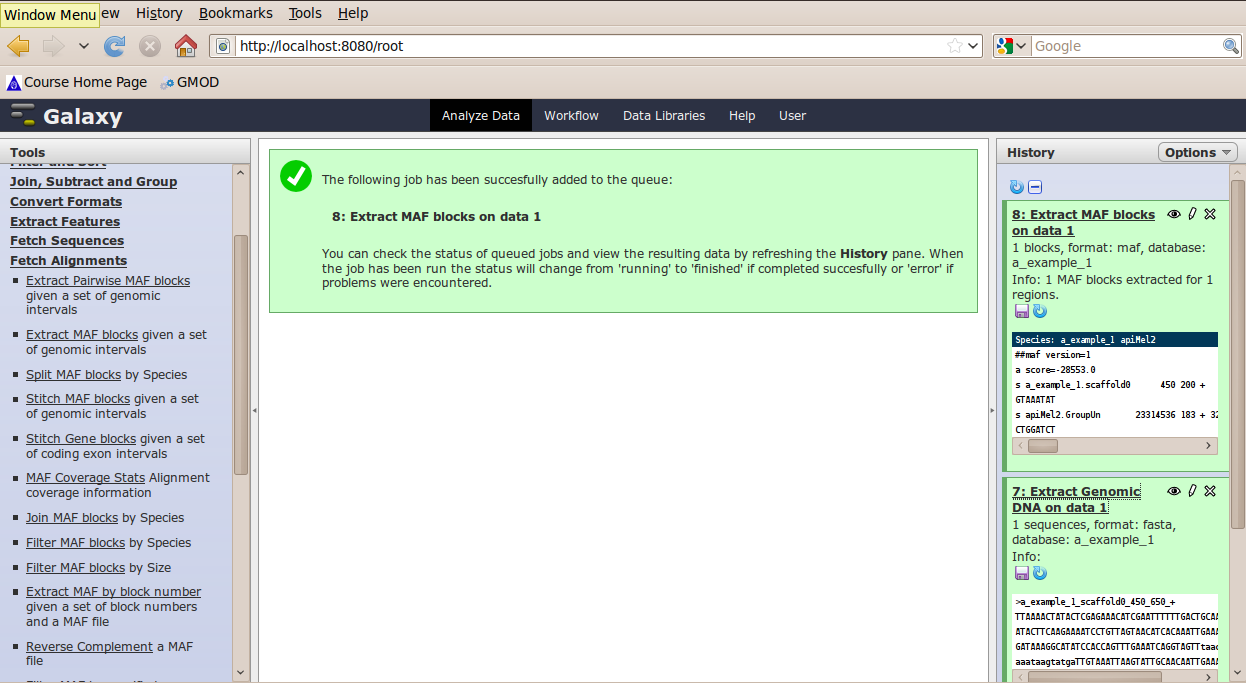
In the Tools menu, click Fetch Alignments → Extract MAF Blocks.
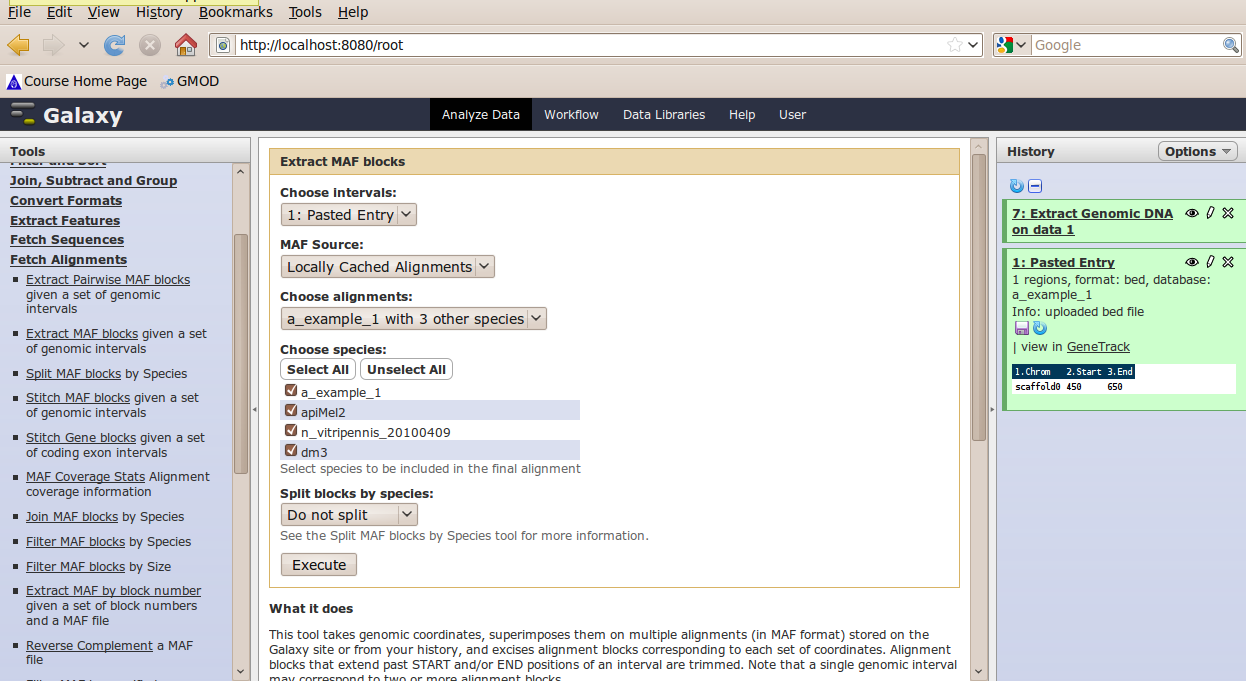
The tool interface should open in the main panel. Again, the defaults should be reasonable, but click Select All to alignments to all other species. Click Execute. A new dataset will be created containing alignments corresponding to your intervals of interest.
BETA Features
Terminate Galaxy with Control-C. Edit universe_wsgi.ini again and in
the section [app:main] add two lines:
# enable_tracks = True
enable_pages = True
Restart Galaxy with run.sh
Galaxy Pages
The Galaxy pages feature allows the creation of documents that integrate datasets, histories, and workflows.
From the User menu at the top, select Pages → Add new page. Enter a name for the page, and a URL compatible identifier will be generated automatically. Click submit, and you will return to the list of pages.
Click the arrow to the right of the page name, and from the popup menu click Edit Content.
You are now in a WYSIWYG editor where you can write-up your analysis for sharing. As a simple example, click Embed Galaxy Object → Embed History, and then select the history you have been working with.
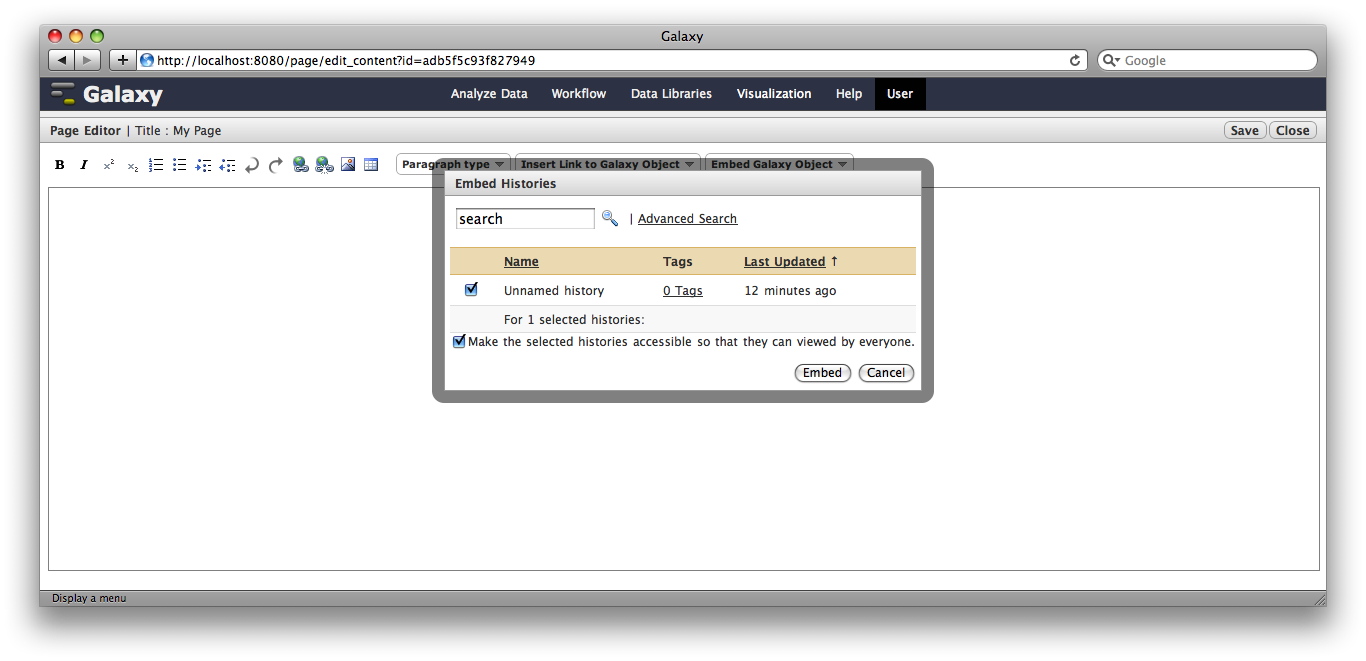
Click Save and Close to return to the page list, and click on the name of the page to view it. You will now see your page, with your analysis history embedded. This page can be shared with others, or published publicly. Others can inspect your history, import and work with your analysis.
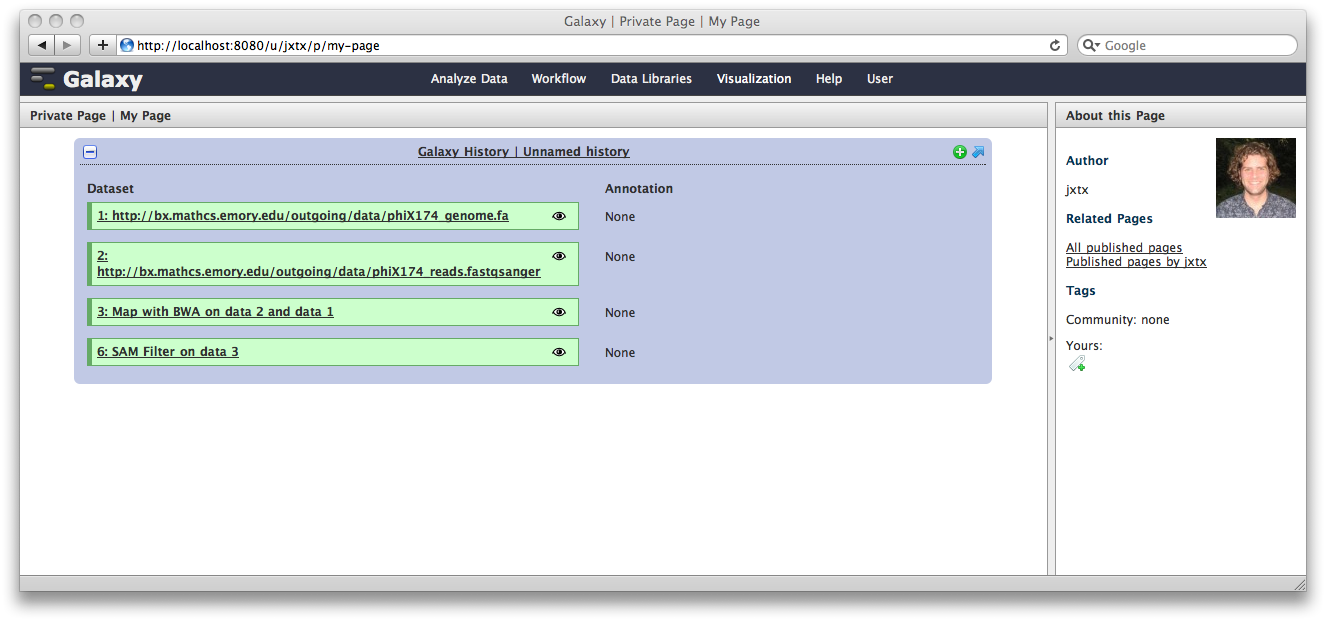
You can return to the History view and annotate your history items by clicking on the Note icon. These annotations will show up with your embedded history.
Where to go next
We’ve only scratched the surface of what can be done with Galaxy. Here are some pointers for learning more:
- You can build much more complicated tool configurations
- Your Galaxy instance can run jobs on a cluster
- Your Galaxy can be more robust and scalable
- You can make local genomes, alignments, and other data available to Galaxy
- You can customize what external applications are available for displaying datasets
- You can customize the datatypes for a Galaxy instance
- You can instantiate Galaxy on the Amazon cloud
- You can find even more at the Galaxy wiki
Facts about “Galaxy Tutorial 2010”
| Has topic | Galaxy + |