GMOD
Apollo Tutorial 2010

This Apollo tutorial was presented by Ed Lee at the 2010 GMOD Summer School - Americas, May 2010. The most recent Apollo tutorial can be found at the Apollo Tutorial page.
Contents
- 1 VMware
- 2 Caveats
- 3 Introduction
- 4 Installation
- 5 Using Apollo
- 6 Configuring Apollo
- 7 Setting Up Custom Chado Configurations
- 8 Setting Up a Custom WebStart Instance
- 9 Writing Custom Data Adapters
VMware
This tutorial was taught using a VMware system image as a starting point. If you want to start with the same system, download and install the start image (below). See VMware for what software you need to use a VMware system image and for directions on how to get the image up and running on your machine.
Download the start image and the end image.
Logins:
| Purpose | Username | Password |
|---|---|---|
| Shell | gmod | gmodamericas2010 |
| MySQL | root | gmodamericas2010 |
Caveats
Important Note
This tutorial describes the world as it existed on the day the tutorial was given. Please be aware that things like CPAN modules, Java libraries, and Linux packages change over time, and that the instructions in the tutorial will slowly drift over time. Newer versions of tutorials will be posted as they become available.
Introduction
Overview
Once we have a sequence assembled, we need to annotate that sequence, that is add features such as genes, pseudogenes, ncRNAs, etc. Otherwise we just have sequence and can’t make much sense of the data. Computational analysis, such as Genscan, FGeneSH and tRNAscanSE are a great way to start the annotation process, as they help us localize regions of interest. However, these automated tools are far from perfect and the results often require manual updating from expert biologists. That is where Apollo comes in. Apollo is a sequence annotation editor and will allow you to create and edit annotations.
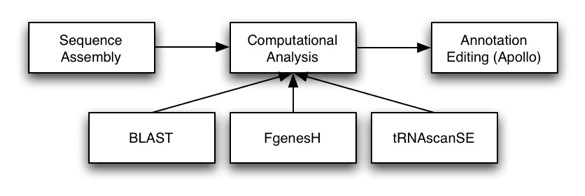
Architecture
Apollo is setup in a 3-tier architecture, with a presentation (GUI), logic and data layer. It is highly configurable, with most users configuring the presentation and data layers.
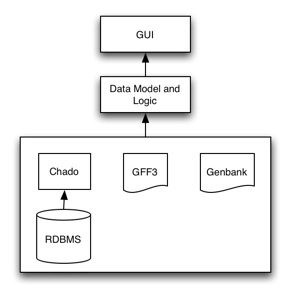
Presentation Layer
The presentation layer (GUI) handles displaying and gives the user an interface for creating and editing these annotations. Customization of this layer usually entails setting up how features are displayed (e.g., color, shape, labels).
Logic Layer
The logic layer handles how data is represented and the various operations you can perform on the data (e.g., creating, editing, adding information to annotations).
Data Layer
The data layer takes care of interfacing with the different data sources. Customization of the data layer usually entails setting up access to different databases (e.g., your own Chado instance) to even creating new adapters to read new data formats or schemas.
Installation
You can download Apollo from pre-built installer packages or getting the code from either SVN or tarball, both which require building the application.
Pre-built Installers
You can download OS-specific pre-built installer packages from the Apollo installer page. We provide the following installers:
| Platform | Optionally bundled JRE |
|---|---|
| Windows | Yes |
| Mac OS X | No |
| Linux | Yes |
| Solaris | Yes (x86 version) |
| Unix | No |
Since we’re installing it on our Linux virtual machine, we’ll use the
Linux version. Java has already been setup in these machines, so we’ll
use the installer without the bundled JRE. The bundled JRE option is a
great solution for users who don’t have Java installed or have multiple
ones installed and are not sure how to select the correct one to be
used. The installer has already been downloaded to
~/Software/installers.
The Linux installer is a shell script. If we want to install Apollo to
the common application locations (such as /usr/local/bin), we’ll need
root access. We’ll do everything from the command line since it’s easier
that way. Open up a terminal window and type the following:
$ cd ~/Documents/Software/installers
$ sudo /bin/sh Apollo_unix.sh
We’ll just install everything with the default options.
Checking Out the Code From SVN
You can also checkout the code from SourceForge SVN. You’ll need a SVN client to do so. This will guarantee that you’ll get the latest Apollo code. Note that you’ll be getting the development version and as such might not be fully stable. The following commands apply to Unix based command line SVN clients for an anonymous checkout.
$ svn co https://gmod.svn.sourceforge.net/svnroot/gmod/apollo/trunk Apollo
If you’re using an IDE, chances are that your IDE will have SVN support (or have a plugin available).
Getting the Source Tarball
You can also download the source tarball from SourceForge. You can get the source code for both the current and previous public releases. You won’t get the latest development code as in SVN, but you should be getting code that is more stable.
Using Apollo
We’ll start off with seeing some of the features that Apollo can do. We’ll be connecting to our local Chado instance. A customized Apollo Chado configuration has been setup for this. Don’t worry, we’ll cover the details on how we did that once we talk about setting up custom Chado configurations.
Let’s first start by launching Apollo. Type the following in your terminal:
$ apollo
We’ll see an option for which data we want to load. We’ll choose Chado database as our data source. Since we still don’t have annotations on our data, we can’t use the gene option. Select contig in Select a region to display. Let’s look at scf1117875582023 in the region between 523000 and 532000.
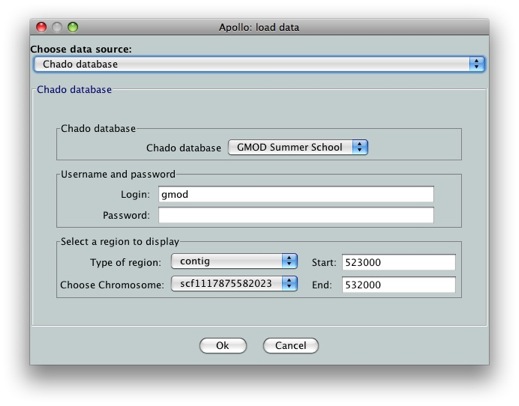
Tip: If you want to load the whole genomic region from Chado into Apollo, you can enter 0 for both Start and End coordinates. This is useful so that you don’t need to know the exact length of the sequence being loaded. Keep in mind that Apollo has a large memory footprint, so you probably want to keep the loaded regions to less than 500kb.
Once loading is complete, we’ll see the main Apollo window.
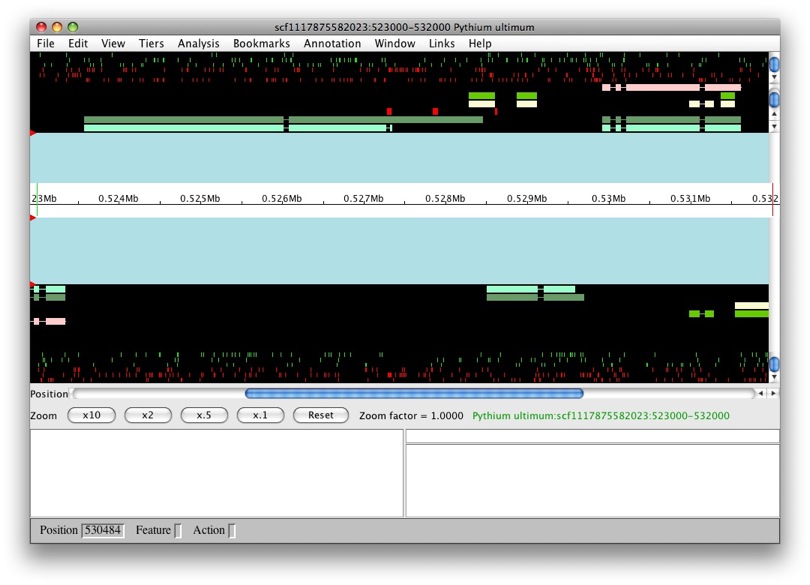
The panels with the aqua background are for annotations and those with the black background are for computational results. The white box in the middle with the ruler represent the genomic region with the numbers being coordinates. The annotation and result panels above the genomic coordinate window are for the plus strand and the ones on the bottom are for the minus strand. The “Zoom” buttons will allow you to zoom in and out of the currently loaded region. The panels below provide information on the currently selected feature.
We only have results loaded and no annotations. So let’s create a gene. We’ll select maker-529921-531609. We want to create a transcript with all of the exons. So to select all of the exons, we just need to double left-click on one. You’ll notice that all the exons have a red border around them.
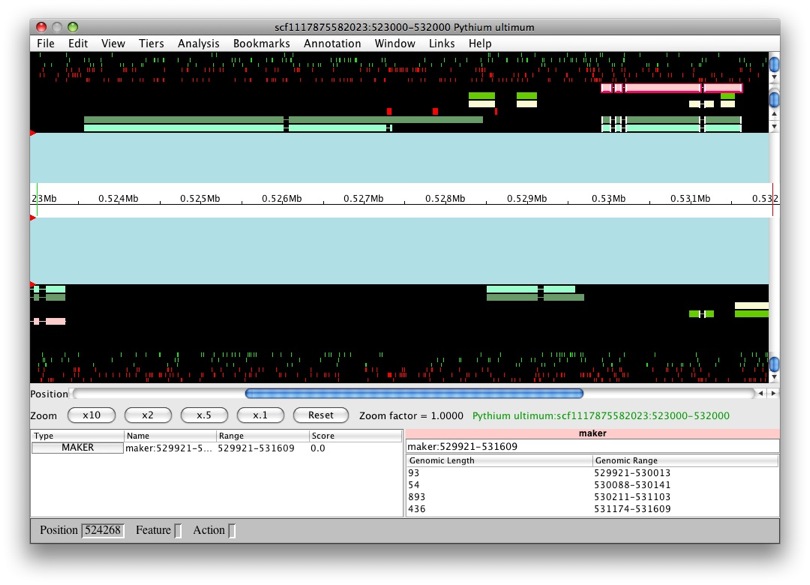
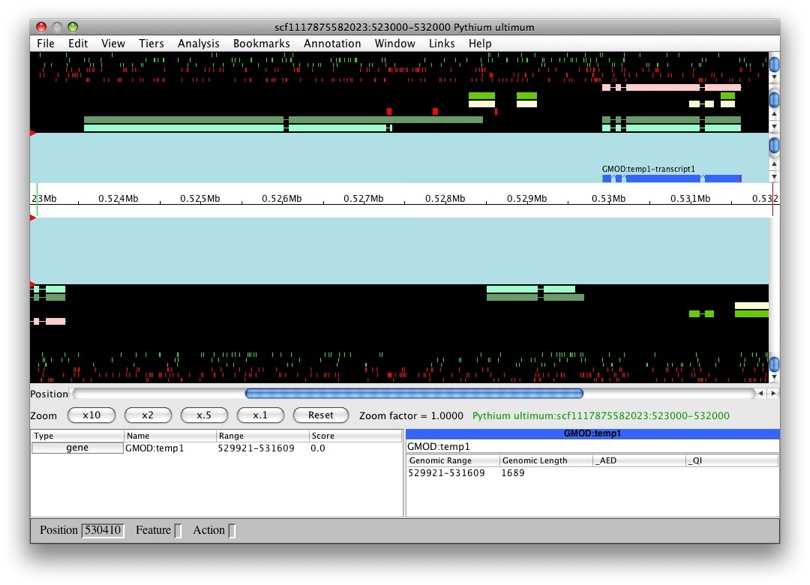
Now that they’re all selected, to create a new gene it’s as easy as just
dragging and dropping into the annotation panel. Voila! We have a new
gene, GMOD:temp1, with transcript GMOD:temp1-transcript1.
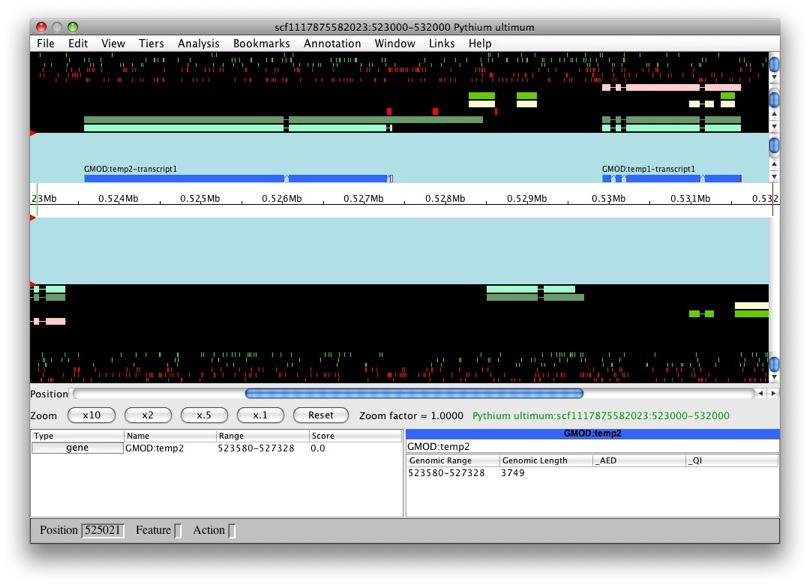
OK, let’s try this again with another model. Let’s do the same with
snap_masked-scf1117875582023-abinit-gene-5.17-mRNA-1_4016 (man, that’s
a long name!). We can see that the transcript belongs to a new gene,
GMOD:temp2. Makes sense, it’s a obviously a separate gene.
But what if we were create a new feature from
genemark_masked-scf1117875582023-abinit-gene-5.70-mRNA-1_4284? Let’s
find out. Whoa! We can see that this new transcript was created as part
of GMOD:temp2.
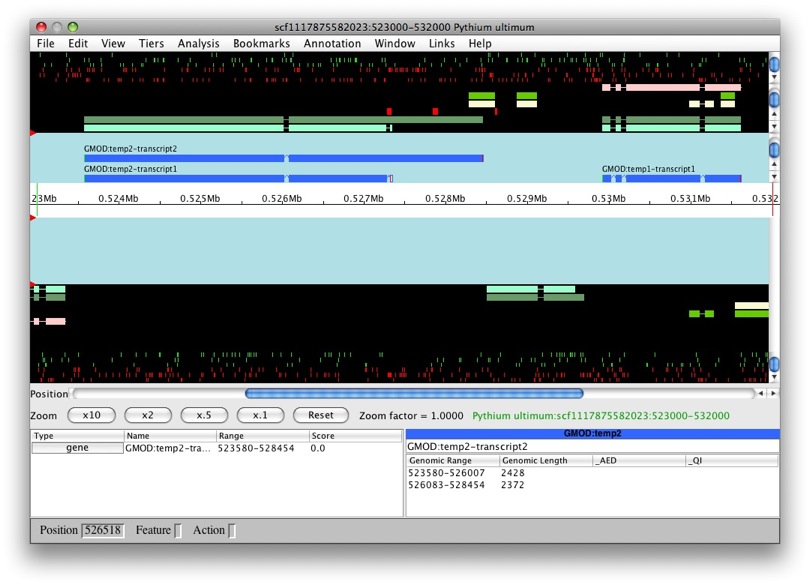
That’s great, as it looks as it’s a splice variant, rather than a whole new gene. So is this always the case? After all, there are overlapping genes, right? Apollo handles overlaps the following ways (which is configurable):
ORF_Overlap: If the transcript has any in-frame overlaps with existing transcripts, it gets assigned as a splice variant to the existing gene; otherwise a new gene is created.SimpleOverlap: If the transcript has any overlap (regardless of frame) with existing transcripts, it gets assigned as a splice variant to the existing gene; otherwise a new gene is created.
You’ll notice that the newly created genes have an ID of the form
GMOD:temp# and the transcripts have an ID of the form
GMOD:temp#-transcript#. Apollo uses naming adapters to define how
newly created features should be named. For example, FlyBase uses
FBgn:temp# for genes and
FBgn:temp#:chromosome#:chromosome_start-chromosome_end-R? where ? is
A, B, C and so on.
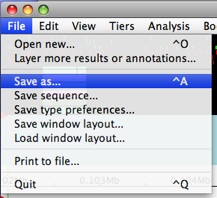
Let’s make sure that our Chado connectivity is working. Let’s save our work using File → Save as….
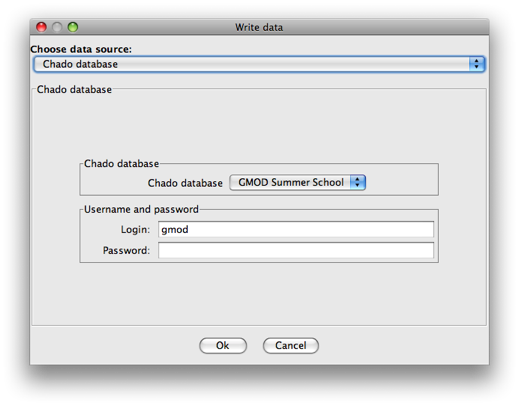
Make sure that Chado database is selected at the data source (should
already be).
You’ll notice that the IDs have changed. This is because the GMOD naming
adapter follows the convention that all newly created features should
have an ID of PREFIX:FEATURE_ID for a Chado database. This only occurs
with newly created features. If you modify the ID of an existing feature
and save that, this ID replacement will not take place.
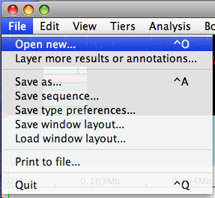
Let’s reload the data with File → Open new….
Again, make sure that Chado database is the selected data source
(should already be). You’ll notice that all the information we put in
when we first loaded from the database is already there. Apollo keeps a
history of loading and saving so that you can easily access previous
data sources. Click Ok. Great, the data is there!
Let’s say that we want to change the gene ID to something more interesting. We can do so by selecting an exon in our feature, and then right click → Annotation Info Editor….
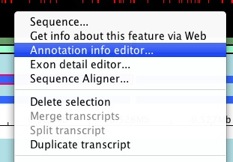
We can see that we can add lots of interesting information for our gene and transcript.
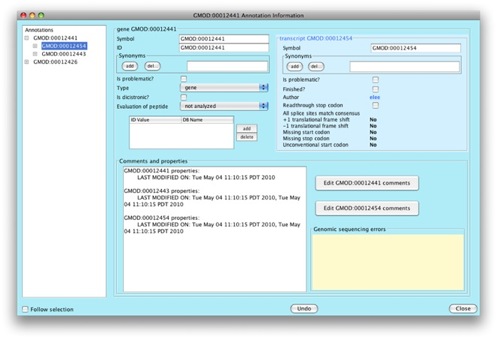
Let’s go ahead and change the gene symbol to something else. We can see that this change affects all the transcripts. Just as we’d expect.
There are a lot of things you can do to your existing annotation from
the popup menu. You can merge and split transcripts and exons, move
exons from one transcript to another, and lots of other cool stuff.
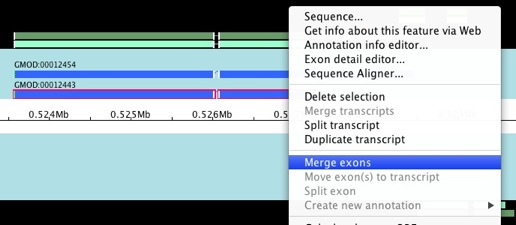
Let’s take a look at merging exons. Select the 2 exons that you want to
merge (hold down shift to allow you select multiple items), right
click, and choose Merge exons.
Alright, it does what we’d expect it to do.
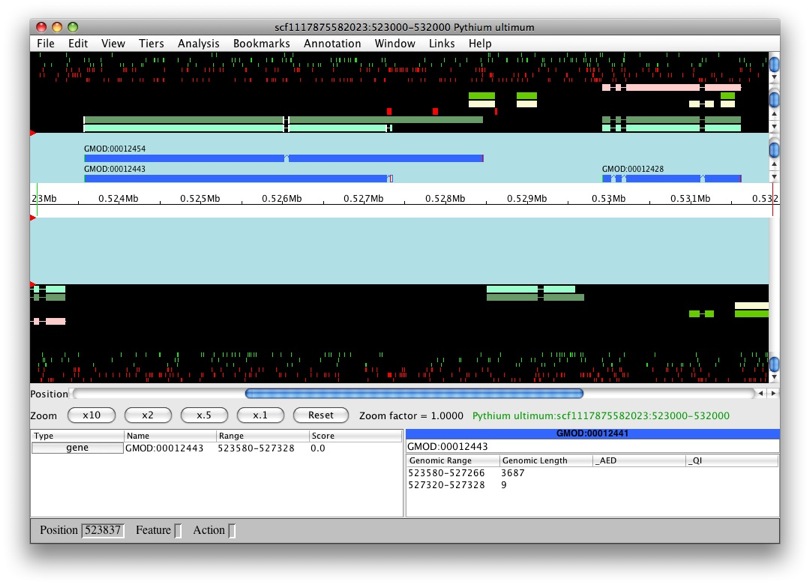
But let’s say that upon closer inspection, this is not what we wanted.
We can undo any changes we’ve made! We can undo our merge with Edit
→ Undo.

Wow, lookie here, it split the exons again. Although this looks to be a trivial operation, it’s actually very complex, as one single change can lead to multiple cascading changes. For example, merging exons can change the coding region frame for the downstream exons, thus affecting the CDS. So a single causes other implicit changes to occur.
Apollo can run remote analysis. We currently support BLAST and
Primer-BLAST (primer identification tool) over at NCBI. Let’s look at
how the BLAST support works.
Select the first model we created (with ID GMOD:00012428 in this
guide - the ID in your data might be different). Double-click on an exon
to select the whole model. Right-click on the selected feature and
choose Analyze region.
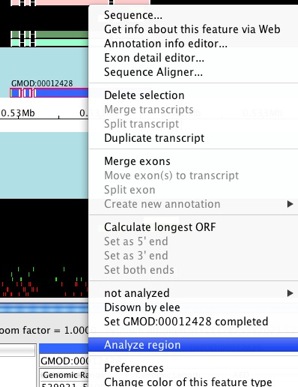
The Run analysis window will show up.
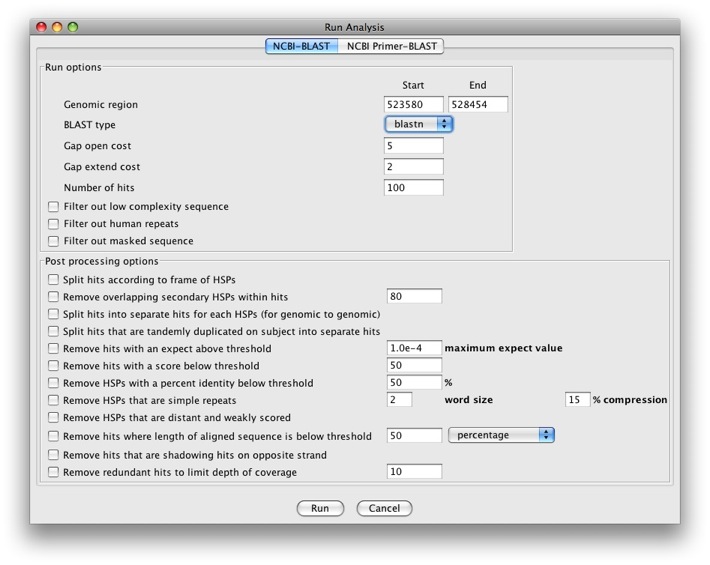
We see there is a tab for NCBI-BLAST and NCBI Primer-BLAST. We’ll
just run BLAST for now. We have a pull-down menu for BLAST type and
can select blastn, blastx, and tblastx.

Let’s run a blastx search. There are a number of options for running
BLAST and post processing options. The post processing options are
particularly useful as since we’re searching against NCBI’s nr database
(which is very large), we’ll get A LOT of results back. We’ll check the
following options:
- Run options
- Filter out low complexity sequence
- Filter out masked sequence
- Post processing options
- Remove hits with an expect above threshold
- Remove hits with a score below threshold
- Remove HSPs with a percent identity below threshold
We can leave the default values for those options. Click Run to run the analysis. After a few seconds, a popup window will appear.
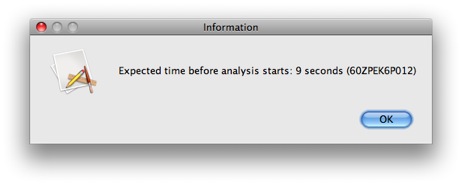
This gives us the estimated time before our analysis starts running (as estimated by the NCBI servers). Note that this is the estimated time for the analysis to start, NOT the expected time for the analysis to the completed. Checking for analysis completion all take place in the background, so you can feel free to continue working as usual. You will be notified when the analysis is complete.
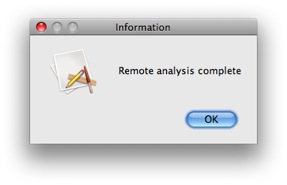
The new analysis will appear in the results panel and since we ran
blastn against the nr database, the type for the result is
blastx:nr.
![]()
One last thing worth mentioning is the Exon Detail Editor. It allows
you to make edits to your models at the base level. The
Sequence Aligner allows you to make the same types of edits the
Exon Detail Editor support, but in reference to multiple alignment
data. We’ll come back and talk about the Sequence Aligner if we have
time.
Unfortunately we don’t have the time to go over all the sophisticated editing features for Apollo, but you can get more information on all the powerful editing features from the Apollo user’s guide.
Configuring Apollo
Ok, now that we got some idea of what Apollo can do, let’s talk about how to configure Apollo. First of all, be aware that all configuration files can live in two places:
- The global Apollo configuration directory in
$APOLLO_ROOT/confwhere$APOLLO_ROOTis where Apollo was installed - User specific configurations, are stored in
~/.apollowhere ~ is the user home directory (different OS’s handle it differently)
The configurations in the user directory take precedence over the global ones. Depending on the configuration, it will either fully overwrite the global configuration or just overwrite/append to the global one.
There are 3 sets of general configurations we’ll discuss:
apollo.cfg, data_source.style, data_source.tiers. You can check out
the Apollo configuration section
from the user guide for a more detailed description of the supported
options.
apollo.cfg
This is the main Apollo configuration. Options are composed of columns
delimited by white space, where the first column is the option parameter
and the following columns are the specific options for the parameter.
// is used for comments and everything following it (up the the new
line) will be ignored. Out of all the options, the most interesting one
is DataAdapterInstall, which is used to install data adapters for
handling new sources of data. We’ll talk about it in more detail in the
writing custom data adapters section.
You can just add any new options or ones you wish to override in your
custom apollo.cfg file. The global apollo.cfg options will be used
for any options absent in your custom file.
data_source.style
Each data source has a style file associated with it. The style file
contains options that are data source specific and should be shared
amongst every feature. Like the apollo.cfg file, it is also composed
of columns delimited by white space, where the first column is the
option parameter and the following columns are the specific options for
the parameter. // is also used for comments and everything following
it (up to the new line) will be ignored. There’s a GUI for setting up
the most common options. You can access it from Edit → Preferences.
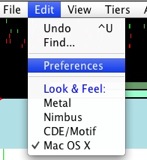
Make sure that the Style tab is selected.
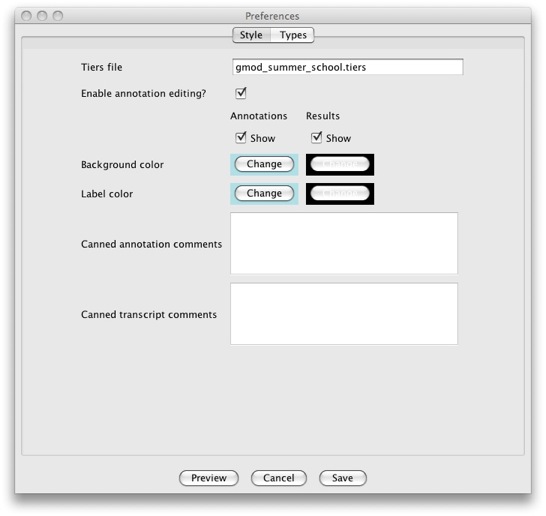
Be aware that the GUI only supports a subset of all the options
supported. This was done as to not overwhelm users with overly complex
GUIs. If you need to change anything that is not supported with the GUI,
you’ll need to do so by manually editing the file. Of particular
interest is the Canned annotation/transcript comments section. It
allows you to add predefined comments that users can add to their top
level annotations and transcripts using the Annotation Info Editor
from a pull down menu.
data_source.tiers
Each data source has a tiers file associated with it. The tiers files
contains options on how to display specific features. It has a
completely different format than both apollo.cfg and
data_source.style files. # is used for comments. A tiers file
contains a set of Tier and Type records.
A tier record defines a set of feature types that will always be
displayed together as a group. They will be displayed in the same row if
possible when the features are expanded but on separate rows if they
overlap. A Tier record will look something like this:
[Tier]
tiername : Annotation
visible : true
expanded : true
maxrows : 0
labeled : true
curated : true
warnonedit : false
Following the Tier record is one or more Type records. A Type
record specifies which different types should appear in a given Tier.
The Type record will look something like this:
[Type]
tiername : Gene Prediction
typename : Genscan
resulttype : genscan:dummy
resulttype : genscan
color : 204,153,255
usescore : true
minscore : - 1
maxscore : 50
glyph : DrawableResultFeatureSet
column : SCORE
column : GENOMIC_RANGE
column : query_frame
sortbycolumn : GENOMIC_RANGE
weburl : http://genes.mit.edu/GENSCAN.html#
Again, there are many options supported by the tiers file and it can get
quite overwhelming. The current fly.tiers file is over 1500 lines
long! Craziness. Luckily we’ve also recently added a GUI for setting the
most useful options. You can access it by clicking Edit →
Preferences and selecting the Types tab.
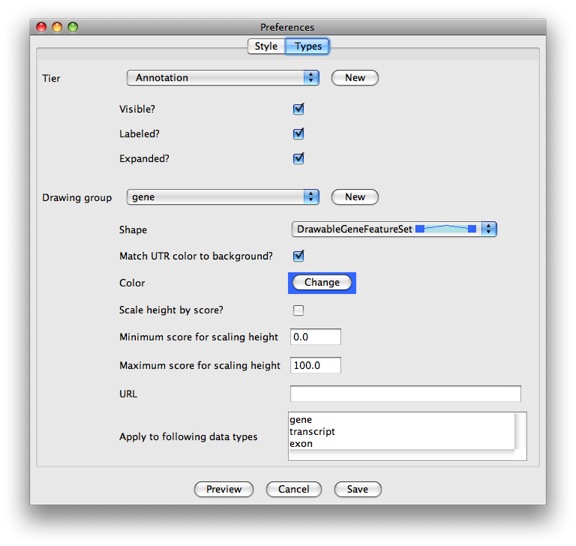
If you need to change something not supported by the GUI, you’ll have to edit the file by hand. You can learn more about the configuration wizards in the Preferences section from the Apollo user guide.
Setting Up Custom Chado Configurations
Ok, so we connected to our local Chado instance before with an already
existing configuration file. Now we’re going to go into detail on how to
set that up. The file that contains the Chado database configuration is
chado-adapter.xml.
chado-adapter.xml
Like all other configuration files, it resides in $APOLLO_ROOT/conf
for the global configuration and ~/.apollo for the user
configurations. As you can guess from the file extension, this
configuration is in XML format (nice how all
the formats between the configurations are so consistent, huh? =P). It
contains a <chado-adapter> root element, with at least one
chadoInstance child element and at least one chadodb element. The
skeleton for the XML file will look something like this:
<?xml version="1.0" encoding="UTF-8"?>
<chado-adapter>
  <chadoInstance>
    ...
  </chadoInstance>
   ...
  <chadodb>
    ...
  </chadodb>
</chado-adapter>
chadoInstance Element
You’ll need at least one chadoInstance element. It will look something
like this:
<chadoInstance id="gmodSummerSchoolInstance" default="true">

  <!-- associated Java class with this instance -->
  <clsName>apollo.dataadapter.chado.jdbc.RiceChadoInstance</clsName>

  <!-- database fields corresponding to top-level entries - will appear in the pulldown menu -->
  <sequenceTypes>
    <type>gene</type>
    <type>
      <name>contig</name>
      <!-- give start and end input box for this region -->
      <useStartAndEnd>true</useStartAndEnd>
      <!-- query the database for valid ids for contigs -->
      <queryForValueList>true</queryForValueList>
      <!-- whether the feature is top level -->
      <isTopLevel>true</isTopLevel>
    </type>
  </sequenceTypes>

  <!-- CV information stored in the Chado instance -->
  <partOfCvTerm>part_of</partOfCvTerm>
  <featureCV>sequence</featureCV>
  <relationshipCV>relationship</relationshipCV>
  <propertyTypeCV>feature_property</propertyTypeCV>

  <!-- list of gene predictions to retrieve -->
  <genePredictionPrograms>
    <program>maker</program>
  </genePredictionPrograms>

  <!-- list of search hits to retrieve -->
  <searchHitPrograms>
    <program>blastn</program>
    <program>blastx</program>
    <program>tblastx</program>
    <program>est2genome</program>
    <program>protein2genome</program>
    <program>repeatmasker</program>
    <program>fgenesh</program>
    <program>fgenesh_masked</program>
    <program>genemark</program>
    <program>genemark_masked</program>
    <program>snap</program>
    <program>snap_masked</program>
  </searchHitPrograms>

  <!-- will most likely be set to true; exists for backward support for non-standard Chado -->
  <searchHitsHaveFeatLocs>true</searchHitsHaveFeatLocs>

  <!-- list of one-level annotations to retrieve -->
  <oneLevelAnnotTypes>
    <type>promoter</type>
    <type>transposable_element</type>
    <type>remark</type>
    <type>repeat_region</type>
  </oneLevelAnnotTypes>

  <!-- list of three-level annotations to retrieve -->
  <threeLevelAnnotTypes>
    <type>gene</type>
    <type>pseudogene</type>
    <type>tRNA</type>
    <type>snRNA</type>
    <type>snoRNA</type>
    <type>ncRNA</type>
    <type>rRNA</type>
    <type>miRNA</type>
  </threeLevelAnnotTypes>

</chadoInstance>
chadodb Element
You’ll need at least one <chadodb> element. It contains information to
connect to the database. Each <chadodb> element will have a
<chadoInstance> associated with it. You’ll need one <chadodb>
element for each database you want to connect to (you can have multiple
ones). The XML will look something like this:
<chadodb>

  <!-- label that will appear in the dropdown list of databases -->
  <name>GMOD Summer School</name>

  <!-- the Apollo class to use for your database -->
  <adapter>apollo.dataadapter.chado.jdbc.PostgresChadoAdapter</adapter>

  <!-- the URL for the database server -->
  <url>jdbc:postgresql://localhost:5432/chado</url>

  <!-- database name -->
  <dbName>chado</dbName>

  <!-- database user / login -->
  <dbUser>gmod</dbUser>

  <!-- identifies the type of Chado database -->
  <dbInstance>gmodSummerSchoolInstance</dbInstance>

  <!-- style configuration for this database -->
  <style>gmod_summer_school.style</style>

  <!-- if set to true, will be database used when launching Apollo using command line arguments -->
  <default-command-line-db>true</default-command-line-db>

</chadodb>
Setting Up a Custom WebStart Instance
One of the benefits of having Apollo as a Java application is that we can make use of Java WebStart. This is a great way to deploy Apollo with your custom modifications. If any modifications are made (either source code or configuration), it will be automatically deployed through WebStart. To setup our own WebStart instance, we’ll need to compile the code ourselves. See the installation section on information on how to checkout the code.
We’ve already checked out the code from SVN in our virtual machines. The
code is located in ~/Documents/Software/Apollo. The code is the up to
date so we don’t need to update it. Change into the Apollo directory.
$ cd ~/Documents/Software/Apollo
Now we’ll need to create our Apollo jar file for deployment. Before we
do that, we want to make sure that our custom configurations are in the
conf directory (we want it to be globally deployed, not locally). So
let’s copy our modified chado-adapter.xml and the style and tiers
files to the conf directory.
$ cp ~/.apollo/chado-adapter.xml ~/.apollo/gmod_summer_school.* conf
Now we’re ready to build our updated Apollo jar. We’ll use
Apache Ant to do so. Ant is similar in many ways to
make but has a lot of native support for Java. Like make, we can
have multiple targets. We’re interested in the jar target.
$ cd src/java
$ ant jar
So traditionally, setting up a WebStart instance is quite a bit of work. Luckily, we have a very nice Perl script that does a lot of the magic for us! Before we can use this script, we’ll need to look at the template XML file that is used for this script.
<?xml version="1.0" encoding="UTF-8"?>
<webstart>

  <!-- all this stuff is required for signing jars, shouldn't take too long to run -->
  <jarsigner>
    <alias>apollo</alias>
    <keypass>apollo</keypass>
    <storepass>apollo</storepass>
    <keystore>apollo_store</keystore>
    <validity>700</validity>
    <!-- you might want to put your name -->
    <commonName>GMOD Summer School 2010</commonName>
    <!-- you might want to put your department name -->
    <organizationUnit>GMOD Summer School 2010</organizationUnit>
    <!-- you might want to put your organization's name -->
    <organizationName>GMOD</organizationName>
    <!-- you might want to put your organization's city -->
    <localityName>Durham</localityName>
    <!-- you might want to put your organization's state -->
    <stateName>NC</stateName>
    <!-- you might want to put your organization's country -->
    <country>USA</country>
  </jarsigner>

  <!-- now we need to populate our jnlp information -->
  <jnlp spec="1.0+">
    <information>
      <title>Apollo</title>
      <vendor>GMOD Summer School 2010</vendor>
      <description>Apollo Webstart</description>
      <!-- location of your project's web page -->
      <homepage href="http://localhost/apollo" />
      <!-- if you want to have WebStart add a specific image as your icon,
            point to the location of the image -->
      <icon href="images/head-of-apollo.gif" kind="shortcut" />
      <!-- create a shortcut on your desktop -->
      <shortcut online="true">
        <desktop />
      </shortcut>
      <!-- allow users to launch Apollo when offline -->
      <offline-allowed />
    </information>
    <!-- request all permissions - might be needed since Apollo will access the local
          file system -->
    <security>
      <all-permissions />
    </security>
    <!-- we require at least Java 1.5, set to start using 64m and up to 500m -->
    <resources>
      <j2se version="1.5+" initial-heap-size="64m" max-heap-size="500m" />
    </resources>
    <!-- where the main method is located - don't change this -->
    <application-desc main-class="apollo.main.Apollo">
        <!-- we can add arguments when launching Apollo - this particular one allows us to
              load chromosome 1, from 11650000 to 11685000 - great way to have Apollo load
              specific regions -->
        <argument>-i</argument>
        <argument>chadodb</argument>
        <argument>-l</argument>
        <argument>scf1117875582023:523000-532000</argument>
    </application-desc>
  </jnlp>
  <webserver>
    <!-- URL where the webstart instance will reside -->
    <url>http://localhost/apollo/webstart</url>
    <!-- relative location to <url> where jars are located -->
    <jar_location>jars</jar_location>
  </webserver>
</webstart>
The nice thing about this template is that you only need to set it up once (assuming you’re not changing the URL or any other option).
The Apache web pages reside at /var/www. We’ll create an Apollo
directory. The directory is only writable by root, so we’ll need to be
root.
$ sudo -s
$ cd /var/www
$ mkdir -p apollo/webstart
$ cd apollo/webstart
Let’s create the file apollo_webstart.xml in the webstart directory
we just created. Now we’ll run the magical script. Note that you’ll need
to have the XML::Twig module installed.
$ ~/Documents/Software/Apollo/bin/webstart_generator.pl -i apollo_webstart.xml \
   -d ~/Documents/Software/Apollo/jars -o apollo.jnlp -D jars
Voila, it was THAT easy. This script took care of signing all the jars
and generating the appropriate jnlp file. Next time, when you make a
change to one of the configurations, you’ll just need to recompile the
apollo.jar and re-run this script.
Lastly, we’ll just create a simple web page to link to the Apollo
WebStart instance. Let’s call it index.html.
 <html>
   <body>
     <a href="apollo.jnlp">Launch Apollo!!!</a>
   </body>
 </html>
One last note, you’ll want to make sure that your web server has support
for jnlp files. With our Apache install, you’ll need to make sure that
you have the following line in your /etc/mime.types file:
application/x-java-jnlp-file jnlp
Now we can test out our Java Web Start instance by going to
http://localhost/apollo/webstart and clicking on the link.
Writing Custom Data Adapters
There’s a bit of work involved with writing a custom data adapter. It will require you to have knowledge of Java and the data model used in Apollo. We won’t have enough time to write one ourselves, but we can briefly discuss how the process works.
All data adapters belong to the apollo.dataadapter package. To build
our own custom data adapter, we need to implement two specific
interfaces: ApolloDataAdapterI.java and org.bdgp.io.DataAdapterUI.
There are abstract classes that implement common methods for both of
those interfaces: AbstractApolloAdapter.java and
org.bdgp.swing.AbstractDataAdapterUI respectively.
ApolloDataAdapterI does the work of parsing the input data. The most
important method for the interface is getCurationSet() which does the
work of returning the data to the logic layer.
ApolloDataAdapterGUI provides the GUI that we see in the Apollo:
load data window. It implements the necessary interfaces and extends
JPanel, so you can build your GUI directly in the class.
We’ll take a look at how to get the sample adapter to work. The code for
the sample adapter is located in apollo.dataadapter.sample package.
Since we just finished building the jar, we have already compiled the
code. So all we need to do is tell Apollo to load the data adapter
plugin. We’ll add the following to apollo.cfg:
DataAdapterInstall "apollo.dataadapter.sample.SampleAdapter" "gmod_summer_school.style" "Sample data adapter"
The first column tells Apollo that we’ll be loading a new data adapter. The second column points to the class for the data adapter. The third column tells which style to associate with this data. The fourth column provides the text that will be displayed in the data adapter pull down menu.
Now if we run Apollo, we’ll see Sample data adapter as one of the options. Lovely!
There’s a roughly written tutorial on how to create your own data
adapter. It covers some information on the data adapter API and the data
model. You’ll want to read that if you’re interested in creating one.
It’s located in $APOLLO_ROOT/doc/html/dataadapter_cookbook.html. You
can also view the
Apollo Javadoc API.
Facts about “Apollo Tutorial 2010”
| Has topic | Apollo + |