GMOD
Tripal Tutorial v1.1
(Redirected from Tripal Tutorial

This Tripal tutorial was presented by Stephen Ficklin at the 2013 GMOD Summer School, July 2013. The most recent Tripal tutorial can be found at the Tripal Tutorial page.
Welcome to the Tripal v1.1 Tutorial. Here you will find instructions for installation, usage and administration of a Tripal-based genome website. This tutorial guides the user through the process of installation, setup and data loading of genomic feature data and annotations.
Note: Tripal is provided free of charge, as-is with no warranty or guarantee of fitness. The developers are committed to creating a platform usable by all and as bug free as possible. However, bugs may be present, especially with the newest features. If you find problems or bugs, please feel free to report them either via the Tripal mailing List or adding a bug report on the Tripal issues tracker.
Contents
- 1 What is Tripal
- 2 Content Management System
- 3 Drupal
- 4 Chado
- 5 Goals of Tripal
- 6 Structure of Tripal
- 7 Sites Running Tripal
- 8 Resources
- 9 Contributing Organizations
- 10 Funding
- 11 Publications
- 12 Pre-planning
- 13 Server Installation
- 14 Database Setup
- 15 Install Drupal
- 16 Drush
- 17 Explore Drupal
- 18 Prepare Drupal for Tripal
- 19 Tripal Installation
- 20 Using
Tripal
- 20.1 Creating Organism Pages
- 20.2 Creating an Analysis
- 20.3 Creating a Database Cross Reference
- 20.4 Loading Feature Data
- 20.5 Creating Feature Pages
- 20.6 Materialized Views
- 20.7 Feature Page Configuration
- 20.8 Loading Functional Data Using Extension Modules
- 20.9 Adding New Resources To Pages
- 20.10 Linking to Resource Blocks
- 20.11 Adding Publications
- 20.12 Drupal Views Integration
- 20.13 Customizing The Look-and-Feel of Tripal
- 20.14 Advanced Features
What is Tripal
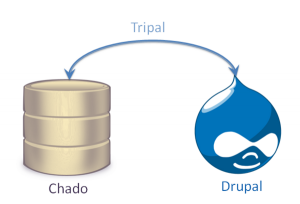
Tripal is a suite of PHP5 modules that bridges the Drupal Content Managment System (CMS) and GMOD Chado. The goal is to simplify construction of a community genomics website to enable individual labs or research communities to construct a high-quality, standards-based website for data sharing and collaboration.
Content Management System
Definition From Wikipedia:
A content management system (CMS) is the collection of procedures used to manage work flow in a collaborative environment. These procedures can be manual or computer-based. The procedures are designed to do the following:
- Allow for a large number of people to contribute to and share stored data
- Control access to data, based on user roles (defining which information users or user groups can view, edit, publish, etc.)
- Aid in easy storage and retrieval of data
- Reduce repetitive duplicate input
- Improve the ease of report writing
- Improve communication between users
In a CMS, data can be defined as nearly anything: documents, movies, pictures, phone numbers, scientific data, and so forth. CMSs are frequently used for storing, controlling, revising, semantically enriching, and publishing documentation. Serving as a central repository, the CMS increases the version level of new updates to an already existing file. Version control is one of the primary advantages of a CMS.
Drupal
Drupal is an open-source freely available CMS with thousands of users and existing sites. Features of Drupal
- A well-supporting community.
- Books, tutorials and online forums for help .
- Hundreds of user-contributed extension modules that are freely available.
- Hundreds of user-contributed themes to instantly change the look-and-feel of the site
- User management infrastructure.
- Allows for non-coding manipulation of the website contents. Anyone can edit content.
- Easy to install and maintain
Drupal website: http://www.drupal.org Drupal modules: http://www.drupal.org/project/modules Drupal themes: http://www.drupal.org/project/themes
Tripal v1.0 is compatible with Drupal v6. This is the final Drupal 6 compatible version. Later releases will be compatible with Drupal v7.
Chado
You can find more detailed information about Chado here: http://gmod.org/wiki/Chado_-_Getting_Started. However, one thing to remember in regards to Tripal organization is that Chado has a modular structure:
- Audit - for database audits
- Companalysis - for data from computational analysis
- Contact - for people, groups, and organizations
- Controlled Vocabulary (cv) - for controlled vocabularies and ontologies
- Expression - for summaries of RNA and protein expresssion
- General - for identifiers
- Genetic - for genetic data and genotypes
- Library - for descriptions of molecular libraries
- Mage - for microarray data
- Map - for maps without sequence
- Organism - for taxonomic data
- Phenotype - for phenotypic data
- Phylogeny - for organisms and phylogenetic trees
- Publication (pub) - for publications and references
- Sequence - for sequences and sequence features
- Stock - for specimens and biological collections
- WWW -
Tripal is also modular along these same designations.
Goals of Tripal
- Simplify Construction of Biological Databases
- Reduce time of development
- Reduce costs
- Reduce technical resources (i.e. programmers, systems admins).
- A non-technical site administrator can add content without knowing PHP, HTML, JavaScript.
- Greater Flexibility of the Biological Website
- Social Networking
- Non-biological content
- Outreach, tutorials, documentation, protocols, publications
- Expandability
- Site can be programmatically expanded in any way
- Changes to base-code are not needed but modules are added.
- Availability of an Application Programmer Interface (API)
- Reusability
- All code can be shared. Expansion modules created by one group can be shared with all.
Structure of Tripal
Tripal is a collection of modules that integrate with Drupal. These modules are divided into hierarchical categories:
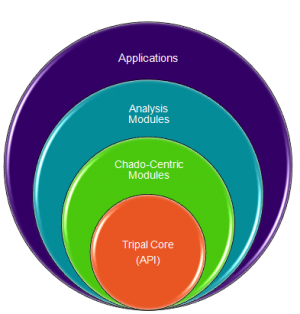
The Tripal Core level contains supportive functionality for all other modules. It contains
- A jobs management utility
- A utility to manage materialized views
- An API for these features
- Functions for managing module specific CV terms
- Functions for interfacing with Chado.
The Chado-centric modules provide:
- Edit/Update/Delete for Chado modules.
- Bulk loaders for these data
- Basic visualizations for data in Chado specific for the module
- An API for easily accessing Chado.
Analysis modules provide
- Custom visualization for specific analyses (e.g. Blast, KEGG, InterProScan, Unigene construction)
- Uses the API from the Tripal Analysis (Chado-centric) module.
Applications:
- These are full blown applications that use Tripal, Drupal and Chado and typically consist of several Chado-centric modules, Analysis modules and custom built modules. (e.g. Breeders Toolbox currently under construction).
Sites Running Tripal
| Site Name | URL |
|---|---|
| Banana Genome Hub | <a href=”http://banana-genome.cirad.fr/” class=”external free” |
| rel=”nofollow”>http://banana-genome.cirad.fr/</a> | |
| Pulse Crops Genomics & Breeding | <a href=”http://knowpulse2.usask.ca/portal/” class=”external free” |
| rel=”nofollow”>http://knowpulse2.usask.ca/portal/</a> | |
| Genome Database for Vaccinium | <a href=”http://www.vaccinium.org” class=”external free” |
| rel=”nofollow”>http://www.vaccinium.org</a> | |
| Genome Database for Rosacaee | <a href=”http://www.rosaceae.org” class=”external free” |
| rel=”nofollow”>http://www.rosaceae.org</a> | |
| Cool Season Food Legume Database | <a href=”http://www.gabcsfl.org” class=”external free” |
| rel=”nofollow”>http://www.gabcsfl.org</a> | |
| Cacao Genome Database | <a href=”http://www.cacaogenomedb.org” class=”external free” |
| rel=”nofollow”>http://www.cacaogenomedb.org</a> | |
| Fagaceae Genome Web | <a href=”http://www.fagaceae.org” class=”external free” |
| rel=”nofollow”>http://www.fagaceae.org</a> | |
| Citrus Genome Database | <a href=”http://www.citrusgenomedb.org” class=”external free” |
| rel=”nofollow”>http://www.citrusgenomedb.org</a> | |
| Marine Genomics Project | <a href=”http://www.marinegenomics.org” class=”external free” |
| rel=”nofollow”>http://www.marinegenomics.org</a> |
Resources
The Tripal home site where you can find everything about Tripal: http://tripal.info
GMOD Tripal mailing lists: http://gmod.org/wiki/GMOD_Mailing_Lists
GMOD Tutorials from previous GMOD schools: http://gmod.org/wiki/Tripal
Contributing Organizations
Individuals from these organizations have provided design and coding for Tripal v1.1
![]()
![]()
Acknowledgments are extended to the Clemson University Genomics Institute where Tripal was first conceived and where development of earlier releases was performed.
![]()
Also, special thanks are extended to the GMOD project for logistical support and community interaction!!
Funding
Funding for Tripal v1.0 has been provided through various grants from various sources.
Publications
- Lacey-Anne Sanderson, Stephen. P. Ficklin, Chun-Huai Cheng, Sook Jung, Frank A. Feltus, Kirstin E. Bett, Dorrie Main. Tripal v1.1: a Standards-based Platform for Construction of Online Genetic and Genomic Databases”. Submitted for review June 2013.
- Stephen P. Ficklin, Lacey-Anne Sanderson, Chun-Huai Cheng, Margaret Staton, Taein Lee, Il-Hyung Cho, Sook Jung, Kirstin E Bett, Dorrie Main. Tripal: a construction Toolkit for Online Genome Databases. Database, Sept 2011. Vol 2011.
Pre-planning
IT Infrastructure
Tripal requires a server with adequate resources to handle the expected load and systems administration skills to get the machine up and running, applications installed and everything properly secure. Tripal requires a PostgreSQL databases server, Apache (or equivalent) web server, PHP5 and several configuration options to make it all work. However, once these prerequisites are met, working with Drupal and Tripal are quite easy.
There are four ways you could get a Tripal/Drupal/Chado database web server available for your site
- Option #1 In-house dedicated servers: You may have access to servers in your own department or group which you have administrative control and wish to install Tripal/Drupal/Chado on these.
- Option #2 Institutional IT support: Your institution may provide IT servers and would support your efforts to install a website with database backend.
- Option #3 Commercial web-hosting: If options #1 and #2 are not available to you, commercial web-hosting is an affordable option. For large databases you may require a dedicated server. Bluehost.com is a web hosting service that provides hosting compatible with Drupal, Tripal and its dependencies.
- Option #4 In the Cloud: Tripal is a part of the GMOD in the cloud Amazon AWS image created by GMOD. It is also accompanied by other GMOD tools such as GBrowse2, JBrowse, Apollo and WebApollo.
After selection of one of the options above you can arrange your database/webserver in the following ways:
- Arrangement #1: The database and web server are housed on a single server. This is the approach taken by this course. It is necessary to gain access to a machine with enough memory (RAM), hard disk speed and space, and processor power to handle both services.
- Arrangement #2: The database and web server are housed on different servers. This provides dedicated resources to each service (i.e. web and database).
Selection of an appropriate machine
Databases are typically bottle-necked by RAM and disk speed. Selection of the correct balance of RAM, disk speed, disk size and CPU speed is important and dependent on the size of the data. The best advice is to consult an IT professional who can recommend a server installation tailored for the expected size of your data.
Note: Tripal does require command-line access to the web server with adequate local file storage for loading of large data files. Be sure to check with your service provider to make sure command-line access is possible.
Technical Skills
Depending on your needs, you may need additional Technical support….
Tripal already supports my data, what personnel to I need to maintain it?
- Someone to install/setup the IT infrastructure
- Someone who understands the data to load it properly
Tripal does not yet support all of my data, but I want to use what’s been done and expand on it….?
- Someone to install/setup the IT infrastructure
- Someone who understands the data to load it properly
- PHP/HTML/CSS/JavaScript programmer(s) to write your custom extensions
Why Use Tripal
Tripal v1.1 provides default views for most Chado data types. It also support all of Chado in terms of data access. So why use Tripal?
- You want to use a community-supported common database infrastrcure (i.e. Chado).
- You need a web interface but do not want to build one from scratch.
- You need content-management capabilities (distributed content editing, user management, social networking… i.e. Drupal)
- You want to contribute to a community effort to help build a tool others can use.
- You want to participate in a community with other database developers using the same technology and confronting similar problems.
- You want to use open-source and free technology!
Development and Production Instances
It is recommended that you have separate development and production instances of Tripal. The staging or development instance allows you to test new functionality, add customizations, or test modification or additions to data without disturbing the production instance. The production instance serves content to the rest of the world. Once you are certain that customizations and new functionality will work well on the development instance you can easily re-implement or copy these over to the production site. Sometimes it may take a few trials to load data in the way you want. A development sites lets you take time to test data loading prior to making it public. The development site can be password-protected to allow only access only to site administrators, developers or collaborators.
Server Installation
The following instructions are for setup of Tripal on an Ubuntu version 12.04 server edition. When possible, alternative command-line statements have been added to this tutorial as users of other Linux version have provided feedback. Unless specifically identified, all commands are for Ubuntu 12.04 linux.
During installation of the Ubuntu 12.04 server please select the following software packages for installation:
- OpenSSH server
- LAMP (includes Apache and PHP)
- PostgreSQL database version 8.4 or higher
After installation the Ubuntu Unity Desktop can be installed. For the virtual machine image that accompanies this tutorial, the following command was issued to install the desktop:
sudo apt-get install ubuntu-desktop
Reboot your server after installation of the Ubuntu Desktop.
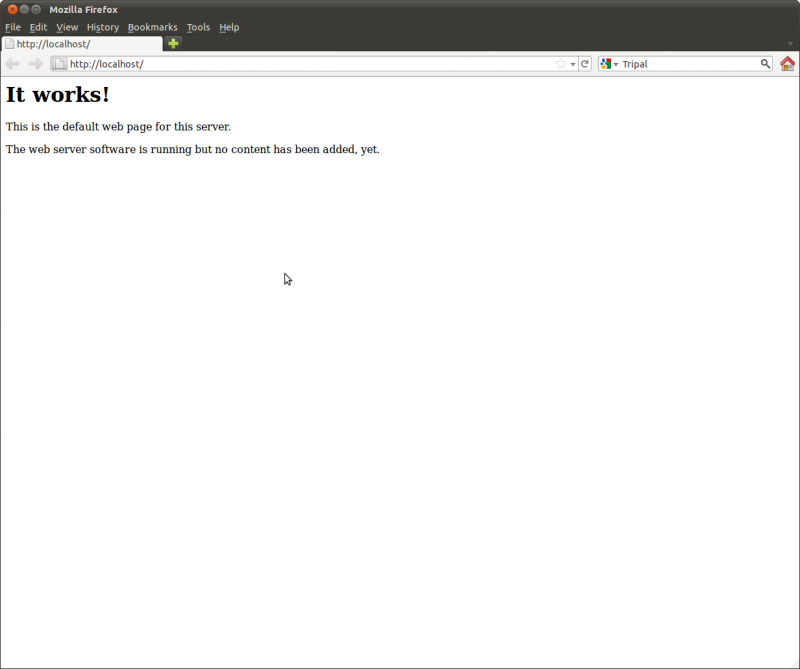
Apache Setup
Apache is the web server software. Apache should be installed. On the Ubuntu server, navigate to your new website using this address: http://localhost/. You should see the text “It works!”.
Enable the rewrite module for apache. This is useful so that we can use Clean URLs with Drupal. Clean URLs are not required but make the page URLs easier to use. We’ll discuss clean URLs later.
   cd /etc/apache2/mods-enabled
   sudo ln -s ../mods-available/rewrite.load
Next we need to edit the apache configuration file to give Drupal full controls of options within the directory root. Edit the /etc/apache2/sites-available/000-default file:
   cd /etc/apache2/sites-available/
   sudo gedit default
And change the AllowOverride option from None to All:
   <Directory /var/www/>
      Options Indexes FollowSymLinks MultiViews
      AllowOverride All
      Order allow,deny
      allow from all
   </Directory>
Now restart your apache again.
sudo /etc/init.d/apache2 restart
Setup PHP
PHP comes loaded onto the server, but we need a few other packages:
 First install php5 using
Ubuntu’s apt-get utility:
First install php5 using
Ubuntu’s apt-get utility:
   sudo apt-get install php5-pgsql
   sudo apt-get install php5-gd
For newer versions of Ubuntu (e.g. 13.10) you will also want to install the php5-json package:
sudo apt-get install php5-json
![]() For Suse Linux you may need
to install the php-posix package:
For Suse Linux you may need
to install the php-posix package:
yum install php-posix
![]() For RedHat
Linux you may also need to install the php-process package:
For RedHat
Linux you may also need to install the php-process package:
yum install php-process
Change some php settings (as root):
   cd /etc/php5/apache2
   sudo gedit php.ini
Set the memory_limit to something larger than 128M (should not
exceed physical memory, be conservative but not too much so):
memory_limit = 2048M;
Now, restart the webserver:
sudo /etc/init.d/apache2 restart
Install phpPgAdmin
phpPgAdmin is a nice web-based utility for easy administration of a PostgreSQL database. Note: PhpPgAdmin is not required for successful operation of Tripal but is very useful.
sudo apt-get install phppgadmin
Next, we need to make changes to the configuration settings so that we can remotely access phppgadmin. To do this, edit the phppgadmin config file for apache:
   cd /etc/apache2/conf.d
   sudo gedit phppgadmin
Now, comment out the line that allows access to the local server only, and uncomment the line that allows access to anyone.
#allow from 127.0.0.0/255.0.0.0 ::1/128
allow from all
We also want to password protect PhpPgAdmin using Apache’s access control mechanisms. we need to instruct Apache to use password protection for PhpPgAdmin. To do this add the following lines within the Directory stanza just below the line we just uncommented:
AuthType Basic
AuthName "Password Required"
AuthUserFile /usr/share/phppgadmin/.htpasswd
Require User tripaladmin
The lines above instruct apache to use basic authentication, that the password file is located at /usr/share/phppgadmin/.htpasswd and the only user allowed to login is ‘tripaladmin’. Save the configuration file. Next we need to create the password file:
   cd /usr/share/phppgadmin
   sudo htpasswd -c .htpasswd tripaladmin
The htpasswd command above will create the .htpasswd file and add the new user ‘tripaladmin’. You will need to set a password when requested. Finally, restart the webserver:
sudo /etc/init.d/apache2 restart
Now navigate to the URL [http://localhost/phppgadmin] and you should see the following:
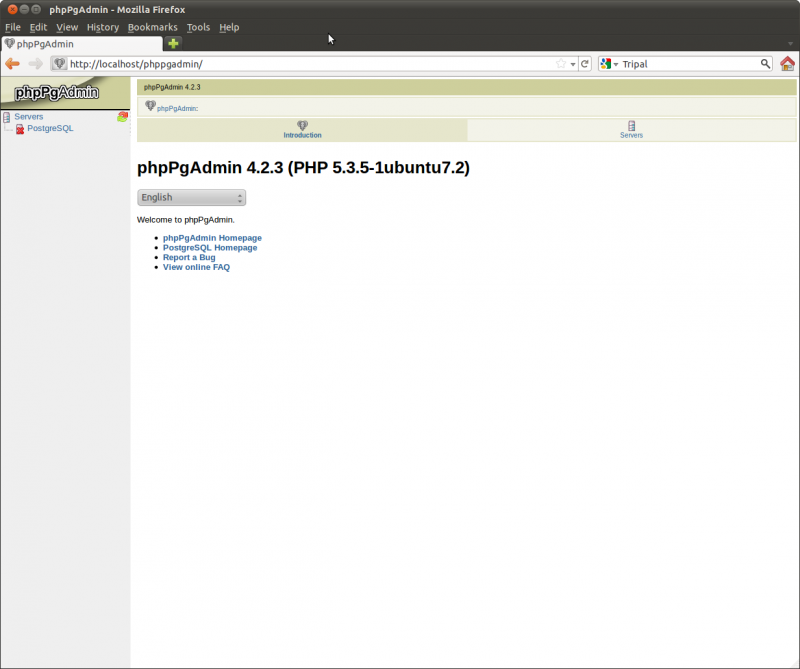
The username ‘tripaladmin’ and the password you specified should be required when accessing the PhpPgAdmin page.
Database Setup
Drupal can run on a MySQL or PostgreSQL database but Chado prefers PostgreSQL so that is what we will use for both Drupal and Chado. We need to create the Drupal database. The following command can be used to create a new database user and database.
First, become the ‘postgres’ user:
sudo su - postgres
Next, create the new ‘drupal’ user account. This account will not be a “superuser’ nor allowed to create new roles, but should be allowed to create a database.
createuser -P drupal
When requested, enter an appropriate password:
  Enter password for new role: *********
  Enter it again:  *********
  Shall the new role be a superuser? (y/n) n
  Shall the new role be allowed to create databases? (y/n) y
  Shall the new role be allowed to create more new roles? (y/n) n
Finally, create the new database:
createdb drupal -O drupal
We no longer need to be the postgres user so exit
exit
Install Drupal
Software Installation
We want to install Drupal into our web document root (/var/www). We
want to be able to do this as our ‘ubuntu’ user. So, first, set the
directory permissions to allow this:
  cd /var
  sudo chown -R ubuntu www
  sudo chgrp -R ubuntu www
In the command above we set the owner and group of the directory to be ubuntu (our user group).
Tripal currently requires version 6.x of Drupal. Drupal can be freely downloaded from the http://www.drupal.org website. At the writing of this Tutorial the most recent version of Drupal 6 is version 6.28. The software can be downloaded manually from the Drupal website through a web browser or we can use the ‘wget’ command to retrieve it:
   cd /var/www
   wget http://ftp.drupal.org/files/projects/drupal-6.28.tar.gz
Note: The current version of Drupal is Drupal 7.x. The major release v1.1 of Tripal is the final major release that will be compatible with Drupal 6.x. Future major releases of Tripal will be compatible with Drupal 7.x.
Next, we want to install Drupal. We will use the tar command to uncompress the software:
  cd /var/www
  tar -zxvf drupal-6.28.tar.gz
Notice that we now have a drupal-6.28 directory with all of the Drupal
files. We want the Drupal files to be in our document root, not in a
‘drupal-6.28’ subdirectory. So, we’ll move the contents of the directory
up one level:
mv drupal-6.28/* ./
mv drupal-6.28/.htaccess ./
mv index.html index.html.orig
Note: It is extremely important the the hidden file .htaccess is
also moved (note the second ‘mv’ command above. Check to make sure this
file is there
ls -l .htaccess
Notice that the last of the three mv commands renames the index.html
file and calls it index.html.orig. The index.html file was serving
as the home page for the website. Drupal uses an index.php page for
it’s home page but the web server has preference for the index.html
page. So, we move it out of the way.
Configuration File
Next, we need to tell Drupal how to connect to our database. To do this we have to setup a configuration file. Drupal comes with an example configuration file which we can borrow.
First navigate to the location where the configuration file should go:
cd /var/www/sites/default/
Next, copy the example configuration that already exists in the
directory to be our actual configuration file by renaming it to
settings.php.
cp default.settings.php settings.php
Now, we need to edit the configuration file to tell Drupal how to connect to our database server. To do this we’ll use an easy to use text editor gedit
gedit settings.php
Find the variable $db_url and set it to this
$db_url = 'pgsql://drupal:********@localhost/drupal';
Replace the text ‘********’ with your database password for the user ‘tripal’ created previously.
Final directory creation
Finally, we need to create three new directories. The first is the
files directory which Drupal uses for storing uploaded files.
  cd /var/www/sites/default
  mkdir files
  sudo chown ubuntu:www-data files
  sudo chmod g+rw files
The above command creates the directory but sets the group to be the web server (i.e. www) with read/write permissions. This way the web server can write to the directory but so can we.
Also, we need to create two new directories, one for storing module files we’ll be installing and another for themes which we’ll also be installing later:
Now create the modules and themes directory
  cd /var/www/sites/all
  mkdir modules
  mkdir themes
Compatibility with other tools
We want to ensure that our Drupal installation doesn’t interfere with
other web-based tools, such as GBrowse. We need update a setting in the
.htaccess file that came with Drupal which instructs the web server to
look for both index.php and index.html files when serving pages.
Use ‘gedit’ to modify the /var/www.htaccess file.
   cd /var/www
   gedit .htaccess
Locate the line DirectoryIndex and change it to mach the following:
DirectoryIndex index.php index.html
Web-based Steps
Navigate to the installation page of our new web site http://localhost/install.php
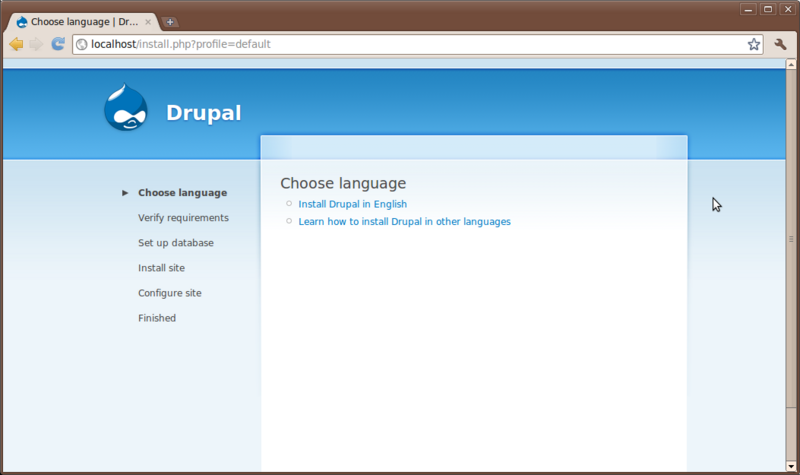
Click the link in the middle section that reads Install Drupal in English
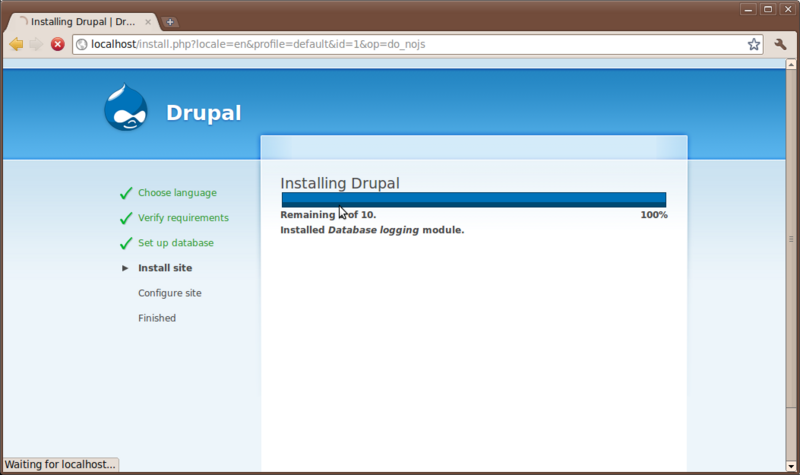
When the progress bar shows completing the page will switch to a configuration page with some final settings.

Set the following
- Site Name: Tripal Demo
- Site email: Your email address
- Administrator Username: administrator (all lower-case)
- Administrator Email: Your email address
- Password: ********
- Default time zone: leave as is
- Clean URLs: enabled
- Update Notification: check for updates automatically
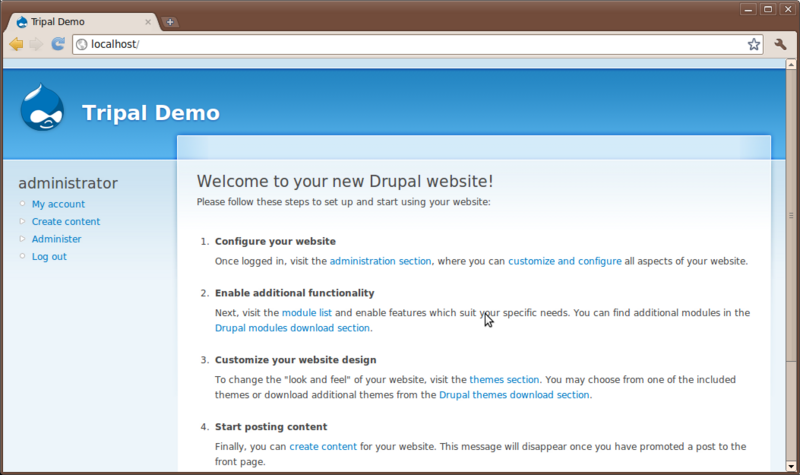
Now, click the Save and Continue button. You will see a message about unable to send an email. This is safe to ignore as email capabilities are not fully enabled on this VMWare image. Now, your site is enabled. Click the link Your new site:
Drupal Cron Entry
The last step for installing Drupal is setting up the automatted Cron entry. The Drupal cron is used to automatically execute necessary housekeeping tasks on a regular interval. Cron is a UNIX facility for scheduling jobs to run at specific intervals.
Drupal itself requires an entry in the crontab to function. To edit the cron launch the crontab editor:
sudo crontab -e
A word on text editors such as nano.
Add this line to the crontab
0,30 * * * * /usr/bin/wget -O - -q http://localhost/cron.php > /dev/null
Now save the changes. We have now added a UNIX cron job that will occur
every 30 minutes that will execute the cron.php script and cause
Drupal to perform housekeeping tasks.
Drush
Drush is a command-line utility that allows for non-graphical access to the Drupal website. You can use it to automatically download and install themes and modules, clear the Drupal cache, upgrade the site and more. Tripal v1.0 supports Drush. For this tutorial we will use Drush and therefore we want the most recent version installed. Drush can be found on the Drupal website at http://drupal.org/project/drush.
To install drush first retrieve the most recent version from it’s Drupal project page. The current version at the writing of this document is version 7.x-5.9. While this version is intended for use with Drupal 7, it is backwards compatible with Drupal 6 and provides the most functionality.
We want Drush to reside in /usr/local which is where 3rd party software is normally installed. We’ll download the package to /usr/local/src and uncompress into /usr/local:
  cd /usr/local/src
  sudo wget http://ftp.drupal.org/files/projects/drush-7.x-5.9.tar.gz
  cd /usr/local
  sudo tar -zxvf src/drush-7.x-5.9.tar.gz
Next, we want the operating system to know about drush. We’ll create a symbolic link to the Drush executable in the /usr/local/bin directory where the operating systems looks for executables:
sudo ln -s /usr/local/drush/drush /usr/local/bin/drush
Finally Drush needs to perform updates the first time it is run, so we’ll run it with elevated privileges (using sudo) so that it can perform it’s updates. In the future we no longer need ‘sudo’ to run drush:
sudo drush
You must always run drush commands within the Drupal installation. It does not matter what subdirectory so long as you are in the Drupal directory sturcture. To see a list of available commands type the following:
  cd /var/www/
  drush
Explore Drupal
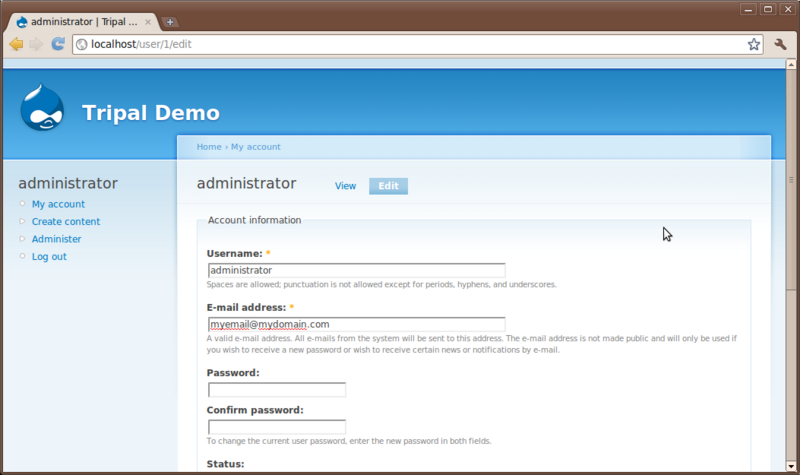
User Account Page
All users have an account page. Currently, we are logged in as the administrator. The account page is simple for now. Click the My account link on the left sidebar. You’ll see a brief history for the user and an Edit tab. Users can edit their own information using the edit interface:
Creating Content
Creation of content in Drupal is very easy. Click the Create content link on the left sidebar.
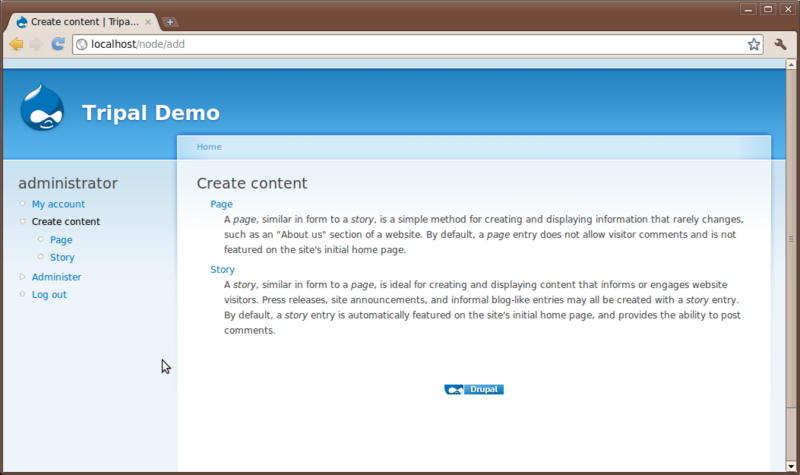
You’ll see two content types that come default with Drupal: Page and Story. Here is where a user can add simple new pages to the website without knowledge of HTML or CSS. Click the Page content type to see the interface for creating a new page:
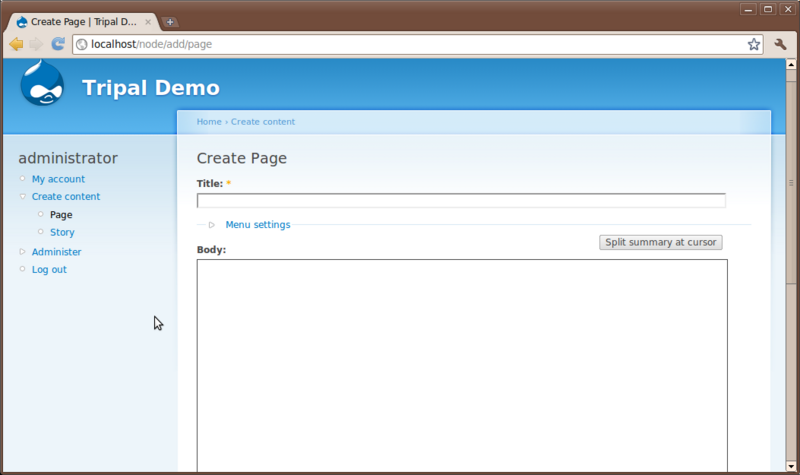
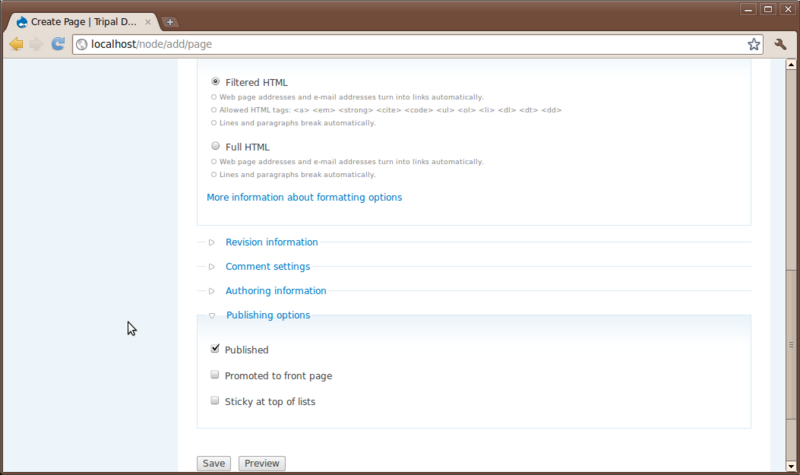
You’ll notice at the top a Title field and a Body text box. All pages require a title and typically have some sort of content entered in the body. Additionally, there are other options that allow someone to enter HTML if they would like, save revisions of a page to preserve a history and to set authoring and publishing information.
For practice, try to create two new pages. A Home page and an About page for our site. First create the home page and second create the about page. Add whatever text you like for the body.
Site Administration
Content Management
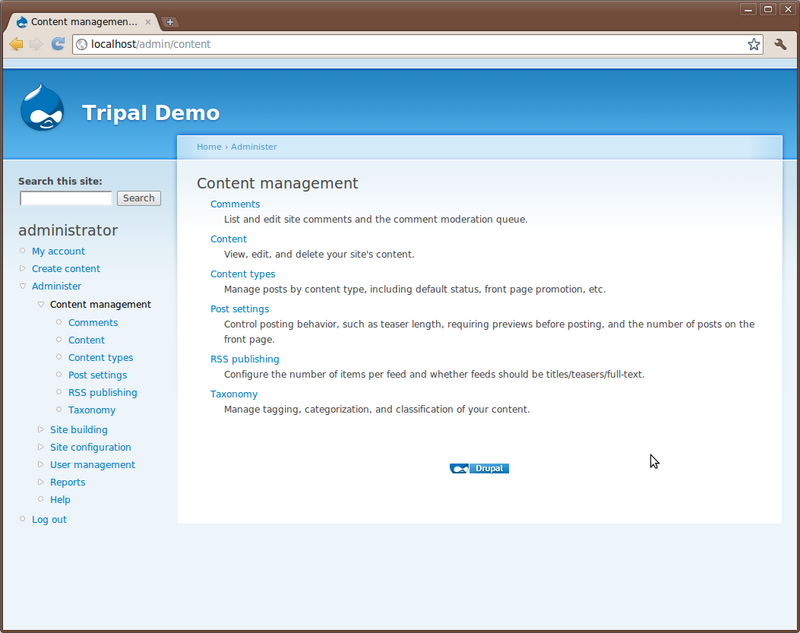
There are many options under the Administer link on the left sidebar. Here you can manage the site setup, monitor and control content, manage users and view reports.
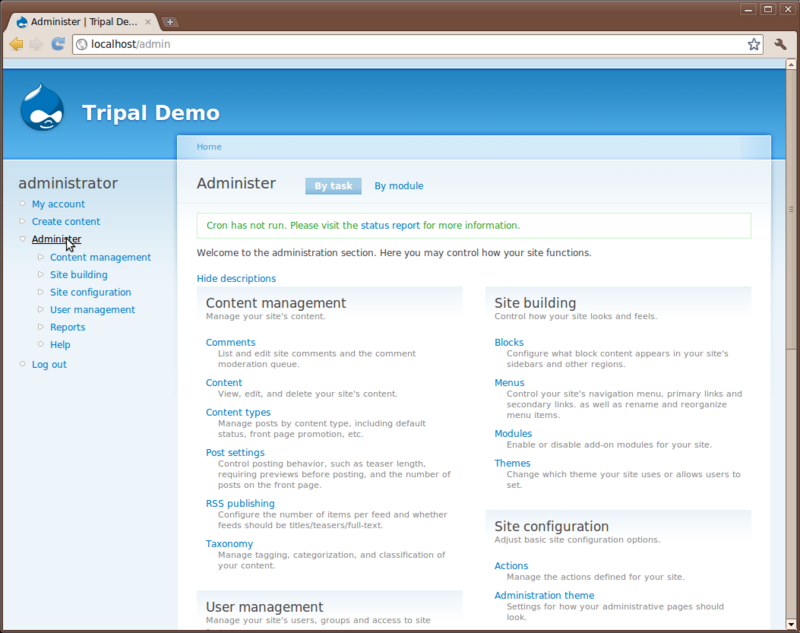
We will not explore all of the options here but will visit a few of the more important ones for this tutorial. First, click the Content Management link on the left sidebar. You’ll see different options.
Click the Content link. The page shows all content available on the site. You will see the “About” and “Home” pages you created previously:
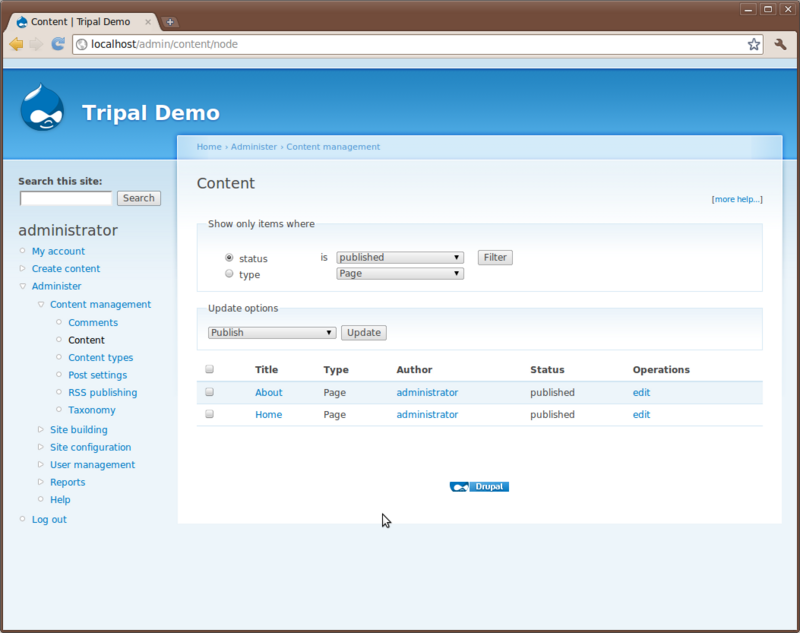
You’ll also notice a set of drop down boxes for filtering the content. For sites with many different content types and pages this helps to find content. You can use this list to click to view each page or to edit.
Site Building
Modules
Click the Site Building link on the let sidebar under the Administer link. You’ll see several new menu options: Blocks, Menus, Modules and Themes. First click Modules
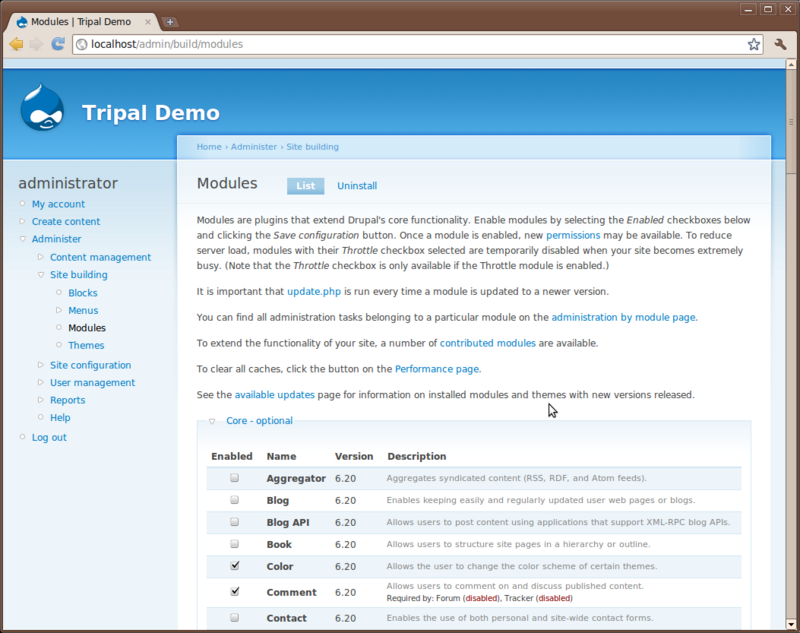
Here is where you will see the various modules that make up Drupal. Take a minute to scroll through the list of these and read some of the descriptions. The modules you see here are core modules that come with Drupal. Those that are checked come pre-enabled. Those that are not checked we will need to install. For this tutorial we will need two additional modules that are not yet installed. Locate the modules Path and Search and check the box next to each of those. Scroll to the bottom and click ‘Save configuration’.
The Path and Search modules are now installed. The Search module enables site-wide searching capabilities for our site and the Path module enables alternative naming of page URLs (we will discuss later).
Themes
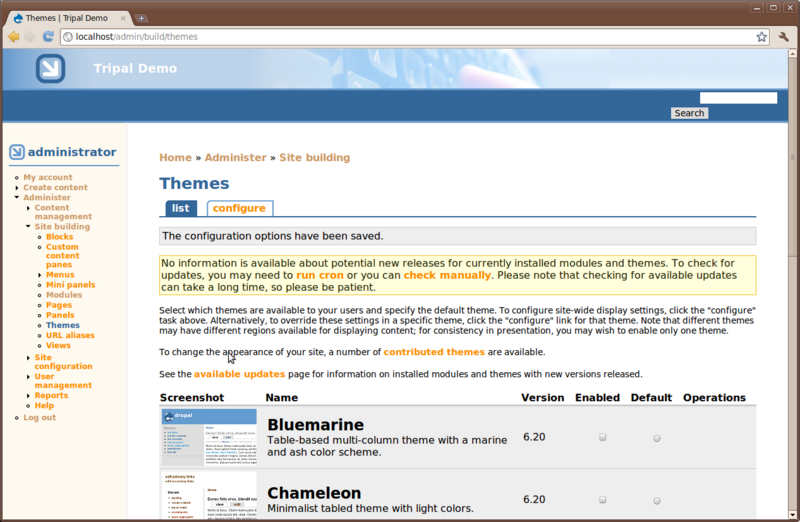
Next, click the Themes link under Administer → Site Building on the left sidebar.
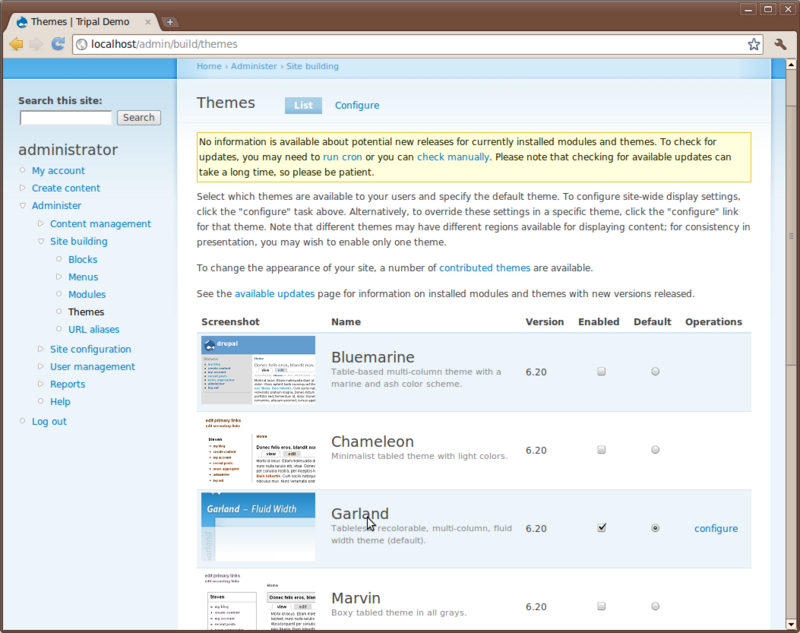
Here, you’ll see a list of themes that come with Drupal by default. If you scroll down you’ll see that one theme named Garland is enabled and set as default. The current look of the site is using the Garland them. Change the them by checking the Enable checkbox and the default radio button for the Pushbutton theme and then clicking Save configuration. Now you’ll see that the theme has changed.
Blocks
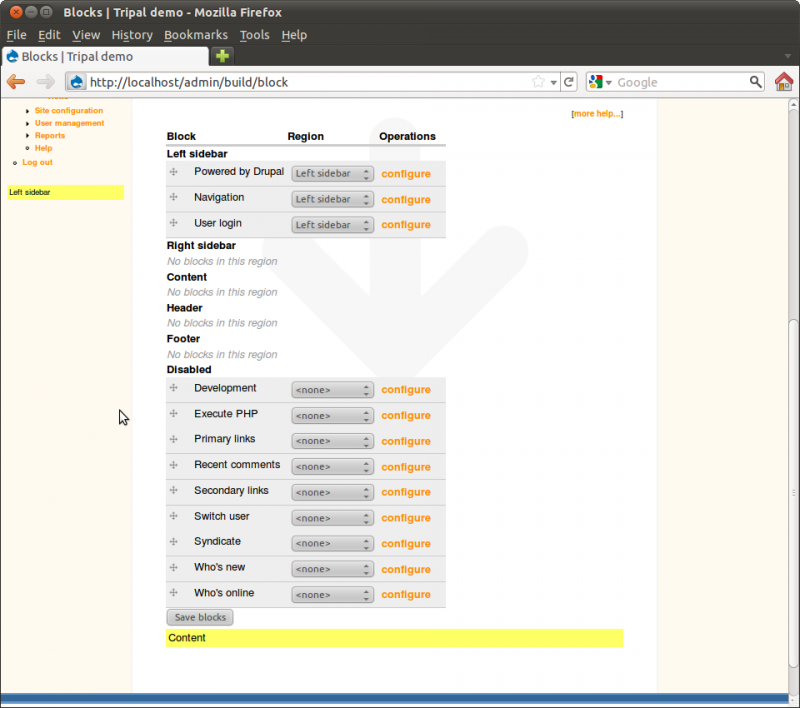
Blocks in Drupal are used to provide content in regions of a Drupal theme. For example, navigate to Adminster → Site Building → Blocks.
You’ll see that regions of the theme have been identified. Within the Sky theme you can see the regions with dashed lines around them. Also, you’ll see a list of available blocks. You can select where blocks will appear by selecting the region in the drop down list. Blocks may also be hidden, if desired, by selecting <none> in the dropdown.
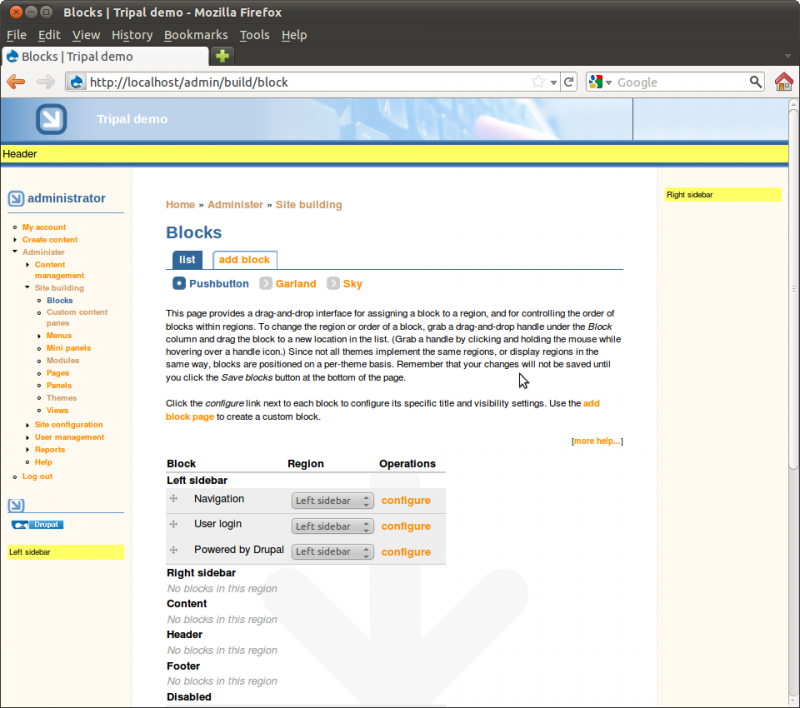
Take time to turn on and off blocks to see where they appear. Re-arrange blocks by dragging and dropping the cross-hairs beside each one. Be sure to leave the blocks in the configuration shown in the image below finished:
Menus
Drupal provides an interface for working with menus, including adding new menu items to an existing menu or for creating new menus. For the exercise in the Blocks section above we added the Primary links menu to the Content top section of the Sky theme. To view the Primary links menu, navigate to Administer → Site building → Menus.
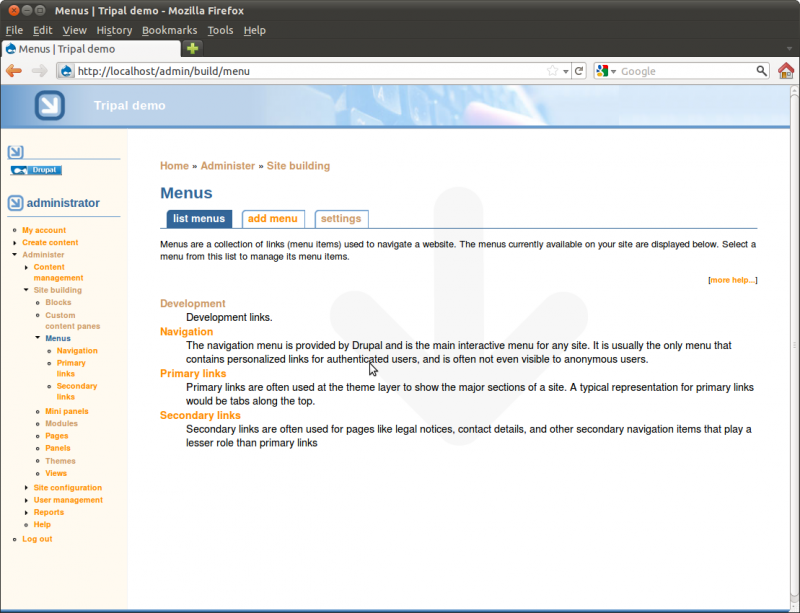
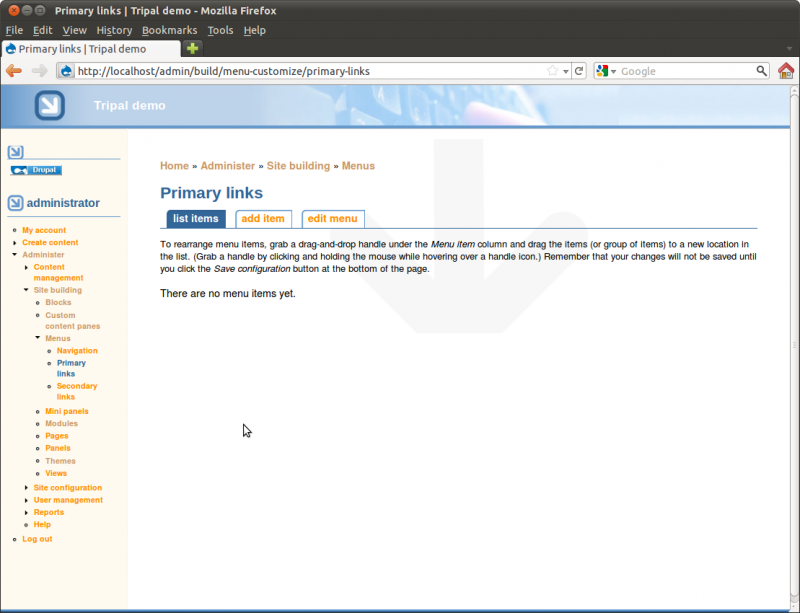
Select the menu Primary links. You’ll see it currently has no item.
As a demonstration for working with menus we’ll add two menu items for the Home and About pages we created earlier. To do so, click the Add item tab. You will see a form for providing information about the menu item to be added.
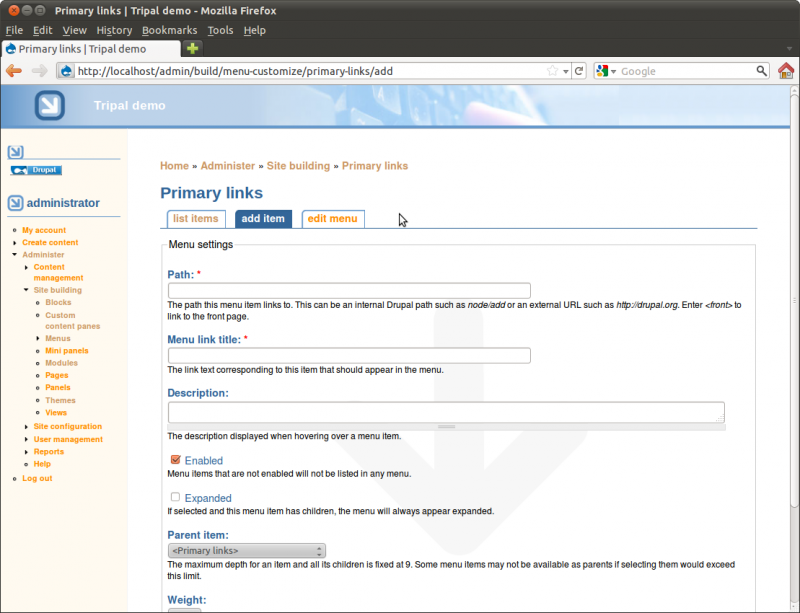
The first field is the path. We need to find the path for our home page.
The path for a page can be found in the address bar for the page. In Drupal pages of content are generally referred to as nodes. So, in the address bar for our home page you’ll see the address is http://localhost/node/1. Our about page should be http://localhost/node/2 (i.e the first and second pages we created).
The path for each of these nodes is simply node/1 and node/2.
Returning to our tab where we are adding a menu item, enter the path
node/1. We will set the fields in this ways:
- Path: node/1
- Menu Link Title: Home
- Description: Tripal Demo Home Page
- Enabled: checked
- Expanded: no check
- Parent item: <primary links>
- Weight: 0
The settings above will give the menu link a title of Home and put it on the Primary Links menu. We now have a Home menu item in the top just under the header, and our Home menu item now appears in the list of menu items for the Primary Links menu
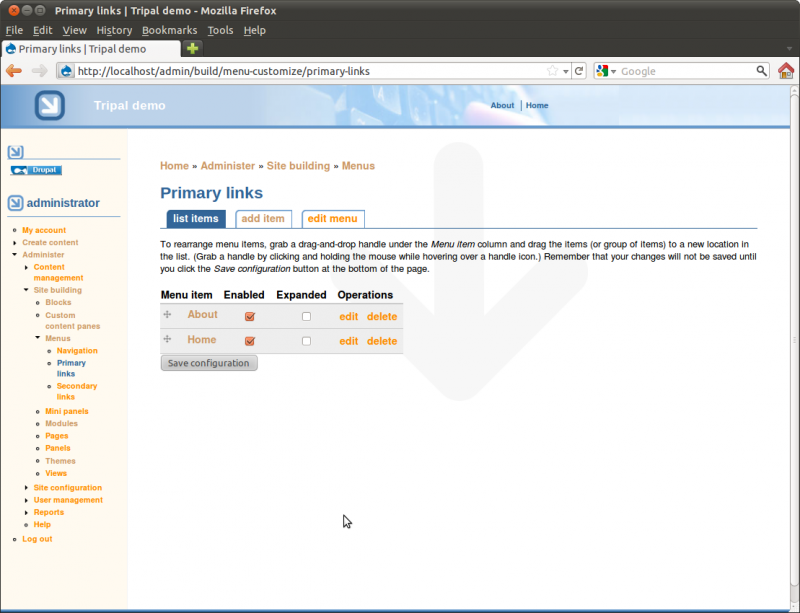
Using the insructions above to add a second menu item for our about page and arrange. Use the ‘weight’ value so that our Home link appears first and the About link appears second.
URL Path
As mentioned previously, the URL paths for our pages have node/1 and
node/2 in the address. This is not very intuitive for site visitors.
Earlier we enabled the Path module. This module will allow us to set
a more human-readable path for our pages.
To set a path, click on our new About page in the new menu link at the top and click the Edit tab. Scroll to the bottom of the edit page and you’ll see a section titled URL path setting. click to open this section.
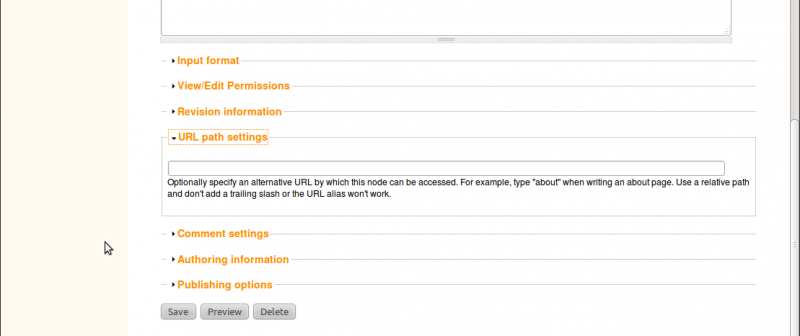
Since this is our about page, we simply want the URL to be http://localhost/about. To do this, just add the word about in the text box. You will now notice that the URL for this page is no longer http://localhost/node/2 but now http://localhost/about. Although, both links will still get you to our About page.
Now, use the instructions described above to set a path of ‘home’ for our home page.
Site Configuration
There are many options under the Administer → Site configuration page. Here we will only look at one of these at the moment–the Site Information page.
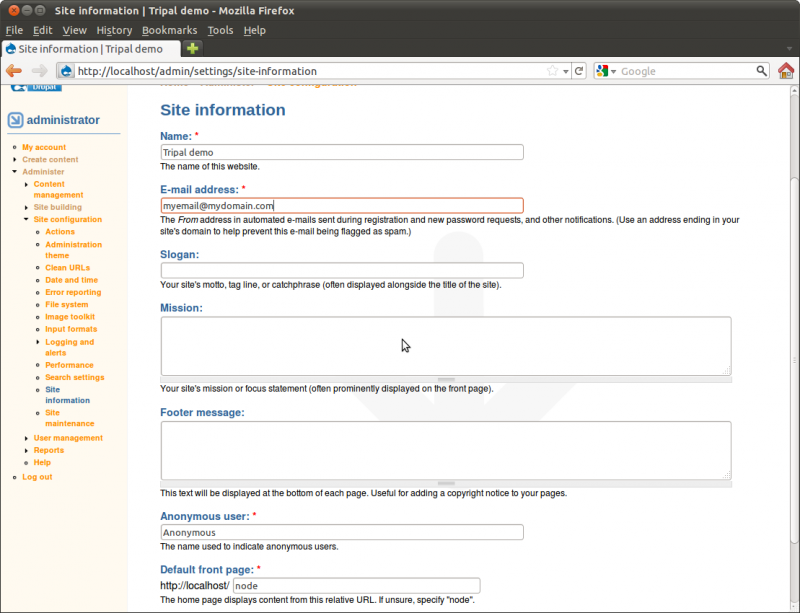
Here you will find the configuration options we set when installing the
site. You can change the site name, add a slogan, mission and footer
text to the. Towards the bottom there is a text box titled Default
front page. This is where we can tell Drupal to use our new Home
page we created as the first page visitors see when the view the site.
In this text box enter the text node/1. This is the address of our
home page. We must use the node number here and not our new URL path of
‘home’ that we just created. Let’s change the name of our site from
Tripal demo to My Community Genome Database and add a slogan:
Resources for Community Genomics.
Now, click the Save configuration button at the bottom. You’ll see our site name has changed at the top. Also, if we click the logo image at the top of the site and it will take you to the front page with our new home page appearing.
User Accounts
For this tutorial, we will not discuss in depth the user management infrastructure except to point out:
- User accounts can be created
- Users are assigned to various roles
- Permissions for those roles can be set to allow groups of users certain administrative rights or access to specific data.
Explore the Drupal User Management menu to see how users can be created, added to roles with specific permissions.
Prepare Drupal for Tripal
Theme Installation
Drupal allows us to install new themes. Installation of themes involves these steps:
- Locate and download a theme from the Drupal website (http://www.drupal.org/themes)
- Unpack the theme in the /var/www/sites/all/themes directory
- Return to the Drupal Administer → Site Building → Themes page and enable the theme
For this tutorial, we will use the Sky theme which is available from http://drupal.org/project/sky. We can use the drush utility to download the theme
  cd /var/www/sites/all/themes
  drush pm-download sky
This should unpack the theme for us. Now, navigate to Administer → Site Building → Themes and enable the ‘Sky’ theme and set it as default:

The sky theme was obtained at this address: http://drupal.org/project/sky
Theme Configuration
Here we return to theming. There are several configuration options that are available to help customize the theme for your site. These can be found by navigating to the Administer → Site Building → Themes page and clicking the Configure tab near the top.
Appearing under the Configure link will be small menu with a listing of every theme we have enabled. You should see the Sky theme at the end of this list. Click that theme because that is the one we are using and want to configure:
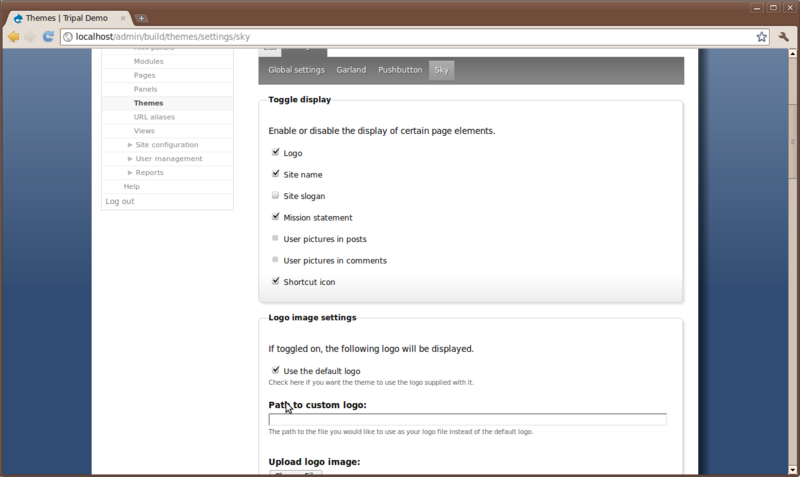
Here you can turn on and off the presence of the logo, site name, slogan, mission statement, etc. For this particular theme we can also adjust background colors and images, link colors, font style and size, and more. Notice when we added a slogan in a previous step but it did not appear anywhere on the site. To make it appear, check the box next to Slogan.
Also set the following for the theme:
- Set the ‘Custom Layout Width’ to be 90% to give us more room
Then, click the Save Configuration button at the bottom. The pages inow a bit wider and our slogan appears.
3rd Party Modules
We can install new extension modules which we will need later. For this workshop we have several modules that we will need to install but which do not yet appear in the list of modules. To do this, we must follow these steps:
- Locate the extension modules from the Drupal website
- Retrieve the module using a drush command.
- Check for a README.txt or INSTALL.txt for any further instructions for installation of the module
- Return the the Drupal Administer → Site Building → Modules page and enable the module.
For an example, let’s install the Views module needed for this workshop. The Views module can be found here: http://drupal.org/project/views. We will download the current version as of the writing of this tutorial:
  cd /var/www/sites/all/modules
  drush pm-download views
Check the README for additional installation instructions
  cd views
  ls
  less README.txt
Use the space-bar to scroll through the README.txt file. Hit the ‘q’ key to quit
There are no other installation steps besides what we’ve done. So return to the Administer → Site Building → Modules page and enable the Views module.
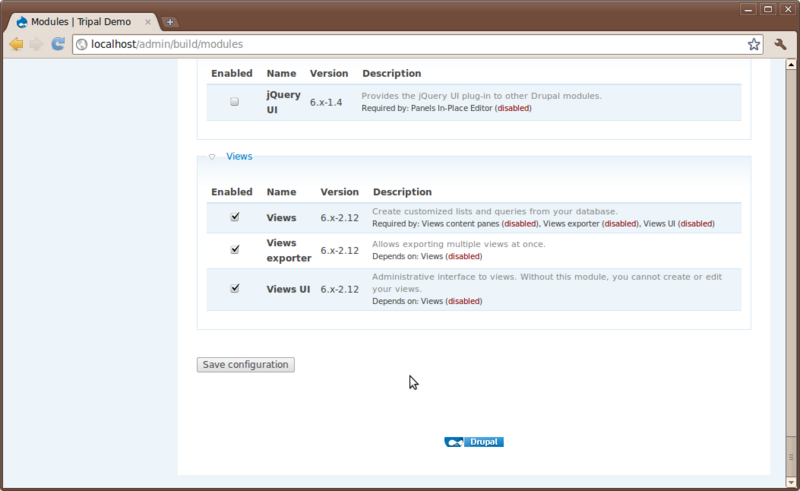
Notice that the Views package provided three different related modules and they all appear under a Views category.
Alternatively, you can enable the module using another drush command:
drush pm-enable views views_ui views_export
for this Tutorial, CCK, Views, Views Data Export, JQuery update, and CKEditor should also be downloaded and installed following the same instructions above
drush pm-download views
drush pm-download views_data_export
drush pm-download cck
drush pm-download jquery_update
drush pm-download ckeditor
For CKEditor, the README file indicates we need to install the CKEditor library before we can enable this module. We must first get this package from online.
Here is a quick command for downloading this file
  cd /var/www/sites/all/modules/ckeditor
  wget http://download.cksource.com/CKEditor/CKEditor/CKEditor%204.1.2/ckeditor_4.1.2_standard.zip
Now unzip the package and rename it according to the instructions
unzip ckeditor_4.1.2_standard.zip
Once all installation steps have been completed the Views Data Export, CCK and CKEditor modules can be enabled with the following
   drush pm-enable views_data_export
   drush pm-enable content fieldgroup content_permissions nodereference userreference text content_copy optionwidgets number
   drush pm-enable jquery_update
   drush pm-enable ckeditor
For reference, the modules installed above can be found here:
- Views: http://drupal.org/project/views
- CCK: http://drupal.org/project/cck
- Views Data Export: http://drupal.org/project/views_data_export
- JQuery Update: https://drupal.org/project/jquery_update
- CKEditor: http://drupal.org/project/ckeditor
Configure CKEditor
Next, we need to configure the CKEditor which provides the Word-style interface for adding content. Navigate to ‘Administer’ -> ‘Site Configuration’ -> ‘CKEditor’. You will see a page similar to the following:
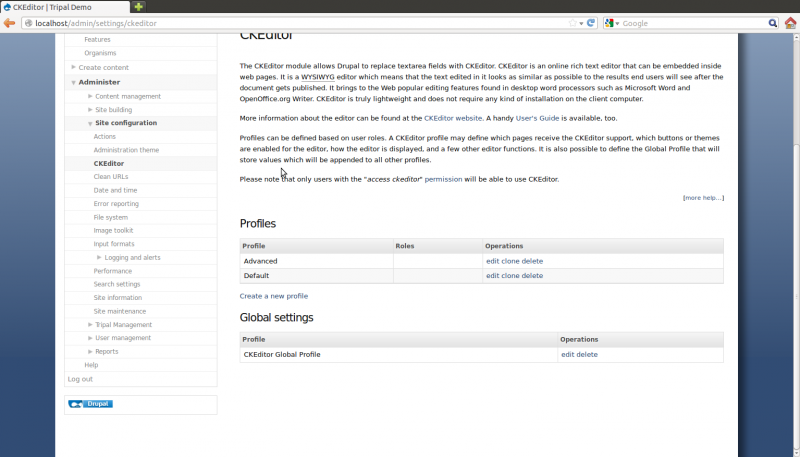
Click the ‘Edit’ link beside ‘CKEditor Global Profile’. On the page that appears, we want to expand the ‘Visibility Settings’ and switch the radio button from ‘Exclude’ to ‘Include’. Then clear all of the entries in the textbox named ‘Fields to exclude/include’:
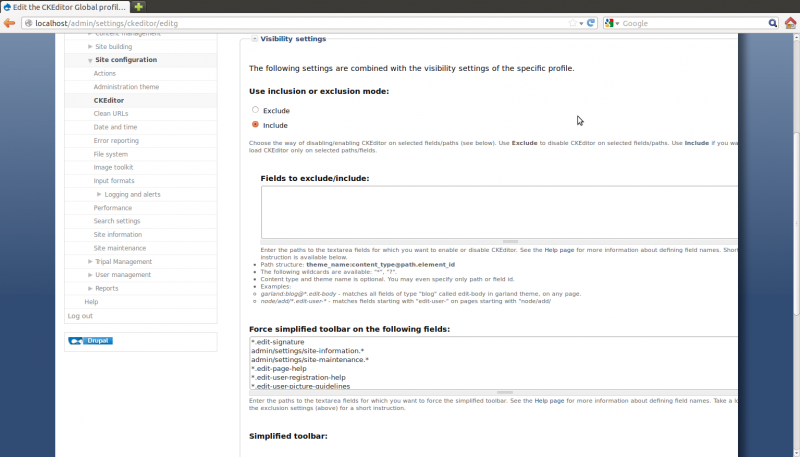
Add the following lines to the textbox you just cleared:
page@node/add/page.edit-body
chado_organism@node/add/chado-organism.edit-description
chado_organism@node/*/edit.edit-description
chado_analysis@node/add/chado-analysis.edit-description
chado_analysis@node/*/edit.edit-description
This will disable the CKEditor for all text boxes except for generic
pages, organism descriptions and analysis descriptions. We can return
later to add any other textareas to the list. You can find the
identifier, similar to those we added to the textbox above, underneath
any compatible text box. CKEditor puts the identifier under each textbox
for your reference. Simply cut-and-paste the identifier. For example,
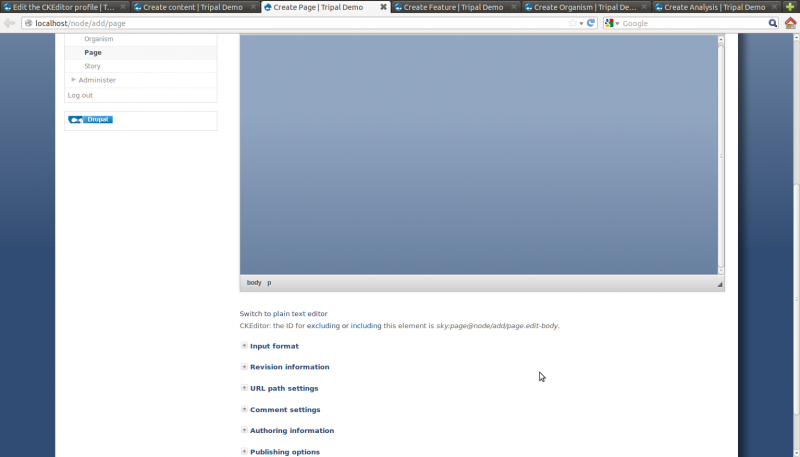
the screenshot from the Create Page page is shown below. Notice the
CKEdintifier for the textbox named sky:page@node/add/page.edit-body..
This was one of the identifiers we used in the textbox above, but with
the theme name (e.g. sky) removed.
Click the Update global profile button. Next, under the Profiles section. Click the edit link next to Default profile. When the page appears, open the Editor Appearance section, and set the Toolbar by clicking the full link. finally, click the Save button.
Tripal Installation
Get the Software
To download Tripal and the Extension modules change to the directory where Drupal keeps it’s modules:
cd /var/www/sites/all/modules
To obtain Tripal, issue the following ‘git commands:
git clone http://git.drupal.org/sandbox/spficklin/1337878.git tripal
cd tripal
git checkout 6.x-1.1
cd ../
We also want to obtain several Extension modules that will be used in this tutorial. Those modules are available on the Extensions Page of the Tripal website. However, these extension modules are also available via a git repository so we will use a git commands to obtain these.
git clone http://git.drupal.org/sandbox/spficklin/1578226.git tripal_blast_analysis
cd tripal_blast_analysis
git checkout 6.x-1.1-tripal_v1.1
cd ../

git clone http://git.drupal.org/sandbox/spficklin/1578234.git tripal_kegg_analysis
cd tripal_kegg_analysis
git checkout 6.x-1.1-tripal_v1.1
cd ../

git clone http://git.drupal.org/sandbox/spficklin/1578232.git tripal_interpro_analysis
cd tripal_interpro_analysis
git checkout 6.x-1.1-tripal_v1.1
cd ../

git clone http://git.drupal.org/sandbox/spficklin/1578230.git tripal_go_analysis
cd tripal_go_analysis
git checkout 6.x-1.1-tripal_v1.1
cd ../

git clone http://git.drupal.org/sandbox/spficklin/1578246.git tripal_unigene_analysis
cd tripal_unigene_analysis
git checkout 6.x-1.1-tripal_v1.1
cd ../
The above commands will download the main tripal package as well as the Blast, KEGG, InterPro, GO and Unigene extension modules. Tripal also has a theme as well. Change to the theme directory:
cd /var/www/sites/all/themes
And issue the following git commands:
git clone http://git.drupal.org/sandbox/spficklin/1342972.git tripal_theme
cd tripal_theme
git checkout 6.x-1.1
Installation
Previously in this Tutorial we enabled the Path and Search modules. The process for enabling the Tripal modules is the same. The site administrator can navigate to the Administer → Site Building → Modules page and enable each of the Tripal modules. However, Drush make it easier to enable modules from the command-line. First, we must enable the tripal_core module. Enter the following command
drush pm-enable tripal_core
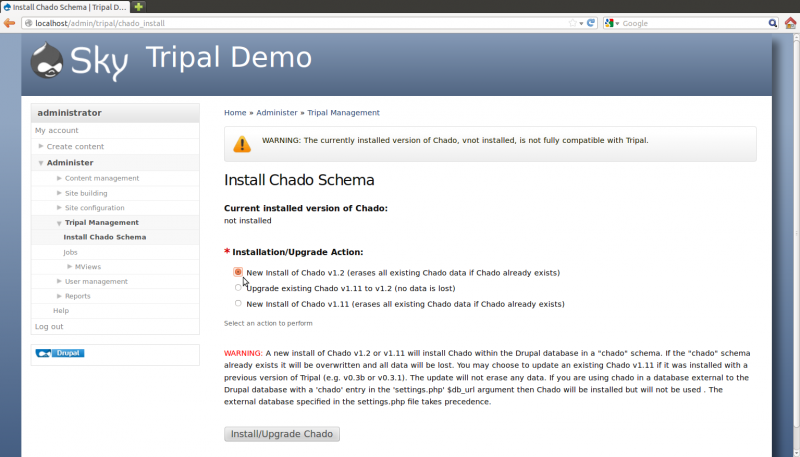
Now that the core module is enabled, we must next install Chado. In the web browser, navigate to Administer → Tripal Management → Install Chado Schema. Since this is a fresh install, select the option to install Chado v1.2 and click the button Install/ugrapde Chado
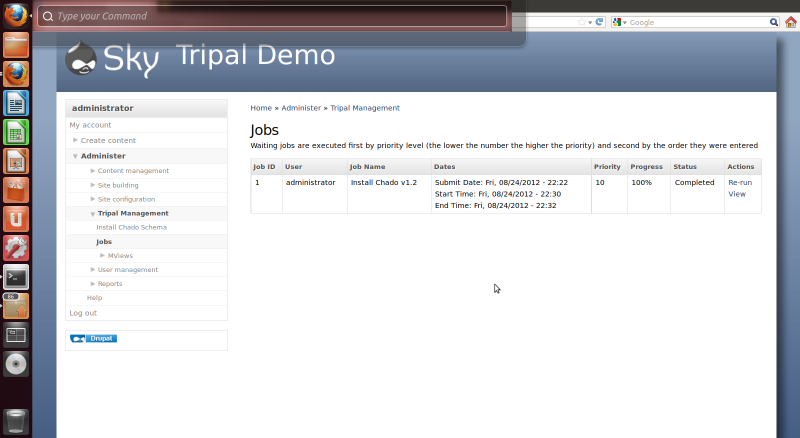
After the button is clicked a message will appear stating “Job ‘Install Chado v1.2’ submitted. Check the jobs page for status”. Click the jobs page link to see the job that was submitted:
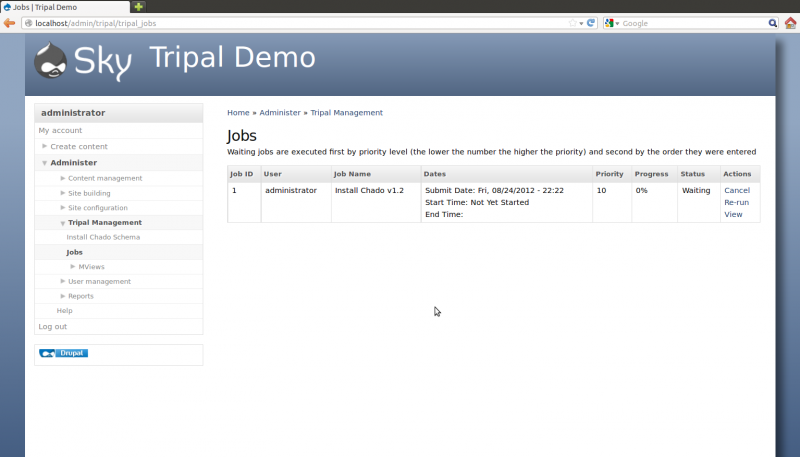
The job is waiting in the queue until the Tripal jobs system wakes and tries to run the job. The jobs management subsystem allows modules to submit long-running jobs, on behalf of site administrators or site visitors. Often, long running jobs can time out on the web server and fail to complete. The jobs system runs separately in the background using the command-line on an automated schedule but jobs are submitted through the web interface by users.
So, in the example above we now see a job for installing Chado. The job view page provides details such as the name of the job, The user who submitted the job, dates that the job was submitted and job status.
Jobs in the queue can be executed in two ways:
- Manually through a command-line call
- Using the UNIX cron to automatically launch the command-line
When we installed Drupal we installed a Cron job to allow the software to run housekeeping tasks on a regular bases. Tripal needs a cron entry as well to allow for regular execution of jobs in the queue. We will need to add a second cron entry:
sudo crontab -e
A word on text editors such as nano.
Add this line to the crontab
0,15,30,45 * * * * (cd /var/www; drush trpjob-run administrator ) > /dev/null
This entry will run the Tripal cron every 15 minutes as the administrator user. For this tutorial we do not want to wait 15 minutes at the most to execute our jobs. So, we will run the jobs manually. Tripal supports Drush and therefore has it’s own commands. We can use drush to manually launch the job:
drush trpjob-run administrator
We should now see to following text in the terminal window indicating that the installation of Chado was successful:
Tripal Job Launcher
Running as user 'administrator'
-------------------
Calling: tripal_core_install_chado(Install Chado v1.2, 1)
Creating 'chado' schema
Loading sites/all/modules/tripal/tripal_core/chado_schema/default_schema-1.2.sql...
Install of Chado v1.2 (Step 1 of 2) Successful!
Loading sites/all/modules/tripal/tripal_core/chado_schema/initialize-1.2.sql...
Install of Chado v1.2 (Step 2 of 2) Successful.
Installation Complete
Also, we see that the job has completed when refreshing the jobs management page:
Now that Chado is installed, we can continue with installation of the remaining Tripal modules. These modules should be installed in the following order one at a time. If you install them all at once you may encounter errors later. Install the modules in the following way (and order):
drush pm-enable tripal_db
drush pm-enable tripal_cv
drush pm-enable tripal_organism
drush pm-enable tripal_analysis
drush pm-enable tripal_feature
drush pm-enable tripal_views
Now, enable the remaining Tripal extension modules
drush pm-enable tripal_analysis_blast
drush pm-enable tripal_analysis_go
drush pm-enable tripal_analysis_interpro
drush pm-enable tripal_analysis_kegg
There are more Tripal modules that can be enabled (e.g. tripal_project, tripal_stock, etc.). But for this tutorial we will only be using the modules we enabled above.
The Tripal modules create directories in the /var/www/sites/default/files directory. By default, Drupal expects the ‘sites/default/files’ directory to be writeable by the web server. Because we installed the Tripal mdoules using Drush we need to reset the permissions for the web user. Execute the following command to give the web user group permission to write to that directory
sudo chown -R ubuntu:www-data /var/www/sites/default/files
sudo chmod -R g+rw /var/www/sites/default/files
The last component we need to enable is the Tripal base theme. This theme provides the necessary look-and-feel to the data presented by Tripal. Installation is the same as for modules:
drush pm-enable tripal
The Tripal theme is not a full Drupal theme. It is intended to beincorporated into the site’s primary theme. In this tutorial we are currently using the sky theme. Therefore, we need to inform Drupal that the sky theme will be using Tripal as a base theme. To do this, change to the sky theme directory:
cd /var/www/sites/all/themes/sky
And edit the sky.info file
gedit sky.info
And add the following line to the bottom of the file:
base theme = tripal
If you do not wish to use the Sky theme, you simply need to find the corresponding .info file for your default theme and add the same line to the file.
Tripal is now installed!
Controlled Vocabularies: Installing CVs
Before we can proceed with populating our Chado table with genomic data we must first load some controlled vocabularies (i.e. ontologies). To do this, navigate to Administer → Tripal Management → Vocabularies. You’ll see a page describing the purpose of the module and how to use it. Click the link on the left sidebar titled ‘Load Ontology With OBO File’. You’ll see the following page:
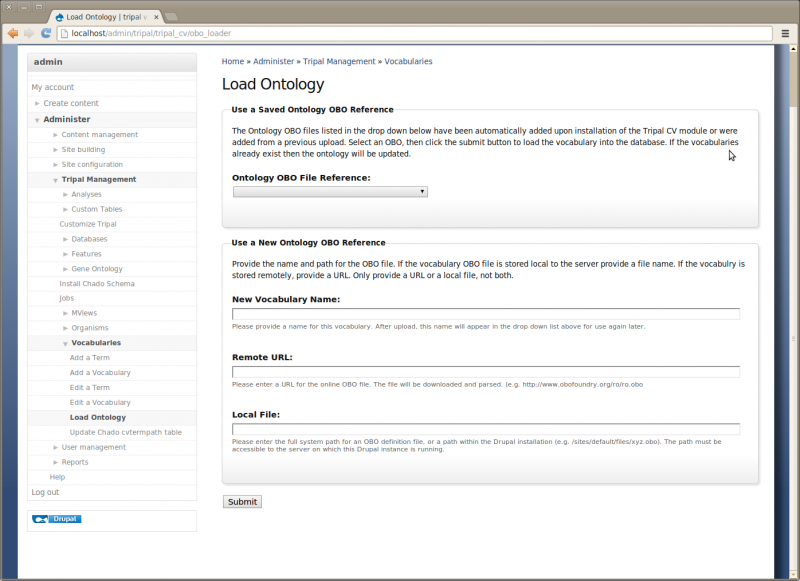
The Ontology loader will allow you to select a pre-defined ontology from the drop down list or allow you to provide your own to be loaded. If you provide your own, you give the remote URL of the OBO file or provide the full path on the local web server where the OBO file is located. In the case of a remote URL, Tripal first downloads and then parses the OBO file for loading. If you do provide your own OBO file it will appear in the saved drop down list for loading of future updates to the ontology.
For this tutorial, we need to install these ontologies:
- Chado feature properties
- Relationship ontology
- Sequence ontology
- Gene ontology.
Do so by selecting one and clicking the Submit button. Repeat this process for each of the three ontologies. You’ll notice each time that a job is added to the jobs subsystem.
Now manually launch these jobs
cd /var/www
drush trpjob-run administrator
Note: Loading the Gene Ontology will take several hours.
Setting Perimssions
Because we are logged on to the site as an admin user we are able to see all content. However, Drupal provides User Management infrastructure that allows the site admin to set which types of users can view the content on the site. By default there are two types of users anonymous and authenticated users. For this tutorial we want to set permissions so that anonymous visitors to the site can see the genomic content. To do this, navigate to Administer → user Management → Permissions. Here you will see permissions for all types of content.
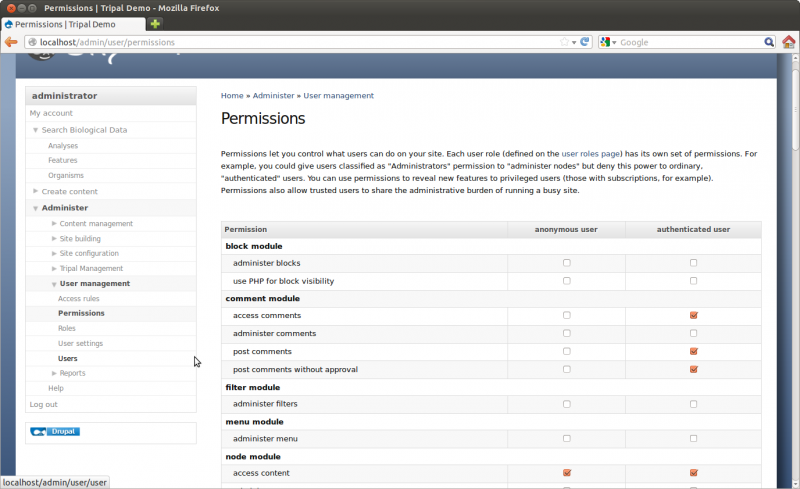
Scroll through the list of permissions and set the following for both anonymous and authenticated users:
- access chado_analysis content
- access chado_analysis_blast content
- access chado_analysis_go content
- access chado_analysis_interpro content
- access chado_analysis_kegg content
- access chado_cv content
- access chado_db content
- access chado_feature content
- access chado_organism content
Each time you install a new module you should always check the Permissions page and set any new permissions that may have been added by the new module.
Using Tripal
Creating Organism Pages
There are two ways to create pages for organism. If your organism is already in Chado then you can sync the organism. If it is not in Chado you will need manually create it using the Tripal web interface. The following two sections describe both methods.
What if Our Organism is Already in Chado?
Now that we have Chado loaded and populated we would like to create a home page for our species. Chado comes pre-loaded with a few species already, so we will check to see if our organism is already present. To do this navigate to Administer -> Tripal Management → Organisms → Configuration
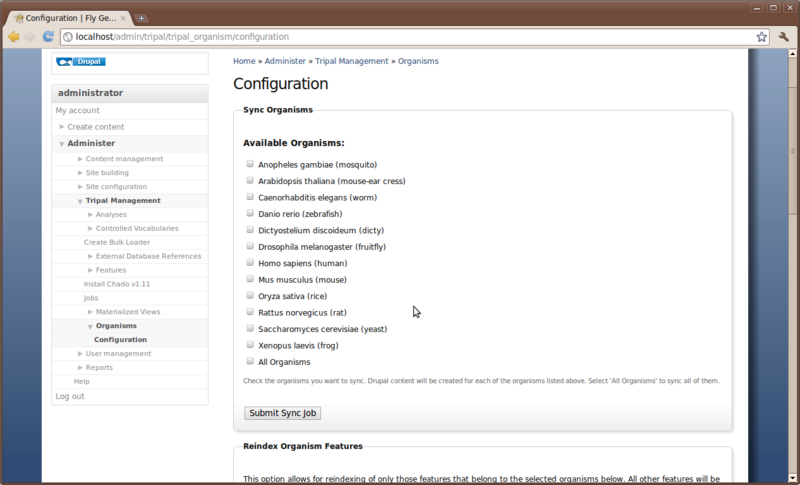
This configuration page has several different options. We will discuss two of these here. The first is the top section labeled Sync Organisms. In this section is a list of organisms. These are the organisms that come by default with Chado. If our organism is already in the list (e.g. Drosophila melenogaster) then we need to inform Drupal that we have data in Chado for which we would like a web page. This is what we call Syncing. We need to sync Drupal and Chado so that Drupal knows about our organism. To do this, click the check box next to Drosophila melenogaster and then click the Submit Sync Job.
As usual we want to run this job manually:
cd /var/www
drush trpjob-run administrator
Now that our organism is synced we should have a new page for Drosophila melenogaster. To find the page, click the Organisms menu item in the left side bar under Search Biological Data. This menu item was automatically added when we installed the Tripal Organism module. On this page we see a list of organisms that are present in Chado. Notice that only the fruitfly is clickable because it is the only organism synced.
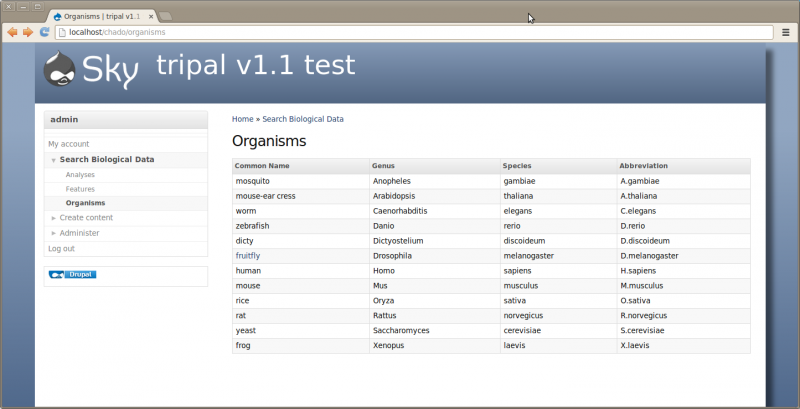
Now if we click the ‘fruitfly’ link it should take us to our new organism page:
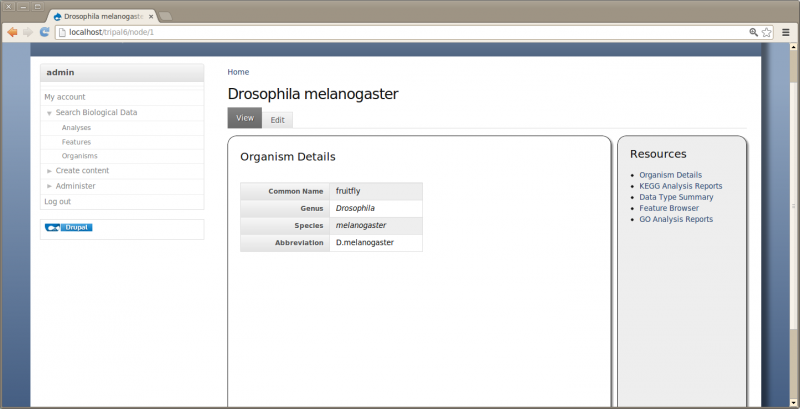
By default all Tripal pages have a center content section and a right side-bar section with links for Resources. However, this page is a bit empty. We need to add some details. Click the Edit tab towards the top of the page. Notice two if the fields are missing content: the description and the organism image
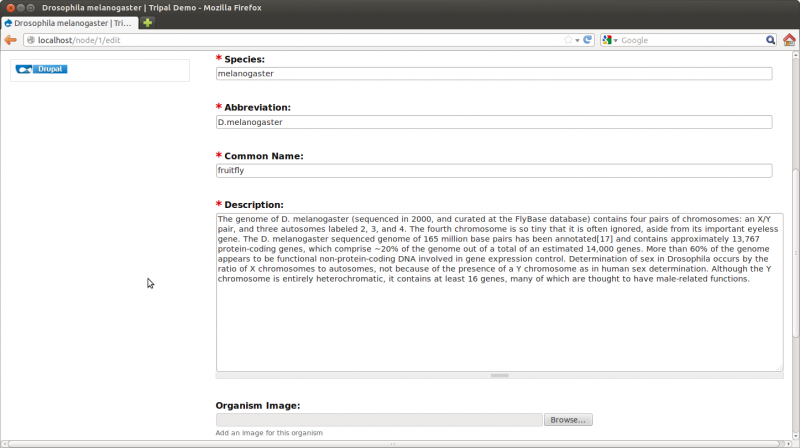
For the description add the following text (taken from wikipedia: http://en.wikipedia.org/wiki/Drosophila_melanogaster):
“The genome of D. melanogaster (sequenced in 2000, and curated at the FlyBase database) contains four pairs of chromosomes: an X/Y pair, and three autosomes labeled 2, 3, and 4. The fourth chromosome is so tiny that it is often ignored, aside from its important eyeless gene. The D. melanogaster sequenced genome of 165 million base pairs has been annotated[17] and contains approximately 13,767 protein-coding genes, which comprise ~20% of the genome out of a total of an estimated 14,000 genes. More than 60% of the genome appears to be functional non-protein-coding DNA involved in gene expression control. Determination of sex in Drosophila occurs by the ratio of X chromosomes to autosomes, not because of the presence of a Y chromosome as in human sex determination. Although the Y chromosome is entirely heterochromatic, it contains at least 16 genes, many of which are thought to have male-related functions.”
For the image, download this image below and upload it using the interface on the page.

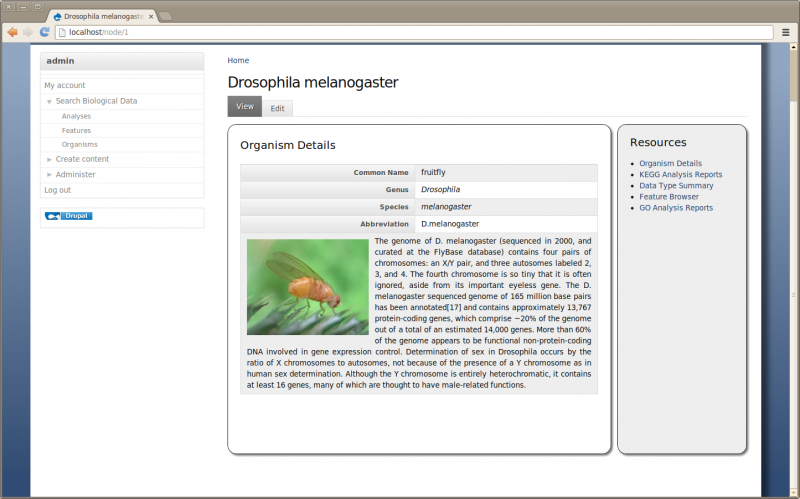
Save the page. Now we have a more informative page:
What if My Organism Is Not Present in Chado?
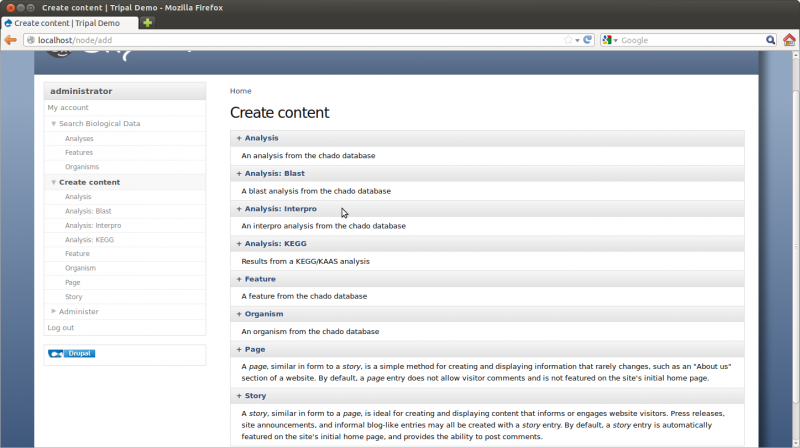
For this tutorial we will be loading data for Citrus sinensis (sweet orange), but this organism is not in Chado by default. We can easily add the organism using the Create Content page. You can find this link on the left side bar navigation menu. The Create Content page has many more content types than when we first saw it. Previously we only had Page and Story content types. Now we have more content types added by the Tripal Analysis, Organism, Feature and Extension modules .
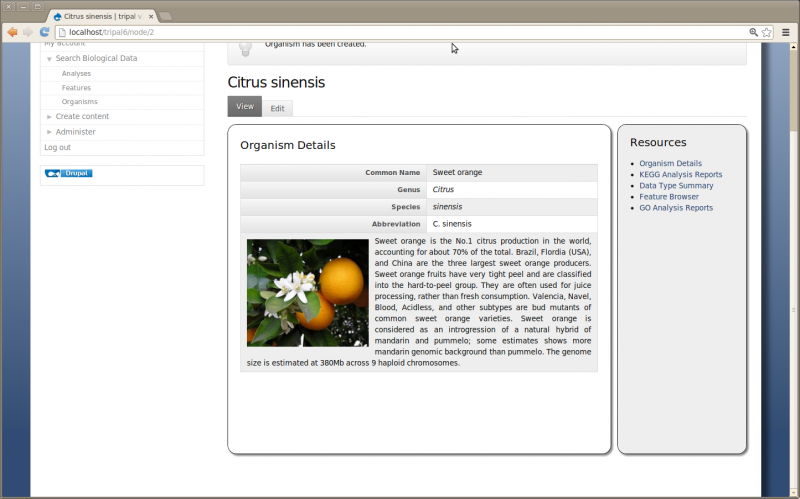
To add a new organism simply click the Organism link and and fill in the fields with these values:
- Genus: Citrus
- Species: sinensis
- Abbreviation: C. sinensis
- Common name: Sweet orange
- Description: Sweet orange is the No.1 citrus production in the world, accounting for about 70% of the total. Brazil, Flordia (USA), and China are the three largest sweet orange producers. Sweet orange fruits have very tight peel and are classified into the hard-to-peel group. They are often used for juice processing, rather than fresh consumption. Valencia, Navel, Blood, Acidless, and other subtypes are bud mutants of common sweet orange varieties. Sweet orange is considered as an introgression of a natural hybrid of mandarin and pummelo; some estimates shows more mandarin genomic background than pummelo. The genome size is estimated at 380Mb across 9 haploid chromosomes.
And, use the following image:

Save the page and view the new Organism:
Creating an Analysis
For this tutorial, we will later import a set of genes, including associated mRNA, CDS, UTRs, etc. Tripal requires that an analysis be associated with all imported features. This has several advantages, including:
- The source of features (sequences) can be traced. Even for features simply downloaded from a database, someone else can see where the features came from.
- Provides a mechanism for describing how the features were created (e.g. whole genome structural and functional annotation description)
- The analysis links all of the features together which can be useful for querying for specific features from an analysis.
To create an analysis for loading our genomic data, navigate to the Create content and click on the link: Analysis
The analysis creation page will appear:
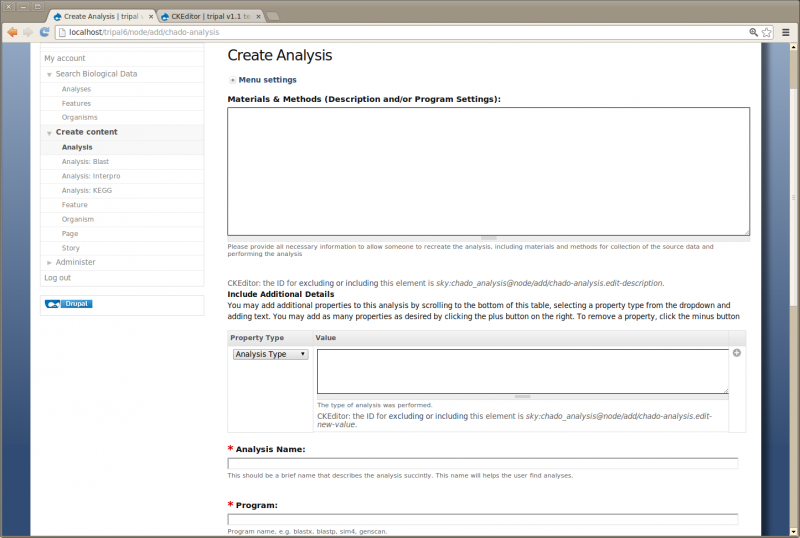
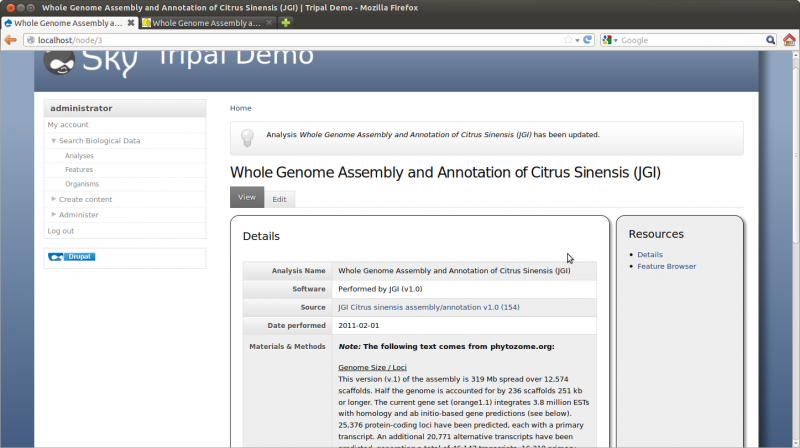
Here you can provide the necessary details to help others understand the source of your data. For this tutorial, enter the following:
- Analysis Name: Whole Genome Assembly and Annotation of Citrus Sinensis (JGI)
- Program: Performed by JGI
- Program Version: v1.0
- Source Name: JGI Citrus sinensis assembly/annotation v1.0 (154)
- Source URI: http://www.phytozome.net/citrus.php
- Time Executed: Feb 1, 2011
- Materials and Methods: (if using CKEditor, click the ‘Source’ button before pasting)
<p>
    <strong><em>Note: </em>The following text comes from phytozome.org:</strong></p>
<p>
    <u>Genome Size / Loci</u><br />
    This version (v.1) of the assembly is 319 Mb spread over 12,574 scaffolds. Half the genome is accounted for by 236 scaffolds 251 kb or longer. The current gene set (orange1.1) integrates 3.8 million ESTs with homology and ab initio-based gene predictions (see below). 25,376 protein-coding loci have been predicted, each with a primary transcript. An additional 20,771 alternative transcripts have been predicted, generating a total of 46,147 transcripts. 16,318 primary transcripts have EST support over at least 50% of their length. Two-fifths of the primary transcripts (10,813) have EST support over 100% of their length.</p>
<p>
    <u>Sequencing Method</u><br />
    Genomic sequence was generated using a whole genome shotgun approach with 2Gb sequence coming from GS FLX Titanium; 2.4 Gb from FLX Standard; 440 Mb from Sanger paired-end libraries; 2.0 Gb from 454 paired-end libraries</p>
<p>
    <u>Assembly Method</u><br />
    The 25.5 million 454 reads and 623k Sanger sequence reads were generated by a collaborative effort by 454 Life Sciences, University of Florida and JGI. The assembly was generated by Brian Desany at 454 Life Sciences using the Newbler assembler.</p>
<p>
    <u>Identification of Repeats</u><br />
    A de novo repeat library was made by running RepeatModeler (Arian Smit, Robert Hubley) on the genome to produce a library of repeat sequences. Sequences with Pfam domains associated with non-TE functions were removed from the library of repeat sequences and the library was then used to mask 31% of the genome with RepeatMasker.</p>
<p>
    <u>EST Alignments</u><br />
    We aligned the sweet orange EST sequences using Brian Haas's PASA pipeline which aligns ESTs to the best place in the genome via gmap, then filters hits to ensure proper splice boundaries.</p>
Note:: Above we entered HTML. This is not the easiest way to enter text, but makes it simple for this tutorial. When the ckeditor module is installed and properly setup the user is provided with editor tools that makes it much easier to add text to any page.
After saving, you should have the following analysis page:
Creating a Database Cross Reference
For our site, we want to create gene pages with sequences and have those pages link back to JGI where we obtained the genes. Therefore, we want to add a database reference for JGI. To add a new external databases, navigate to Administer → Tripal Management → Databases → Add a Database. The resulting page provides fields for adding a new database:
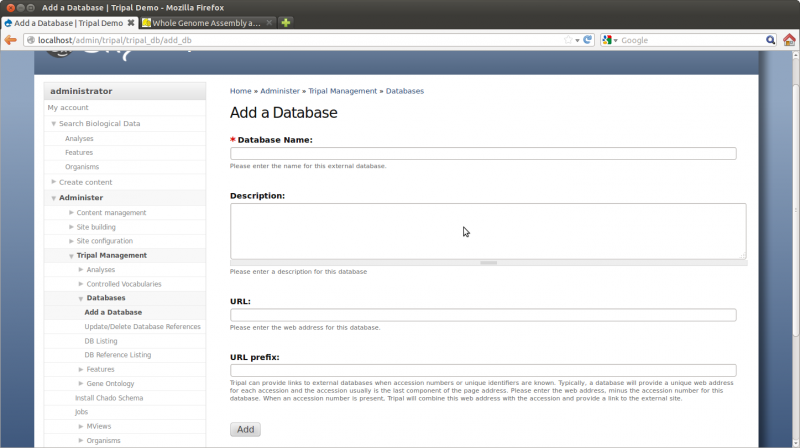
Enter the following values for the fields:
- Name: Phytozome
- Description: Phytozome is a joint project of the Department of Energy’s Joint Genome Institute and the Center for Integrative Genomics to facilitate comparative genomic studies amongst green plants
- URL: http://www.phytozome.net/
- URL prefix: http://www.phytozome.net/genePage.php?search=1&detail=1&er=1&crown&method=0&searchText=transcriptid%253A
The URL prefix is important as it will be used to create the links on our gene pages. Our gene name will be appended to this URL to create the link that will take us to the corresponding gene page on Flybase.
Click Add.
We now have added a new database!
Later we will also load Blast data. We need to create two new databases for those as well. Creat the following entries for NCBI nr, and ExPASy SwissProt:
- Name: NCBI nr
- Description: NCBI’s non-redundant database.
- URL: http://www.ncbi.nlm.nih.gov/
-
URL prefix: http://www.ncbi.nlm.nih.gov/protein/
- Name: ExPASy Swiss-Prot
- Description: A curated protein sequence database which strives to provide a high level of annotation, a minimal level of redundancy and high level of integration with other databases
- URL: http://expasy.org/sprot/
- URL prefix: http://www.uniprot.org/uniprot/
Loading Feature Data
Now that we have our organism and whole genome analysis ready, we can being loading genomic data. For this tutorial only a single gene from sweet orange will be loaded into the databsae. This is to ensure we can move through the tutorial rather quickly. The following datasets will be used for this tutorial:
Facts about “Tripal Tutorial v1.1”
| Has topic | Tripal + |