GMOD
Galaxy Tutorial 2012
This walks you through setting up and running a Galaxy server. This tutorial was originally taught by Dave Clements at the 2012 GMOD Summer School.
To follow along with the tutorial, you will need to use AMI ID: ami-a1de69c8, name: GMOD 2012 start day 3, available in the US East (N. Virginia) region. See the GMOD Cloud Tutorial for information on how to get this AMI.
Contents
Galaxy is a data integration and analysis framework for biomedical research. Galaxy allows nearly any tool that can be run from the command line to be integrated into it.
On top of these tools, Galaxy provides an accessible environment for interactive analysis that transparently tracks the details of analyses, a workflow system for convenient reuse, data management, sharing, publishing, and more.
Some General Galaxy Resources
Before we get started, let’s highlight some Galaxy resources that may be useful to us along the way.
http://galaxyproject.org
The Galaxy Project home page
GalaxyWiki
All things Galaxy.
http://usegalaxy.org/
The Galaxy project’s free public server.
Galaxy Search
Integrated searches of all online Galaxy resources. Available searches:
Pan-Galactic Web Search
Search everything
Galaxy Mailing Lists Search
Search the (Nabble-powered) mailing list archives
Using Galaxy Search
Search online resources related to using Galaxy
Galaxy Admin and Development
Search
Search online resources related to deploying and developing Galaxy
Results from searches are often further broken down into categories
- All: give me everything
- Tools: show me doc on tools related to my search.
- Email: show email threads related to my search.
- Source code: show Galaxy source code related to my search
- Shared: Show published Galaxy objects related to my search
- Documentation: Show documentation (e.g. wiki pages, tool doc, …) related to my search.
- Abstracts: Show papers related to my search.
- Requests: Should feature requests related to my search.
This is all implemented using Google Custom Search.
Public Galaxy Servers
Current list of know publicly accessible Galaxy servers.
Mailing Lists and Mailing Lists Search
Galaxy has several mailing lists, some of which are
very active
Screencasts, lots of them.
Slides, and sometimes videos, from past
Galaxy-related events and presentations.
Galaxy CiteULike group (@ CiteULike) and Mendeley mirror
Eight different tags/categories.
Create a Galaxy instance
See http://getgalaxy.org.
Prerequisites
The only prerequisite to run your own Galaxy is a Python interpreter, version 2.5 or greater. Python 3 is a different language and is currently not supported. The GMOD Amazon Machine Image (AMI) used for this course includes version 2.6.5 of the interpreter.
$ python --version
Python 2.6.5
Galaxy is distributed (and developed) using a distributed version control system called Mercurial. The AMI already includes mercurial version 1.4.3:
$ hg --version
Mercurial Distributed SCM (version 1.4.3)
...
Clone the Galaxy repository
The development and release repositories are available through the bitbucket hosting service.
DO NOT DO THIS NOW as it has already been done on your image:
To create a local clone of the release repository run the following:
 $ cd ~/Galaxy
 $ hg clone http://bitbucket.org/galaxy/galaxy-dist
Take Advantage of the GMOD in the Cloud Directory Structure
All of the Galaxy files are currently in the ~ubuntu home directory
under Galaxy. Let’s start by moving this to the non-volatile disk, so
to speak, on the GMOD in the Cloud-based AWS image we are using.
$ cd
$ mv Galaxy /data/dataHome/
$ ln -s /data/dataHome/Galaxy Galaxy
Update Galaxy Configuration File
Often you can just fire up Galaxy at this point. However, we want a few
things to be different from the default installation. Galaxy’s main
configuration file is universe_wsgi.ini. By default, that file is
created at initialization time by copying universe_wsgi.ini.sample.
However, if the file already exists it is not copied over. Copy the file
and update it:
$ cd ~/Galaxy/galaxy-dist
$ cp universe_wsgi.ini.sample universe_wsgi.ini
$ pico universe_wsgi.ini
Change the port from
#port = 8080
to this:
port = 8081
Galaxy, like WebApollo and several other components that were also covered at the course, will listen to port 8080 by default; for simplicity, we will configure Galaxy to listen to a different port.
Change the host from
#host = 127.0.0.1
to:
host = 0.0.0.0
This makes Galaxy visible to remote hosts, such as your laptop
Set the brand to make it obvious that you are working on your Galaxy instance
Change this:
#brand = None
to this:
brand = My Super Cool Brand
Use a more robust database
Out of the box Galaxy includes the embedded SQLite database. This allows Galaxy to run with zero-configuration and provides an excellent solution for single-user Galaxy installations being used for tool development. However, for any multi-user scenario a more robust database will be needed for Galaxy to be reliable. We highly recommend Postgres, although other databases are known to work. Postgres is already installed on our AMI (it’s the default DBMS for Chado)
Update universe_wsgi.ini file to use Postgres. Update the Database
section of your Galaxy config file to look like:
# -- Database

# By default, Galaxy uses a SQLite database at 'database/universe.sqlite'.  You
# may use a SQLAlchemy connection string to specify an external database
# instead.  This string takes many options which are explained in detail in the
# config file documentation.
#database_connection = sqlite:///./database/universe.sqlite?isolation_level=IMMEDIATE
database_connection = postgres://ubuntu:@localhost:5432/galaxydb

# If the server logs errors about not having enough database pool connections,
# you will want to increase these values, or consider running more Galaxy
# processes.
#database_engine_option_pool_size = 5
#database_engine_option_max_overflow = 10

# If using MySQL and the server logs the error "MySQL server has gone away",
# you will want to set this to some positive value (7200 should work).
#database_engine_option_pool_recycle = -1

# If large database query results are causing memory or response time issues in
# the Galaxy process, leave the result on the server instead.  This option is
# only available for PostgreSQL and is highly recommended.
database_engine_option_server_side_cursors = True

# Create only one connection to the database per thread, to reduce the
# connection overhead.  Recommended when not using SQLite:
database_engine_option_strategy = threadlocal

# Log all database transactions, can be useful for debugging and performance
# profiling.  Logging is done via Python's 'logging' module under the qualname
# 'galaxy.model.orm.logging_connection_proxy'
#database_query_profiling_proxy = False
Save the file.
The ubuntu user has permission to create databases, so let’s create
the database that we told Galaxy to connect to:
$ createdb galaxydb
Run, Galaxy, Run!
Galaxy includes a script to run it. This script also performs the Galaxy initialization the first time it is run. Run it now:
$ sh run.sh --reload
Initializing community_wsgi.ini from community_wsgi.ini.sample
Initializing datatypes_conf.xml from datatypes_conf.xml.sample
Initializing external_service_types_conf.xml from external_service_types_conf.xml.sample
Initializing migrated_tools_conf.xml from migrated_tools_conf.xml.sample
Initializing reports_wsgi.ini from reports_wsgi.ini.sample
Initializing shed_tool_conf.xml from shed_tool_conf.xml.sample
... (a minute or two or three will pass) ...
galaxy.web.buildapp DEBUG 2012-08-15 07:08:36,756 Enabling 'x-forwarded-host' middleware
Starting server in PID 1408.
Serving on 0.0.0.0:8081 view at http://127.0.0.1:8081
This script performs several significant actions the first time it is run:
- Creates initial configuration files, including the main file
universe_wsgi.ini, and empty directories for storing data files - Fetches all of the Galaxy framework’s dependencies, packaged as Python eggs, for the current platform.
- Initializes its database. Galaxy uses a database migration system to automatically handle any changes to the database schema. On first load it runs all migrations to ensure the database is in a known state, which may take a little time.
Once the database is initialized, the normal startup process proceeds, loading tool configurations, starting the job runner, and finally initializing the web interface on the requested port. You can now access your Galaxy at http://ec2-##-##-##-##.compute-1.amazonaws.com:8081.
Running analyses with Galaxy
See also Galaxy 101 tutorial
Without any additional configuration, there is already a lot we can do with our first Galaxy instance. As an example, let’s work through an analysis that is based on, but distinct from the Galaxy 101 tutorial.
1. Access your new Galaxy instance
Start a web browser and access http://ec2-##-##-##-##.compute-1.amazonaws.com:8081.
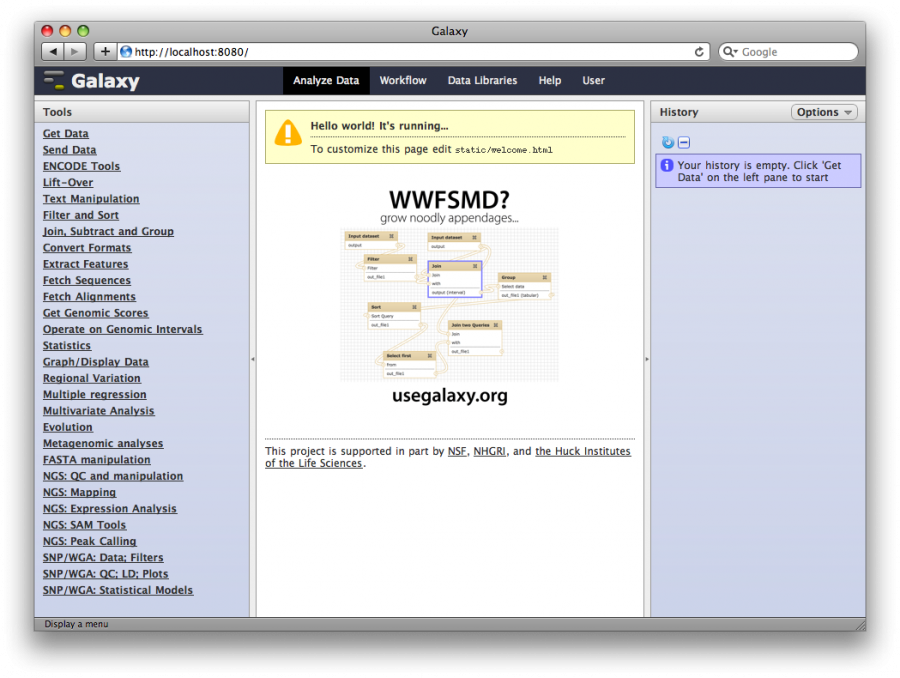
Now that Galaxy is up and running, let’s use it to answer the question:
Which coding exons have the highest number of embedded/overlapping repeats?
We will ask this question about pig chromosome 18 in our example.
2. Create a user
In the top bar, select User → Register. Enter your
- Email address
- Password
- Public name: Public names must be at least four characters in length and contain only lower-case letters, numbers, and the ‘-‘ character.
and click Submit.
Registering is not required in order to use Galaxy. However, to use all of it, users need to register.
2. Get Pig Exons
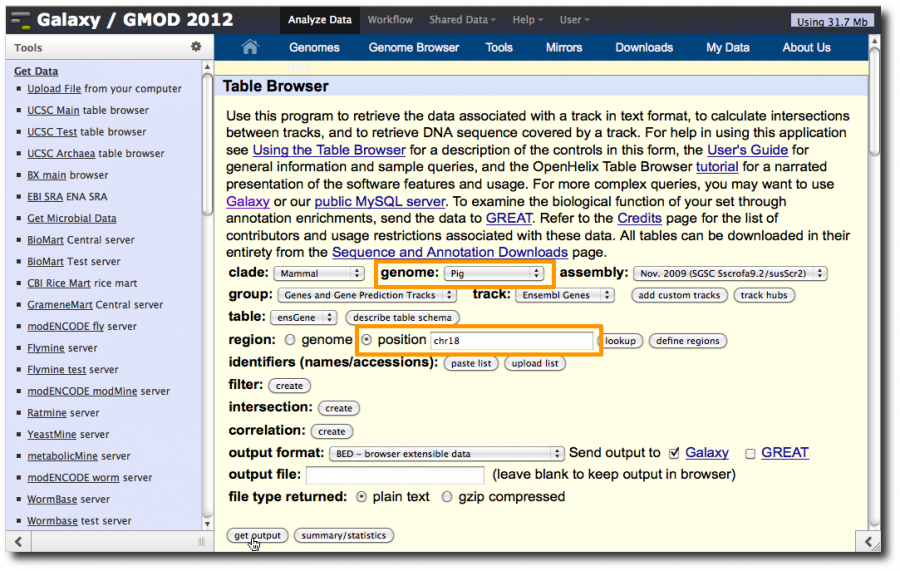
Select Tools → Get Data → UCSC Main. This will display the UCSC Table Browser, a web interface to the databases that back the UCSC genome browser. In this window, set
- genome: Pig
- region: check position and enter
chr18
Click get output.
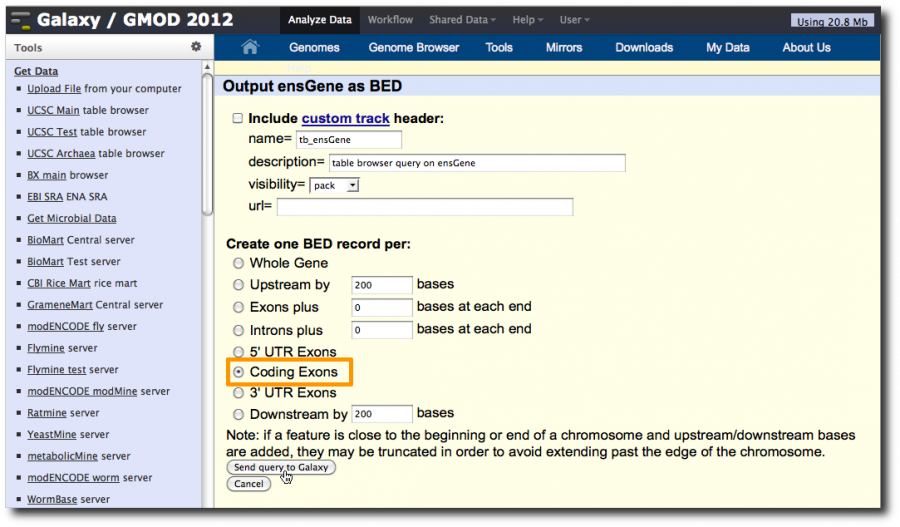
On the second UCSC page, click Coding Exons and then click Send query to Galaxy
Let’s take a look at the data.
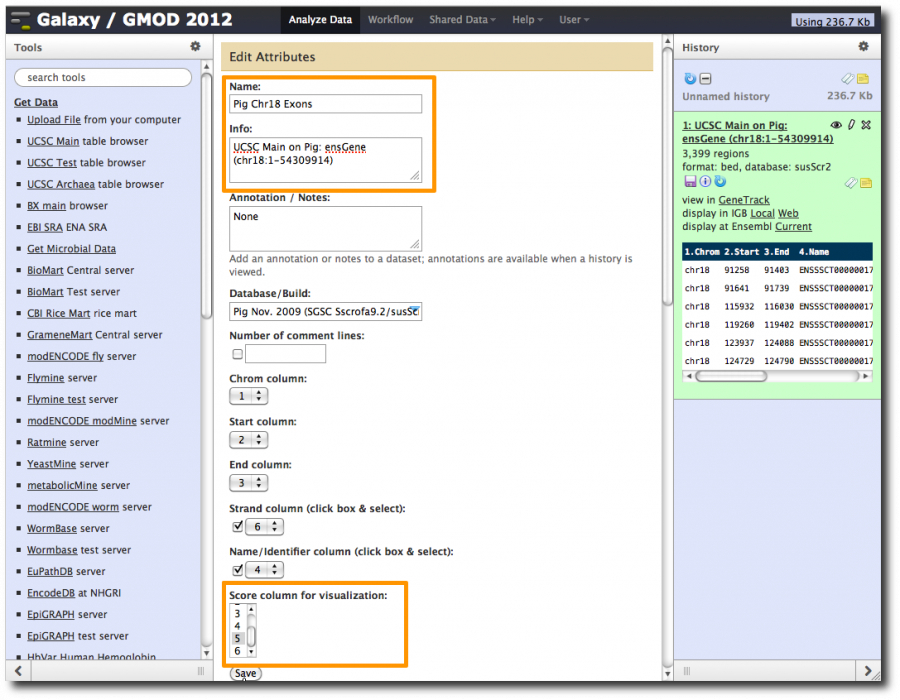
- Click on the dataset name for a preview.
- Poke the eye to see the full dataset.
- Click on pencil icon and give dataset a better name (like
Pig chr18 Exons) and set the score column to column 5. Click Save. - Change the history name from
unnamed history(which is true, but not useful) to something more meaningful.
That’s odd
- I know Galaxy can send datasets to UCSC for visualization.
- But UCSC is not in the list of visualization options, even though we just got the data from UCSC.
- That’s odd
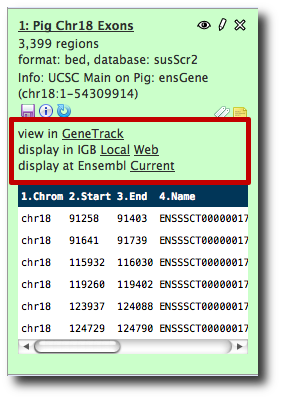
Our first peek at the Plumbing
Galaxy-dist has several important subdirectories
| Path | Description |
|—-|—-|
| tools/ | Defines tools in Galaxy. |
| tool-data/ | Home of .loc files for sets of tools. .loc files tell where reference genomes, indexes, and the like can be found for particular tools. |
| ` • shared/ | Contains subdirectories for ensembl, **gbrowse**, genetrack, igv, jars, ncbi, rviewer, **ucsc** |
| • • ucsc/ | |
| • • • ucsc_build_sites.txt` | Defines which genomes can be viewed at the various UCSC sites. |
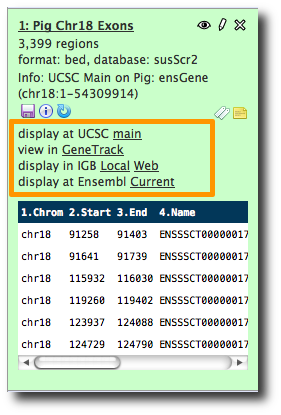
susScr2 is not in the list for the main UCSC site. Edit
tool-data/shared/ucsc/ucsc_build_sites.txt and add it.
Restart Galaxy:
<control-c>
$ sh run.sh --reload
Click the Analyze Data tab to reload the screen. display at UCSC main is now one of the options.
3. Get Pig Repeat Regions
Get repeats from UCSC as well. Select Tools → Get Data → UCSC Main.
Set
- group: Variation and Repeats
- region: position and enter
chr18
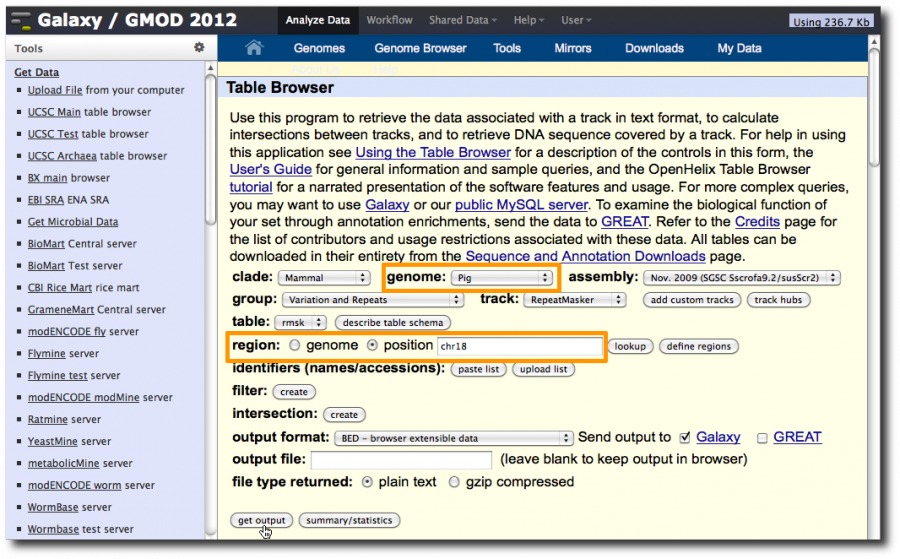
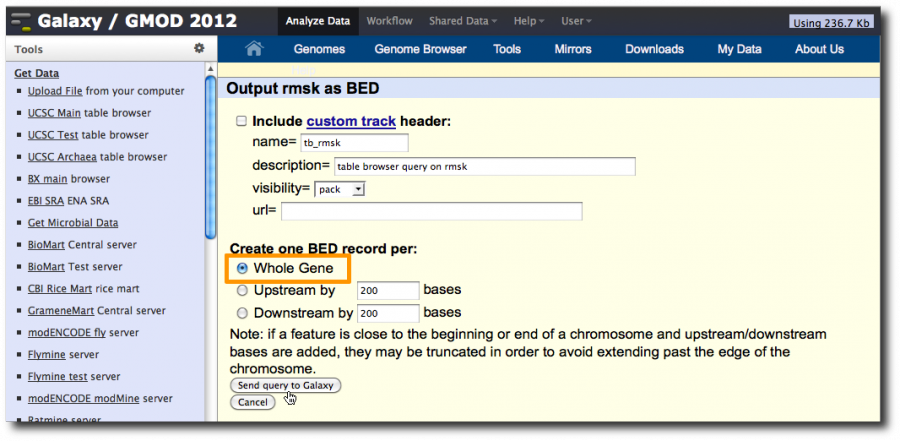
In the second UCSC window make sure Whole Gene is selected and then send the dataset to Galaxy.
Click on the new dataset’s pencil icon and rename the dataset to something more useful, such as Pig Chr18 Rpts. Also set the score column to column 5.
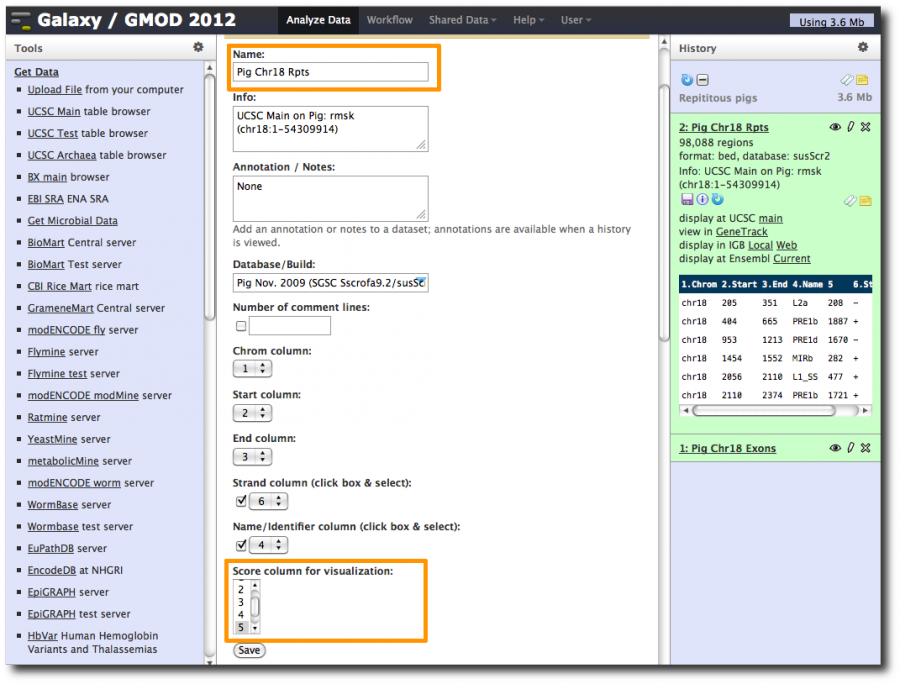
Note that the dataset is already viewable in UCSC.
4. Identify genes and repeats that overlap
Select Tools → Operate on Genomic Intervals → Join.
Join dataset 1 (exons) with dataset 2 (repeats), with min overlap of 1 bp. Return Only records that are joined (INNER JOIN).
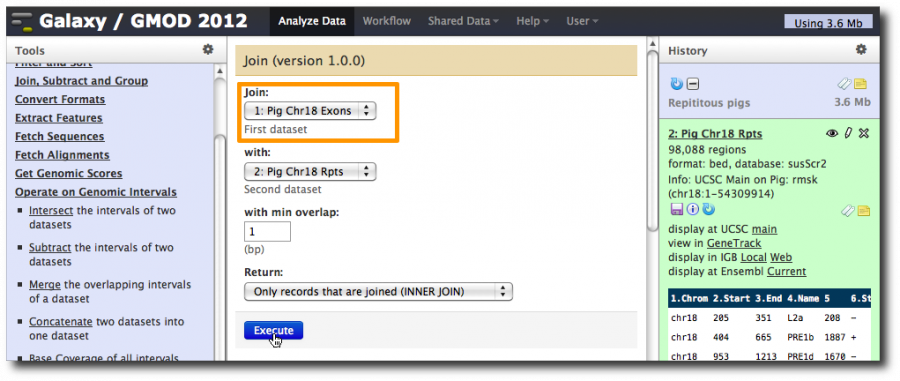
Takes two 6 column bed files and joins them together into 12 column records where the first 6 columns are from the exons dataset and the last 6 columns are from the repeats dataset. Furthermore, it only create records when a gene and a repeat overlap.
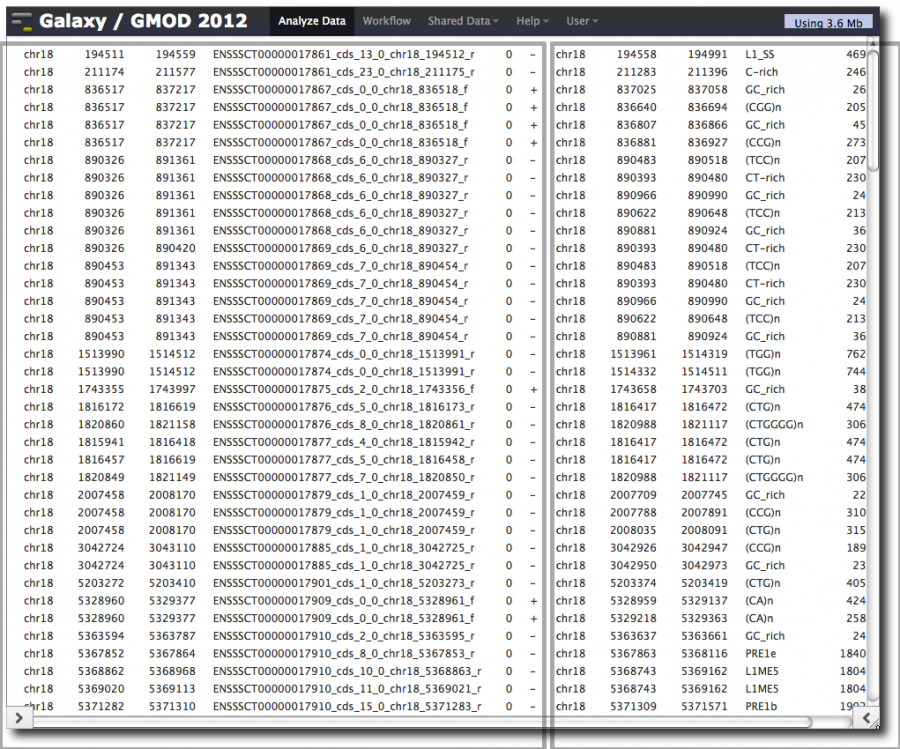
Take a close look at the dataset. Note that
- Some exons were dropped
- Some repeats were dropped
- Some exons occur multiple times
Make sure you understand why.
Finally, rename the dataset something like Exon Rpt Pairings
5. Group and Count
Now we want to walk through the exon-repeat pairings and count the number of times each exon occurs. This number is the number of repeats that overlap with each exon.
We are going to do another operation that is borrowed from relational databases. Select Tools → Join, Subtract, and Group → Group.
Select the exon-repeat pairings dataset and set Group by column to c4, the column in the dataset that contains the exon name.
Then click Add new operation and then set Type to Count.
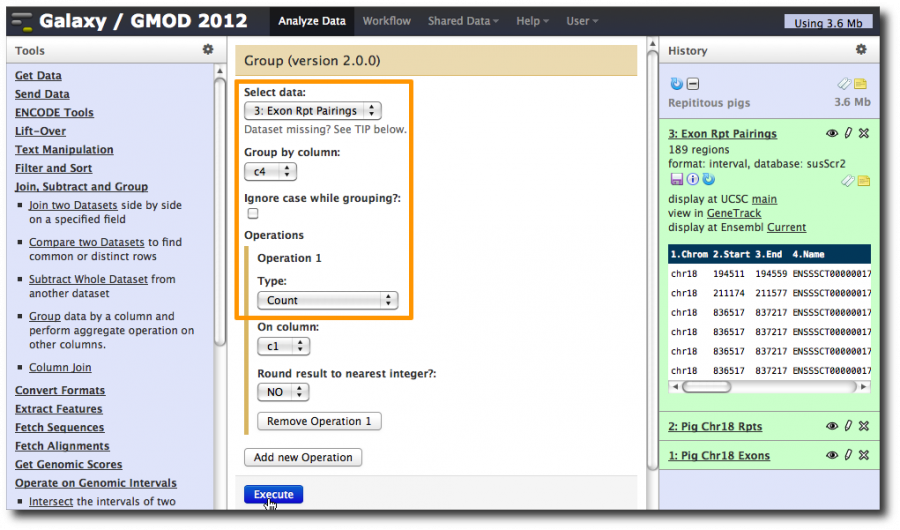
This tells Galaxy to walk through the dataset, create a group for each different value of column 4 (the exon name), and then count the number of records that were in that group (i.e. the number of records that had each exon name).
This produces a two column dataset:
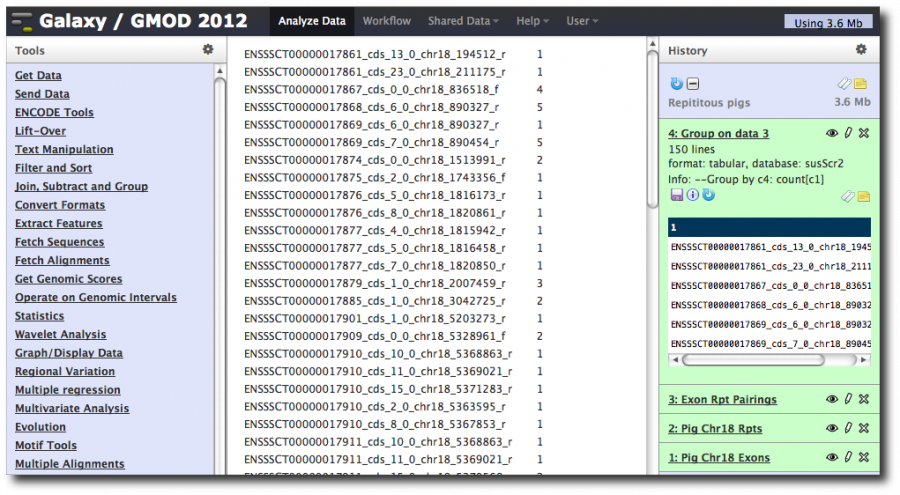
The first column is the value of the column we grouped by. The second is the number of records in the dataset that have that exon name.
Rename this dataset to Exons with rpt counts, unsorted.
If we were to now to run Tools → Filter and Sort → Sort on this dataset, we would have the answer to our original question:
Which exons have the most repeats?
We have the list of exons, and the counts in them. We could use this dataset in further analysis, email it someone, etc..
6. Get Exon Info back
However, we can do better. We have lost some information about the exons (like position, strand, and so on) that we had in the original exon dataset. If we can reclaim that information, and add to it, we can produce a more useful dataset that we can visualize right now.
The original exon dataset downloaded from UCSC had a meaningless score column. Let’s replace that with the repeat count.
First, bring the original exon information together with the counts.
Select Tools → Join, Subtract and Group → Join two Datasets. Set the first dataset to Exons with repeat counts and the second to be the Pig Chr18 Exons dataset.
Join them using column c1 and column c4, which are the exon names in both datasets.
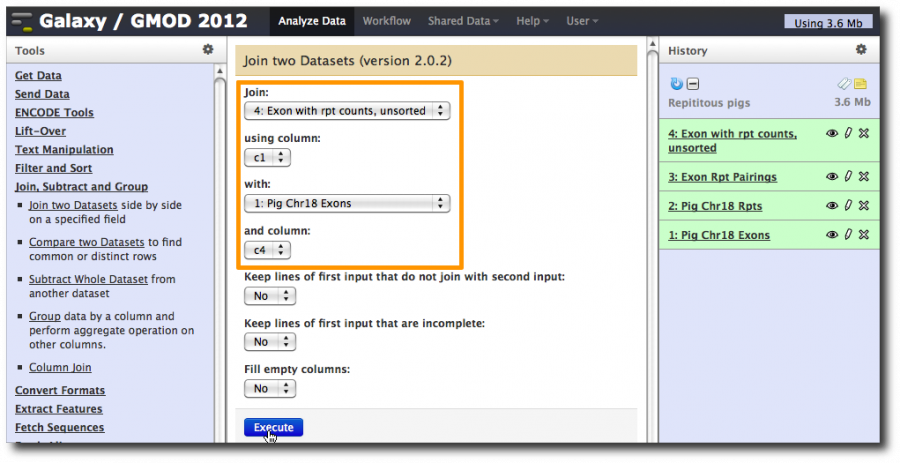
This produces and 8 column dataset with the exon repeat counts in the first two columns and the exon information in the last 6 columns.

Now, use the Cut tool to reshuffle these 8 columns into a valid 6 column BED file with the repeat count in column 5, the score column.
Select Tools → Text Manipulation → Cut. Enter c3,c4,c5,c6,