Difference between revisions of "GBrowse2 VMs"
(→Getting Started with the EC2 VM) |
(→Administration (for both VirtualBox and EC2 VMs)) |
||
| Line 119: | Line 119: | ||
This works by allocating a new EBS volume, attaching it to the server instance, adding it to the logical volume manager group, and then resizing the /opt/gbrowse filesystem. Volumes added in this way have their "delete on termination" flag set, so the data will disappear when you terminate the instance, unless you snapshot the volume or create a new AMI to hold your local modifications. | This works by allocating a new EBS volume, attaching it to the server instance, adding it to the logical volume manager group, and then resizing the /opt/gbrowse filesystem. Volumes added in this way have their "delete on termination" flag set, so the data will disappear when you terminate the instance, unless you snapshot the volume or create a new AMI to hold your local modifications. | ||
| − | ==Administration | + | ==Administration common to both VirtualBox and EC2 VMs== |
Revision as of 05:22, 6 September 2012
__NOTITLE__
Contents
GBrowse2 Virtual Machines

GBrowse versions 2.50 and higher are available as preconfigured virtual machines. Each VM provides you with a stable, self-contained environment on which to build a GBrowse-based web site. Two versions are available:
- A VirtualBox VM that can be run on any Windows, Mac OS, Solaris or Linux desktop system or server using the Open Source VirtualBox application.
- A Amazon Web Services VM that runs under the Amazon Elastic Compute Cloud (EC2), and can be used to host GBrowse with no investment in computer hardware whatsoever.
Because of the many Perl and other third-party software packages that are needed to run GBrowse, it is much easier to run GBrowse from these VMs than by installing from source or binary. Performance of either type of VM is excellent, and they provide added benefits in flexibility and future expansion.
The first sections of this page describes specific aspects of the VirtualBox and EC2 VMs. The last section describes common features for them both.
Getting Started with the VirtualBox VM
To start using the GBrowse2 VirtualBox VM, first install the VirtualBox package onto the desktop or server system that will be hosting the VM. You may [download VirtualBox directly] from its web site, or, if you are using a debian or RedHat-based Linux distribution, use the software package manager to install "VirtualBox". The VirtualBox Extension Pack, which adds support for USB 2.0 devices, is not required to run GBrowse2.
Next, download GBrowse2, VirtualBox Edition. The image is ~1.4 Gb in size:
- Direct download from Amazon S3: [Growse 2.50, VirtualBox Edition.ova]
- As a torrent file: GBrowse_2.50_VirtualBox_Edition.torrent.
The download will give you a compressed virtual machine image file named "GBrowse 2.XX VirtualBox Edition.ova".
Now launch the VirtualBox GUI, choose File=>Import Appliance... and select the downloaded .ova file. This will install and initialize the GBrowse2 VM. If you prefer the command-line version of VirtualBox, run VBoxManage import 'GBrowse 2.XX VirtualBox Edition.ova' .
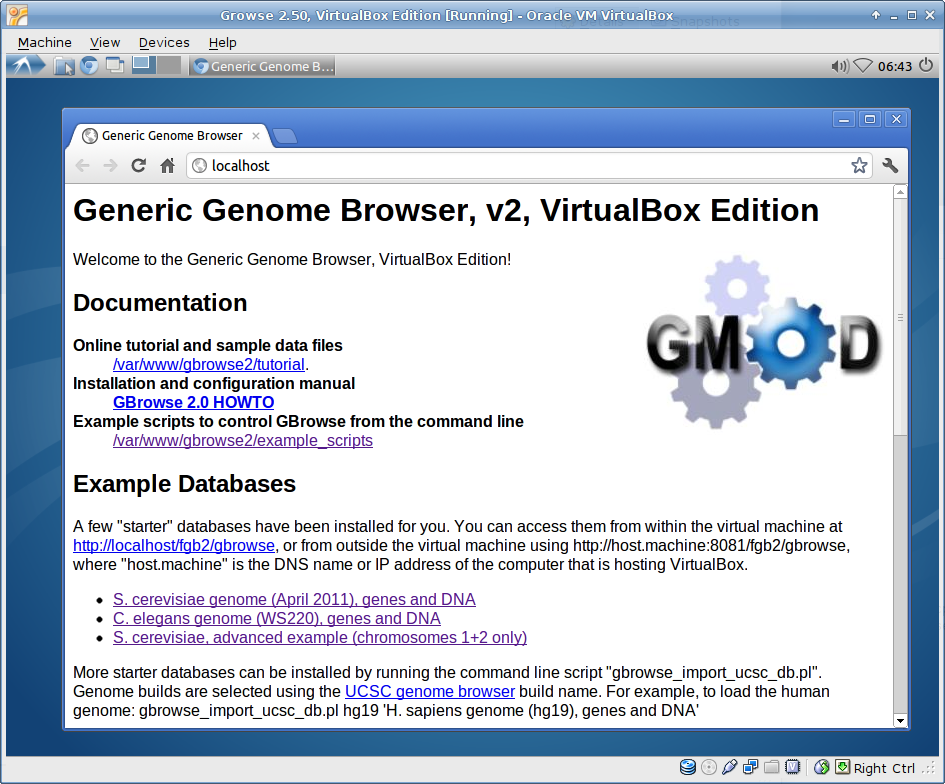
Once GBrowse is installed, you may run it by selecting it in the GUI and pressing the Start button (command-line equivalent VBoxManage startvm 'GBrowse 2.XX VirtualBox Edition' ). The virtual machine will boot, and in about 30s will bring up the Chromium browser displaying the welcome apge shown at the top of this documentation. There are several example genome data sources preinstalled. Please go ahead and browse them by clicking on the links under Example Databases.
When the VM was installed, VirtualBox should have automatically sets up port forwarding from the host (physical) machine's port 8081 to the guest (virtual) machine's port 80. Check this now by opening up a web browser on the host machine, and requesting http://localhost:8081. This should bring you to the GBrowse2 welcome page. If this does not work, then see #Editing Network Settings for help.
User Accounts
The GBrowse2 VM has two user accounts preinstalled. One is the "GBrowse" account, a restricted autologin shell that runs the welcome screen, and the other is the "Administrator" account (username "admin"). The GBrowse account has restricted access to the system resources and is there as a poor man's "kiosk mode" for browsing databases installed on the VM. The Administrator account is allowed to run the sudo command to elevate privileges, and was created for the purpose of adding and configuring new GBrowse databases and tracks.
When you first start up the VirtualBox VM, you will be logged into the GBrowse account automatically. To log in as Administrator, go to the menu at the upper left of the desktop and choose Log Out.... When prompted, select either the Log Out or Switch Users button. You will then be taken to a login screen. Select the Administrator user, and type the password gbrowse, to be taken to the administrator user's desktop. From here you can administer GBrowse from the command line.
If this is a publicly-accessible machine, you will probably want to change the administrator's password. You can do this by selecting Menu=>System Tools=>Users and Groups, where Menu is stylized arrow icon in the upper left of the menu bar. Select the Administrator user and click Password: Change.... You may also change the password by running the passwd command from the command line shell.
Editing Network Settings
The VirtualBox Edition has two network interfaces installed. The first is a Network Address Translation (NAT) interface that allows the guest machine to access the LAN that the host machine is connected to. The second interface is attached directly to the host and allows for incoming connections from the host to the guest machine. This is primarily to allow the host machine to ssh to the guest.

By default, the NAT interface will take network requests targeted to the host machine's port 8081 to the guest VM's port 80. This allows the host machine to act as a GBrowse server for other physical machines on the local LAN and/or Internet. You may modify this if you wish in the following way. From the VirtualBox GUI, select the GBrowse VM, and then double-click on the Network setting in the details panel. This will bring up a dialog box that has tabs for each of the two network adapters attached to the VM. Select Adapter 1, which is the NAT adapter, and then open up the Advanced section. Click on Port Forwarding to open up the Port Forwarding definitions. You may add new forwarding rules by clicking on the Plus icon.
In the example shown on the right, the first rule is the default forwarding of host port 8081 to guest port 80. In addition, we have added a second rule that forwards host's port 80 itself to guest port 80. This allows you and others to access GBrowse without specifying the :8081 port. Note, however, that you must start VirtualBox with root privileges in order to successfully forward port 80 and any others below 1024.
Enabling SSH
The VirtualBox VM does not run an SSH server by default, however you can enable it easily by running this command from Administrator's command-line shell.
sudo apt-get install openssh-server
You can then ssh into the guest by using its host-only network interface. You can look up the network interface from within the virtual machine's desktop by right clicking on the Network icon (pie-wedge icon in the upper right of the menu bar), and selecting Connection Information=>Wired connection 2. Alternatively, you can look it up from the command-line of the host machine using VBoxManage:
$ VBoxManage guestproperty get "Growse 2.XX, VirtualBox Edition" "/VirtualBox/GuestInfo/Net/1/V4/IP"
Value: 192.168.56.101
You can now ssh in using the address you just got:
ssh admin@192.168.56.101
Expanding Storage
All the GBrowse databases are stored on a separate logical volume mounted at /opt/gbrowse. This volume grows dynamically up to 50 GB. If you run out of space, you can easily add more storage. First halt the virtual machine. Using the VirtualBox GUI, select the GBrowse VM, click on Settings, and then select Storage. In the Storage Tree panel, select SATA Controller and click on the Add Hard Disk icon. When prompted, choose Create new disk and then use the wizard to create a virtual disk with the size and characteristics you desire.
Now launch the VM. The new disk you added will appear as a new unpartitioned disk drive device named /dev/sdc (or /dev/sdd if you've done this once before). Do not partition or format this disk. Instead, use the Logical Volume Manager to extend the logical /opt/gbrowse volume onto this disk via the following series of commands:
sudo pvcreate /dev/sdc
sudo vgextend volumes /dev/sdc
sudo lvextend -l +100%FREE /dev/volumes/gbrowse
sudo resize2fs /dev/volumes/gbrowse
/opt/gbrowse will now be increased by the size of the disk you just added.
Getting Started with the EC2 VM
To start a GBrowse server within the Amazon Elastic Compute Cloud (EC2), you will need to have an Amazon Web Services account and to be familiar with the process of configuring and launching Amazon Machine Images (AMIs. A good getting started guide can be found here.
GMOD provides GBrowse AMIs in a small number of availability regions; this list will grow with time. Choose the region you prefer, and click on one of the links below:
GBrowse 2.50, us-east-1: ami-4914a220
GBrowse 2.50, us-west-2: ami-449a1474
Alternatively you may use the Amazon Console to search for public images matching the name "GBrowse*" in order to find images in your preferred region (there may not be any).
Clicking on one of the AMIs listed above will start an instance launch wizard. Here is guidance on how to configure the instance:
- Instance Type
- GBrowse will run even on the tiny t1.micro instance type, but this is only recommended for the purposes of kicking the tires. For production use, we recommend m1.medium or larger. High-CPU and high I/O performance instance types generally provide better performance than high-memory instances.
- Key Pair
- Use your default SSH keypair.
- Firewall
- Use or create a security group that allows both incoming SSH and HTTP connections. The former will allow you to log into the GBrowse server for administrative purposes, while the latter gives you access to the GBrowse web application.
Once you are satisfied with the settings, launch the instance and watch the Amazon Console until it enters Running state. At this point, record the instance's public DNS name from the information provided on the console, and paste this DNS name into a web browser. You will be taken to the GBrowse welcome page, which offers links to documentation and bare-bones starter genome databases.
Logging into the GBrowse EC2 VM
The administrative user for the GBrowse EC2 VM has a password-less account named "admin", which can only be accessed via an SSH key. To log into the instance, invoke ssh with your AWS keypair identity file and the "admin" username:
ssh -i /path/to/aws_private_key.pem admin@ec2-XX-XX-XX-XX.compute-1.amazonaws.com
This will give you a command-line shell on the GBrowse server. To run any command as root, you may use sudo without providing a password.
Expanding Database Storage on the GBrowse EC2 VM
All GBrowse databases are stored in a logical volume mounted at /opt/gbrowse. The default volume is only 10 Gb in size, but you can easily expand it while logged into the GBrowse server by running gbrowse_grow_cloud_vol.pl and providing the number of gigabytes to expand it by. For example, this command increases the volume by an additional 40 GB:
gbrowse_grow_cloud_vol.pl 40
This works by allocating a new EBS volume, attaching it to the server instance, adding it to the logical volume manager group, and then resizing the /opt/gbrowse filesystem. Volumes added in this way have their "delete on termination" flag set, so the data will disappear when you terminate the instance, unless you snapshot the volume or create a new AMI to hold your local modifications.