Difference between revisions of "GBrowse2 VMs"
(→User Accounts) |
(→Network) |
||
| Line 37: | Line 37: | ||
If this is a publicly-accessible machine, you will probably want to change the administrator's password. You can do this by selecting ''Menu=>System Tools=>Users and Groups'', where ''Menu'' is stylized arrow icon in the upper left of the menu bar. Select the Administrator user and click ''Password: Change...''. You may also change the password by running the ''passwd'' command from the command line shell. | If this is a publicly-accessible machine, you will probably want to change the administrator's password. You can do this by selecting ''Menu=>System Tools=>Users and Groups'', where ''Menu'' is stylized arrow icon in the upper left of the menu bar. Select the Administrator user and click ''Password: Change...''. You may also change the password by running the ''passwd'' command from the command line shell. | ||
| − | ===Network=== | + | ===Editing Network Settings=== |
| + | |||
| + | The VirtualBox Edition has two network interfaces installed. The first is a Network Address Translation (NAT) interface that allows the guest machine to access the LAN that the host machine is connected to. The second interface is attached directly to the host and allows for incoming connections from the host to the guest machine. This is primarily to allow the host machine to ssh to the guest. | ||
| + | |||
| + | By default, the NAT interface will take network requests targeted to the host machine's port 8081 to the guest VM's port 80. This allows the host machine to act as a GBrowse server for other physical machines on the local LAN and/or Internet. You may modify this if you wish in the following way. From the VirtualBox GUI, select the GBrowse VM, and then double-click on the ''Network'' setting in the details panel. This will bring up a dialog box that has tabs for each of the two network adapters attached to the VM. Select ''Adapter 1'', which is the NAT adapter, and then open up the ''Advanced'' section. Click on ''Port Forwarding'' to open up the Port Forwarding definitions (see figure on right). | ||
Revision as of 00:55, 5 September 2012
__NOTITLE__
Contents
GBrowse2 Virtual Machines

GBrowse versions 2.50 and higher are available as preconfigured virtual machines. Each VM provides you with a stable, self-contained environment on which to build a GBrowse-based web site. Two versions are available:
- A VirtualBox VM that can be run on any Windows, Mac OS, Solaris or Linux desktop system or server using the Open Source VirtualBox application.
- A Amazon Web Services VM that runs under the Amazon Elastic Compute Cloud (EC2), and can be used to host GBrowse with no investment in computer hardware whatsoever.
Because of the many Perl and other third-party software packages that are needed to run GBrowse, it is much easier to run GBrowse from these VMs than by installing from source or binary. Performance of either type of VM is excellent, and they provide added benefits in flexibility and future expansion.
Getting Started with the VirtualBox VM
To start using the GBrowse2 VirtualBox VM, first install the VirtualBox package onto the desktop or server system that will be hosting the VM. You may [download VirtualBox directly] from its web site, or, if you are using a debian or RedHat-based Linux distribution, use the software package manager to install "VirtualBox". The VirtualBox Extension Pack, which adds support for USB 2.0 devices, is not required to run GBrowse2.
Next, download GBrowse2, VirtualBox Edition. The image is ~1.4 Gb in size:
- Direct download from Amazon S3: [Growse 2.50, VirtualBox Edition.ova]
- As a torrent file: GBrowse_2.50_VirtualBox_Edition.torrent.
The download will give you a compressed virtual machine image file named "GBrowse 2.XX VirtualBox Edition.ova".
Now launch the VirtualBox GUI, choose File=>Import Appliance... and select the downloaded .ova file. This will install and initialize the GBrowse2 VM. If you prefer the command-line version of VirtualBox, run VBoxManage import 'GBrowse 2.XX VirtualBox Edition.ova' .
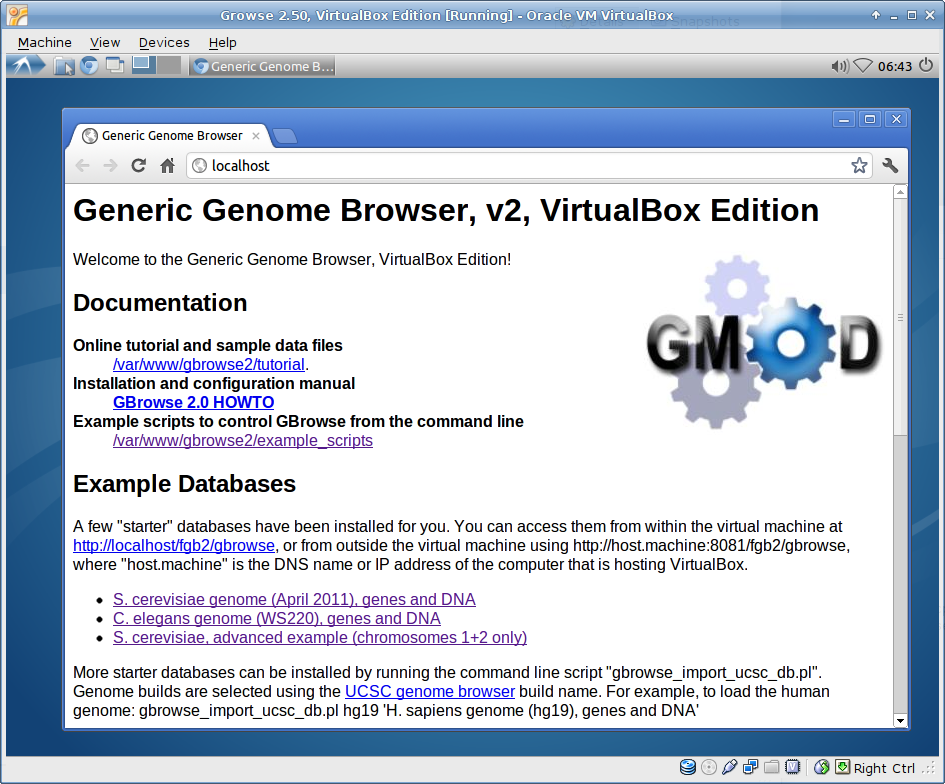
Once GBrowse is installed, you may run it by selecting it in the GUI and pressing the Start button (command-line equivalent VBoxManage startvm 'GBrowse 2.XX VirtualBox Edition' ). The virtual machine will boot, and in about 30s will bring up the Chromium browser displaying the welcome apge shown at the top of this documentation. There are several example genome data sources preinstalled. Please go ahead and browse them by clicking on the links under Example Databases.
When the VM was installed, VirtualBox should have automatically sets up port forwarding from the host (physical) machine's port 8081 to the guest (virtual) machine's port 80. Check this now by opening up a web browser on the host machine, and requesting http://localhost:8081. This should bring you to the GBrowse2 welcome page. If this does not work, then see #Editing Network Settings for help.
User Accounts
The GBrowse2 VM has two user accounts preinstalled. One is the "GBrowse" account, a restricted autologin shell that runs the welcome screen, and the other is the "Administrator" account. The GBrowse account has restricted access to the system resources and is there as a poor man's "kiosk mode" for browsing databases installed on the VM. The Administrator account is allowed to run the sudo command to elevate privileges, and was created for the purpose of adding and configuring new GBrowse databases and tracks.
When you first start up the VirtualBox VM, you will be logged into the GBrowse account automatically. To log in as Administrator, go to the menu at the upper left of the desktop and choose Log Out.... When prompted, select either the Log Out or Switch Users button. You will then be taken to a login screen. Select the Administrator user, and type the password gbrowse, to be taken to the administrator user's desktop. From here you can administer GBrowse from the command line.
If this is a publicly-accessible machine, you will probably want to change the administrator's password. You can do this by selecting Menu=>System Tools=>Users and Groups, where Menu is stylized arrow icon in the upper left of the menu bar. Select the Administrator user and click Password: Change.... You may also change the password by running the passwd command from the command line shell.
Editing Network Settings
The VirtualBox Edition has two network interfaces installed. The first is a Network Address Translation (NAT) interface that allows the guest machine to access the LAN that the host machine is connected to. The second interface is attached directly to the host and allows for incoming connections from the host to the guest machine. This is primarily to allow the host machine to ssh to the guest.
By default, the NAT interface will take network requests targeted to the host machine's port 8081 to the guest VM's port 80. This allows the host machine to act as a GBrowse server for other physical machines on the local LAN and/or Internet. You may modify this if you wish in the following way. From the VirtualBox GUI, select the GBrowse VM, and then double-click on the Network setting in the details panel. This will bring up a dialog box that has tabs for each of the two network adapters attached to the VM. Select Adapter 1, which is the NAT adapter, and then open up the Advanced section. Click on Port Forwarding to open up the Port Forwarding definitions (see figure on right).